
As I rolled the dough, the aroma of sweet vanilla filled my kitchen, instantly transporting me to moments spent baking with loved ones. Stained Glass Cookies not only embody this nostalgia but also turn ordinary baking into an extraordinary experience. These decorative delights are perfect for any occasion, from festive gatherings to cozy afternoons spent with kids in the kitchen. Not only are they visually stunning, but they also offer a fun and forgiving way to express creativity with various shapes and colorful candy fillings. Plus, their simple preparation makes them a go-to treat for anyone looking to ditch fast food for something truly homemade. Curious to see how these colorful creations come together? Let’s dive into this delightful recipe!

Why Are Stained Glass Cookies So Special?
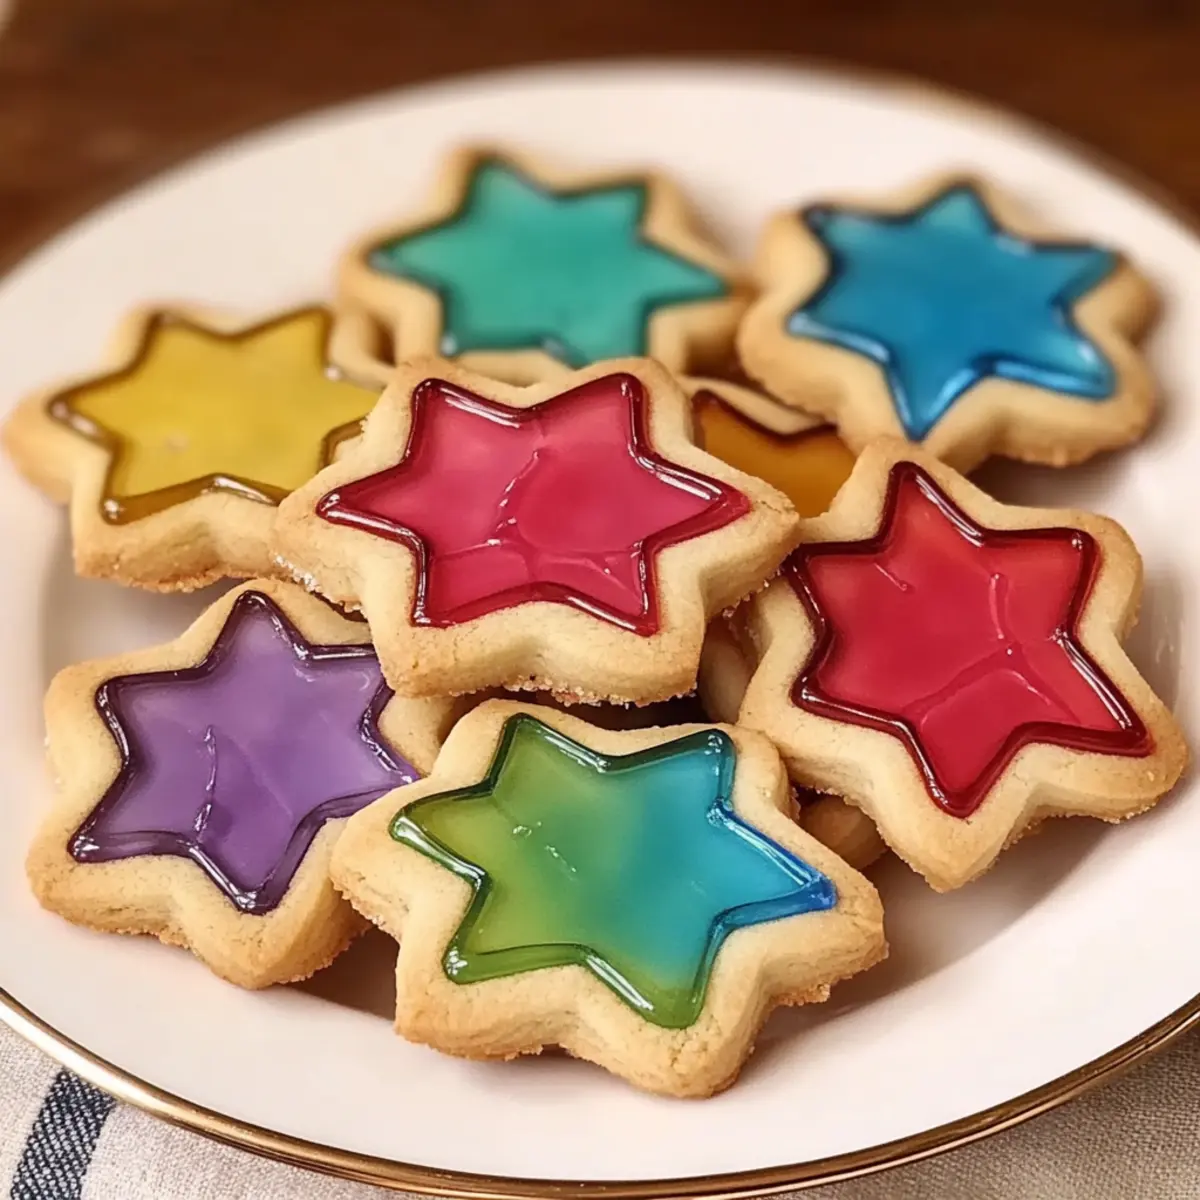
Visual Delight: Each cookie showcases a stunning melted candy center resembling beautiful stained glass, making them a showstopper on any dessert table.
Creative Expression: With various shapes, colors, and candy options, they invite bakers to personalize their creations for any occasion.
Easy to Make: This simple recipe makes it accessible for bakers of all skill levels, turning anyone into a cookie artist!
Kid-Friendly Fun: Perfect for baking with children, these cookies offer a fantastic way to bond while getting messy and creative in the kitchen.
Perfect for Gifting: Package these colorful treats in clear bags for a thoughtful homemade gift that friends and family will adore. Want to try more delightful cookies? Check out our Raspberry Cookies Sweet or Cinnamon Bun Cookies!
Stained Glass Cookies Ingredients
• Get ready to create cookie art!
For the Cookie Dough
- All-purpose Flour – Provides the structure and chewiness for these stained glass cookies; gluten-free flour can be a great alternative.
- Baking Powder – Acts as a leavening agent for light and airy cookies; it’s essential to achieve the right texture.
- Salt – Balances the sweetness; just a pinch can elevate the flavors beautifully.
- Unsalted Butter – Adds richness and moisture to the dough; coconut oil serves as a wonderful dairy-free option if needed.
- Granulated Sugar – Gives sweetness and helps achieve a lovely golden color; try a sugar substitute for a lighter version.
- Egg – Binds the ingredients and adds richness; for a vegan option, a flax egg (1 tbsp ground flaxseed + 3 tbsp water) can work wonders.
- Vanilla Extract – Infuses delicious flavor; opt for pure vanilla for the best aroma.
- Almond Extract (optional) – Imparts a delightful flavor but use sparingly as it’s potent; more vanilla can be used as a substitute.
For the Stained Glass Effect
- Assorted Hard Candies – The star of the show! Different colors and flavors create that magical stained glass look in the center of your cookies.
Step‑by‑Step Instructions for Stained Glass Cookies
Step 1: Combine Dry Ingredients
In a medium bowl, whisk together 2 cups of all-purpose flour, 1 teaspoon of baking powder, and a pinch of salt until well blended. This mixture forms the foundation of your stained glass cookies. Set aside the bowl as you prepare the wet ingredients, ensuring you have your mixing tools ready for a seamless transition.
Step 2: Cream Butter and Sugar
In a large mixing bowl, use an electric mixer to cream together 1 cup of unsalted butter and 1 cup of granulated sugar until the mixture is light and fluffy, about 3-5 minutes. You’ll know it’s ready when it has a pale color and a smooth consistency. This step is crucial for achieving that tender texture in your stained glass cookies.
Step 3: Add Egg and Extracts
Once the butter and sugar are fluffy, beat in 1 large egg, 1 teaspoon of vanilla extract, and if desired, a ½ teaspoon of almond extract. Mix until everything is fully combined, about 1-2 minutes. The aroma will be delightful! This mixture adds richness and flavor that transforms your cookies from ordinary to extraordinary.
Step 4: Incorporate Dry Ingredients
Gradually add the flour mixture into your wet ingredients, mixing on low speed until just combined. Avoid over-mixing to maintain a tender dough. You should see the dough come together into a cohesive ball, perfect for the next stage of making your stained glass cookies.
Step 5: Chill the Dough
Divide the dough into two discs, wrapping each in plastic wrap. Refrigerate for at least 1 hour, allowing it to firm up and making it easier to roll out. This step is vital for achieving clean shapes when cutting out your stained glass cookie designs, so be patient and let it chill.
Step 6: Preheat the Oven
While the dough chills, preheat your oven to 350°F (175°C) and line your baking sheets with parchment paper. This ensures your stained glass cookies bake evenly and don’t stick to the pan, giving you a beautiful cookie once they are out of the oven.
Step 7: Roll and Cut the Dough
After chilling, remove the dough from the fridge and roll it out on a lightly floured surface to about ¼ inch thick. Use cookie cutters to create your desired shapes, making sure to press firmly for clear edges. Transfer the cut-out shapes to the prepared baking sheets, ready for their colorful centers.
Step 8: Create Holes and Fill
Using smaller cookie cutters, create holes in the center of each cookie shape. Fill these holes with crushed assorted hard candies, ensuring the candy pieces are evenly distributed. This is where the magic happens, as the candy will melt during baking, creating that stunning stained glass effect.
Step 9: Bake the Cookies
Place the baking sheets in the preheated oven and bake for 8-10 minutes. Keep an eye on them; the edges should turn lightly golden, and the centers should bubble with melted candy. This is when your stained glass cookies will start to transform into edible art!
Step 10: Cool and Transfer
Once baked, let the cookies cool on the baking sheet for about 5 minutes. This allows them to set slightly before transferring them to a wire rack. Allow them to cool completely before enjoying or decorating to showcase the gorgeous stained glass effect.
Make Ahead Options
These Stained Glass Cookies are perfect for meal prep enthusiasts looking to save time on busy baking days! You can prepare the cookie dough up to 24 hours in advance by wrapping it tightly in plastic wrap and refrigerating it. To enhance flavor, consider letting the dough rest overnight. Alternatively, the dough can be frozen for up to 3 months; just thaw it in the refrigerator before rolling and cutting out your cookie shapes. Additionally, you can pre-measure and crush your assorted hard candies ahead of time, storing them in an airtight container. When you’re ready to bake, simply roll out the chilled dough, create the holes, fill with candy, and bake according to the instructions. This way, you’ll have stunning Stained Glass Cookies with minimal effort, perfect for any occasion!
What to Serve with Stained Glass Cookies?
As the sweet aroma of freshly baked cookies fills your home, envision the delightful accompaniments that can elevate your treat to new heights.
- Glass of Milk: The classic pairing! Chilled milk complements the sweetness of the cookies, creating a nostalgic experience for kids and adults alike.
- Hot Cocoa: Warm and comforting, hot cocoa adds a rich chocolatey goodness that beautifully balances the sugary goodness of the cookies, perfect for cozy occasions.
- Fruit Salad: A refreshing mix of seasonal fruits adds a burst of color and a healthy touch, making the ideal contrast to the sweetness of the stained glass cookies.
- Whipped Cream: Light and airy, a dollop of whipped cream served alongside invites indulgence, transforming dessert into a delightful experience.
- Vanilla Ice Cream: For a special treat, serve your cookies with a scoop of creamy vanilla ice cream. The contrast of warm and cold textures is utterly irresistible.
- Lemonade: A glass of fresh lemonade offers a zesty refreshment that cuts through the sweetness, complementing your cookies beautifully while brightening up any gathering.
- Chocolate Dipping Sauce: Create a fun interactive experience by adding a side of warm chocolate sauce for dipping. The combination of flavors is truly delightful!
- Cheese Platter: Soft cheese like brie or goat cheese could provide a creamy, savory balance to the sweetness of your cookies, surprising your taste buds in the best way.
With these delightful pairings, your stained glass cookies will shine even brighter on your dessert table!
Storage Tips for Stained Glass Cookies
Room Temperature: Store cookies in an airtight container for up to 7 days to keep them fresh and delicious.
Fridge: If you prefer, you can refrigerate the cookies for longer freshness, which extends their life to about 2 weeks. Just be sure they are in a sealed container.
Freezer: For longer storage, freeze the cookies in a single layer on a baking sheet until solid, then transfer to an airtight container for up to 3 months.
Reheating: To enjoy your stained glass cookies warm, reheat them in the oven at 300°F (150°C) for 5-7 minutes, restoring their delightful chewy texture.
Stained Glass Cookies Variations
Feel free to let your creativity shine by customizing these cookies in fun and exciting ways!
-
Cut-Out Shapes: Play with different cookie cutter shapes; think hearts for Valentine’s, stars for Christmas, or seasonal themes.
-
Candy Switch: Swap hard candies with flavored jellybeans to inspire a unique twist; don’t shy away from experimenting with various flavors!
-
Add Color: Incorporate food coloring into the dough for an added colorful effect, making your cookies even more mesmerizing.
-
Spicy Kick: Sprinkle a dash of cayenne pepper into the dough for a surprising spicy twist. It balances perfectly with the sweetness!
-
Citrus Zest: Add grated lemon or orange zest to the dough for a refreshing flavor burst that pairs beautifully with the sweetness.
-
Nutty Texture: Fold in finely chopped nuts, like pecans or walnuts, for a delightful crunch and added richness in each bite.
-
Dairy-Free Option: Substitute unsalted butter with coconut oil to make these cookies dairy-free. They still maintain their delicious taste and texture!
-
Glaze Finish: Once cooled, drizzle a simple glaze over your cookies made from powdered sugar and milk for an extra layer of sweetness, adding flair to your creations.
These variations will keep your stained glass cookies exciting and tailored to any occasion. If you’re looking for more creative cookie ideas, try our Raspberry Sugar Cookies or Samoa Cookies Homemade!
Tips for the Best Stained Glass Cookies
-
Softened Butter: Make sure your unsalted butter is softened at room temperature for easy creaming, which is crucial for achieving the right texture in your stained glass cookies.
-
Avoid Over-Baking: Keep an eye on your cookies in the oven; they should be slightly chewy with a crisp edge. Over-baking can lead to hard cookies instead of a delightful treat.
-
Use Parchment Paper: Lining your baking sheets with parchment paper or silicone mats helps prevent sticking, making it easy to remove your beautiful stained glass cookies without any damage.
-
Chill the Dough: Be patient and chill your dough for at least an hour; this step is vital for easy rolling and cutting, resulting in perfectly shaped cookies.
-
Candy Choices: Experiment with assorted hard candies for the stained glass effect. Different colors and flavors can give your cookies a unique and vibrant look, making each batch special!

Stained Glass Cookies Recipe FAQs
What type of hard candies work best for the stained glass effect?
Absolutely, you want to choose clear or light-colored hard candies like Jolly Ranchers or Life Savers for the best stained glass effect. These candies melt beautifully and create a vibrant color once baked, adding to the visual allure of your cookies. Avoid using candies with chocolate centers or those that won’t melt clearly.
How do I store stained glass cookies to keep them fresh?
For optimal freshness, store your stained glass cookies in an airtight container at room temperature for up to 7 days. If you’d like to extend their life, you can refrigerate them for up to 2 weeks. Just be sure to keep them sealed to prevent them from drying out!
Can I freeze stained glass cookies? If so, how?
Yes, you can definitely freeze your stained glass cookies! To do this, arrange the cookies in a single layer on a baking sheet and freeze until solid, about 1-2 hours. Then, transfer them to an airtight container or freezer bag for up to 3 months. When you’re ready to enjoy, thaw them in the refrigerator overnight or at room temperature for a few hours before serving.
What should I do if my cookies spread too much during baking?
If your stained glass cookies spread too much, this can often be due to not chilling the dough long enough. Make sure to chill the dough for at least one hour, as this helps the cookies maintain their shape while baking. Additionally, ensure your butter is softened, not melted, as melted butter can cause excessive spreading. If necessary, you can also add a bit more flour to stiffen the dough slightly for future batches.
Are these cookies safe for pets?
While the cookies are a delightful treat for humans, they are not suitable for pets, especially dogs. The sugar and butter content can upset their stomachs, and certain ingredients like chocolate (if added) can be harmful. Always keep these cookies out of reach of your furry friends to ensure their safety!
Can I make these cookies vegan or gluten-free?
Absolutely! To make a vegan version, simply replace the egg with a flax egg (1 tablespoon ground flaxseed mixed with 3 tablespoons of water) and use coconut oil instead of butter. For gluten-free cookies, use a gluten-free flour blend that is 1:1 for all-purpose flour, as this will maintain the structure and texture of your stained glass cookies. Enjoy experimenting!

Stained Glass Cookies: Colorful Treats That WOW Everyone
Ingredients
Equipment
Method
- In a medium bowl, whisk together 2 cups of all-purpose flour, 1 teaspoon of baking powder, and a pinch of salt until well blended.
- In a large mixing bowl, use an electric mixer to cream together 1 cup of unsalted butter and 1 cup of granulated sugar until light and fluffy.
- Beat in 1 large egg, 1 teaspoon of vanilla extract, and if desired, a ½ teaspoon of almond extract until fully combined.
- Gradually add the flour mixture into your wet ingredients, mixing on low speed until just combined.
- Divide the dough into two discs, wrapping each in plastic wrap. Refrigerate for at least 1 hour.
- Preheat your oven to 350°F (175°C) and line your baking sheets with parchment paper.
- Remove the dough from the fridge, roll it out on a lightly floured surface to about ¼ inch thick, and cut out desired shapes.
- Using smaller cookie cutters, create holes in the center of each cookie shape and fill with crushed assorted hard candies.
- Bake for 8-10 minutes until the edges turn lightly golden and the centers bubble.
- Cool on the baking sheet for about 5 minutes before transferring to a wire rack to cool completely.