
As I stood in my kitchen, I couldn’t help but be transported to the warm, bustling streets of Tokyo, where sushi vendors expertly roll fresh delights right before your eyes. So, I decided to bring that experience home with a comforting twist: the Creamy Salmon Sushi Bake. This easy, sushi-inspired dish combines the beloved flavors of traditional sushi into a simple one-pan bake, perfect for weeknight dinners or gatherings. The rich, creamy salmon mix paired with seasoned sushi rice and a crunchy furikake topping creates a satisfying meal without the fuss of rolling. Not only is this recipe a fantastic way to impress your family or friends, but it’s also incredibly flexible, allowing for substitutions like shrimp or tuna if you’re feeling adventurous. Ready to indulge in this flavorful dish? Let’s dive in!

Why is Salmon Sushi Bake a Must-Try?
Comforting and Convenient: This Salmon Sushi Bake transforms traditional sushi into a warm, cozy dish that’s perfect for any weeknight dinner.
Rich, Creamy Flavor: With a delightful blend of Kewpie mayo and cream cheese, every bite is packed with sumptuous flavor that sushi lovers will adore.
Versatile Ingredients: Swap the salmon for shrimp or tuna to suit your tastes, making this dish adaptable to your pantry staples or dietary preferences.
Crowd-Pleasing Appeal: From family dinners to gatherings with friends, this dish is a showstopper that’s sure to impress without the need for intricate sushi-rolling skills.
Time-Saving Delight: Save time in the kitchen with this one-pan wonder that allows you to enjoy delicious sushi flavors without hours of prep, just like in our Berry Croissant Bake.
Elevate your culinary routine and satisfy your sushi cravings with this easy-to-make, satisfying dish!
Salmon Sushi Bake Ingredients
• Get ready to create a delightful dish!
For the Base
• Sushi Rice – This forms the essential base; rinse thoroughly for that perfect sushi texture.
• Water – Necessary for cooking the sushi rice to achieve the right consistency.
• Lite Seasoned Rice Vinegar – Adds a tangy kick to the rice; swap with regular rice vinegar in a pinch.
For the Salmon Mixture
• Salmon Fillet – The star of the dish; use fresh or sashimi-grade for that high-quality taste.
• Imitation Crab Meat – Adds a sweet flavor and great texture; real crab or shrimp can also be used.
• Kewpie Mayo – Brings creaminess and a unique flavor; can substitute with regular mayonnaise, though it’s not quite the same!
• Cream Cheese – Adds richness; make sure it’s softened for easy mixing.
• Sriracha – For a spicy kick; adjust according to your heat preference.
• Soy Sauce or Tamari – Deepens the flavors; coconut aminos work as a gluten-free alternative.
• Green Onions – Fresh garnish that enhances taste; chives can be a good substitute if needed.
For the Topping
• Furikake – This Japanese seasoning mix provides umami; sesame seeds can replace it if unavailable.
• Unagi Sauce – Brings a unique sweetness; teriyaki sauce can be a fitting substitute.
• Spicy Mayo – A delightful mix of mayo and sriracha for dipping; adjust according to your spice preference.
For the Garnish
• Toppings (Avocado, Cucumber, Sesame Seeds, Nori Sheets) – These add freshness and texture; feel free to mix and match based on what you love.
Enjoy putting together your Salmon Sushi Bake and get ready for an exciting culinary experience!
Step‑by‑Step Instructions for Salmon Sushi Bake
Step 1: Prepare the Sushi Rice
Begin by rinsing 2 cups of sushi rice in cold water until the water runs clear; this removes excess starch for a perfect texture. Soak the rice for 15 minutes to enhance the cooking process. After soaking, combine the rice with 2 cups of fresh water in a rice cooker or pot, then cook for about 20 minutes until tender and fluffy. Once cooked, transfer the rice to a large bowl and mix in ¼ cup of lite seasoned rice vinegar, letting it cool slightly.
Step 2: Make the Salmon Mixture
While the rice cools, dice 8 ounces of fresh salmon fillet into small cubes and combine it in a medium bowl with 4 ounces of imitation crab meat, ½ cup of Kewpie mayo, 4 ounces of softened cream cheese, 1 tablespoon of sriracha, and 1 tablespoon of soy sauce. Add in sliced green onions to taste. Stir everything together until well mixed and creamy, then cover and refrigerate the mixture for at least 15 minutes to meld the flavors.
Step 3: Prepare the Unagi Sauce
In a small saucepan over medium heat, combine ¼ cup of soy sauce, 2 tablespoons of mirin, 1 tablespoon of sake, and 1 tablespoon of sugar. Whisk together and let it simmer for approximately 5-7 minutes until the sauce slightly thickens and becomes glossy. Remove the saucepan from heat and allow it to cool. This will add a sweet umami flavor to your Salmon Sushi Bake.
Step 4: Make the Spicy Mayo
In a small bowl, mix together ¼ cup of mayo, 1 tablespoon of sriracha, 1 teaspoon of lime juice, and a pinch of salt to taste. This spicy mayo will serve as both a topping and a dipping sauce. Set it aside in the refrigerator to chill while you assemble the rest of your Salmon Sushi Bake.
Step 5: Assemble the Bake
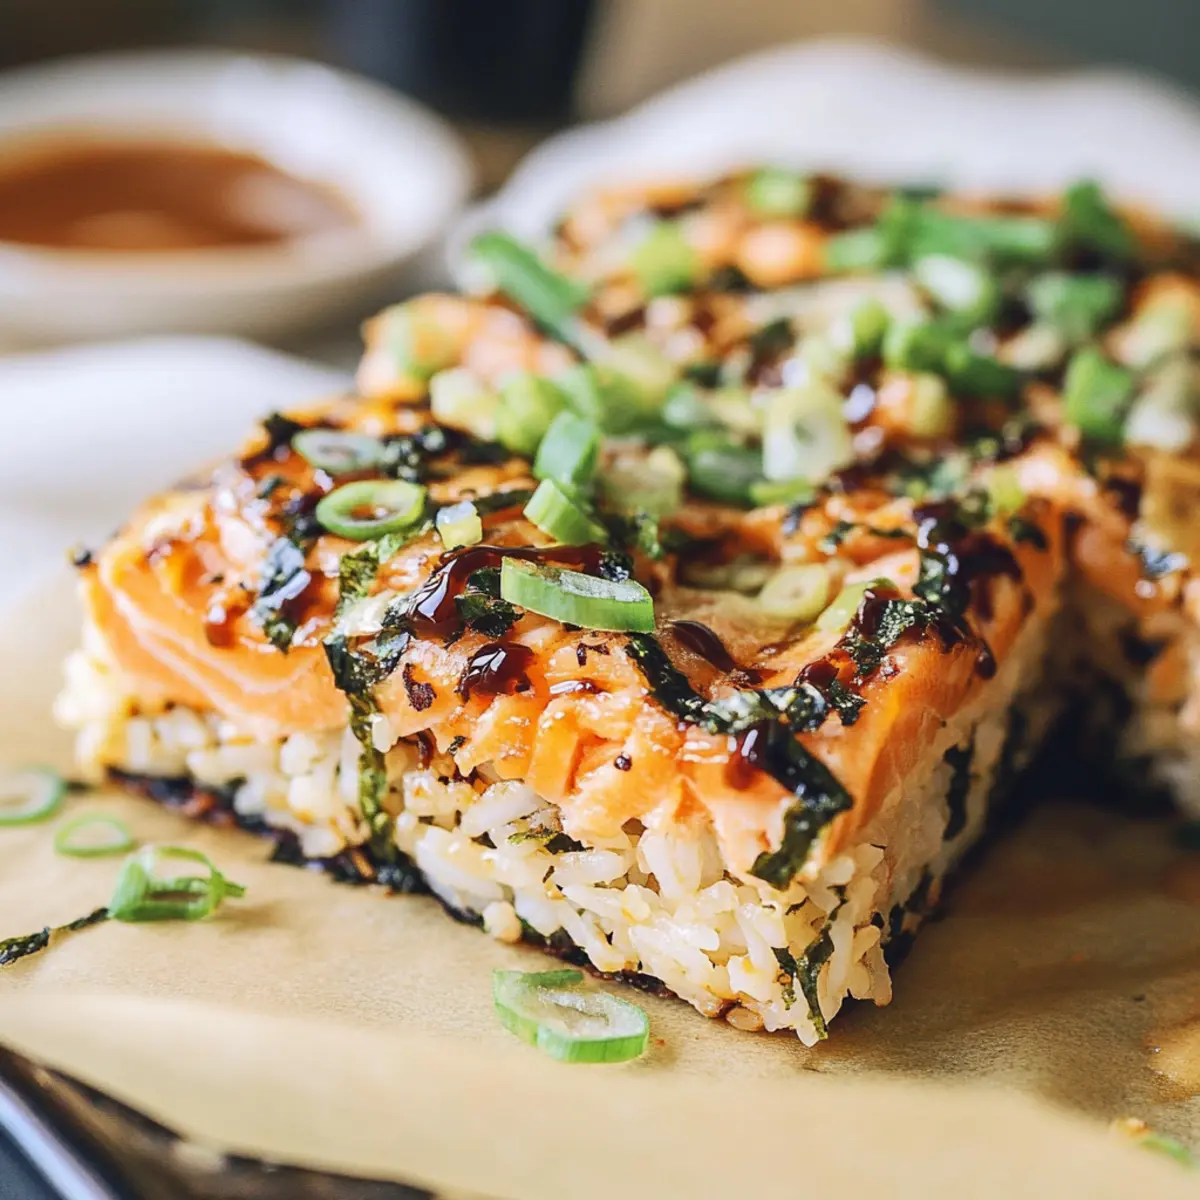
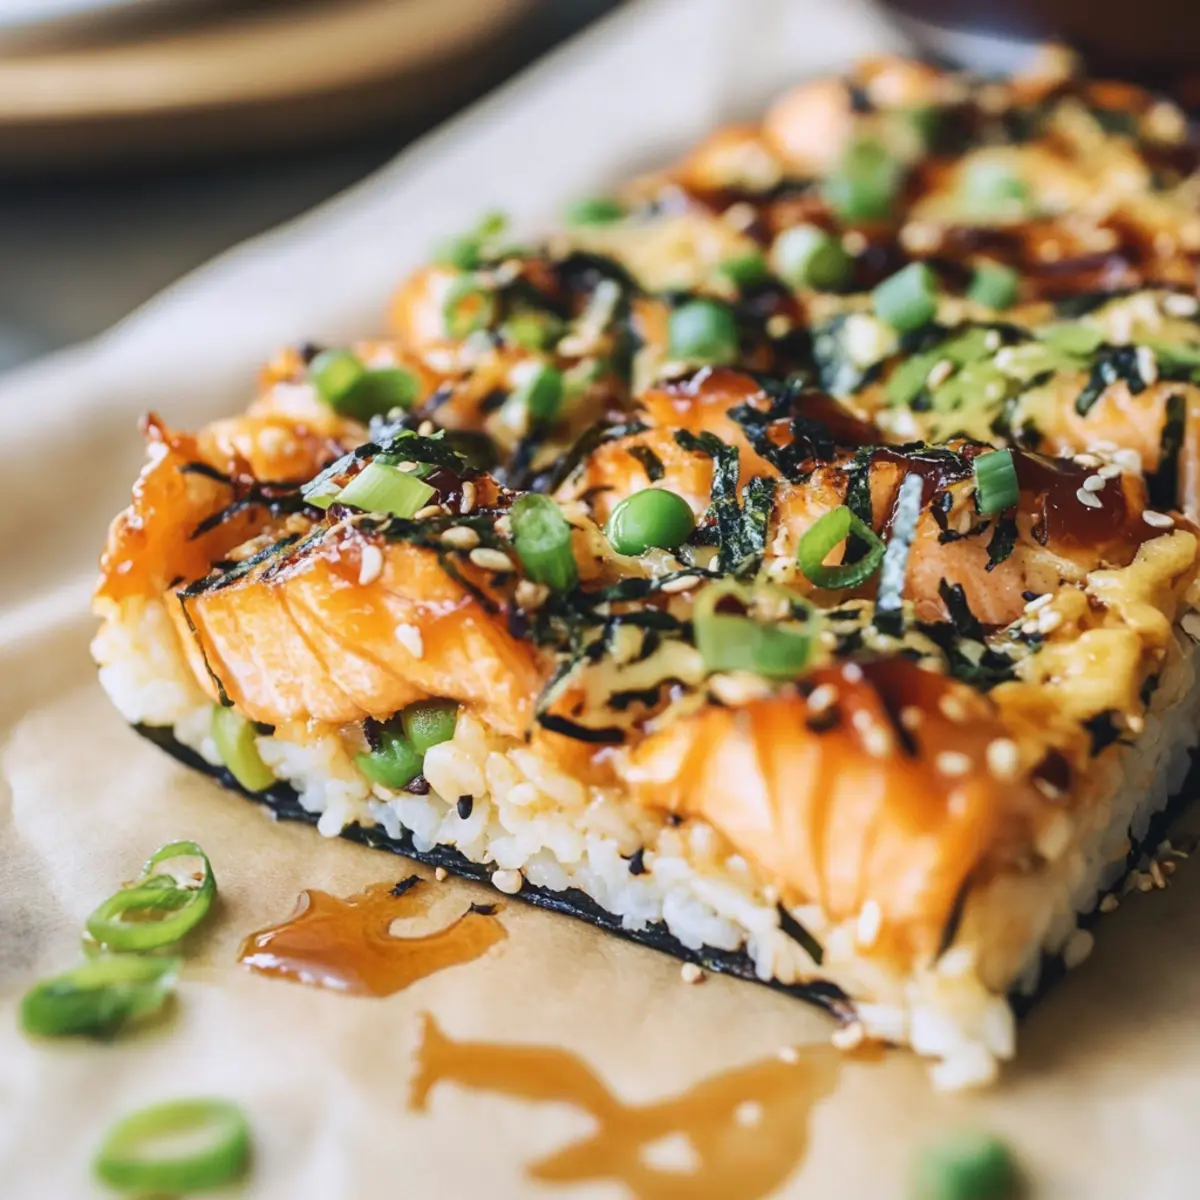
Preheat your oven to 425°F (220°C). Grease and line an 8×8-inch baking dish with parchment paper for easy removal. Press the cooled sushi rice evenly into the bottom of the dish, ensuring a nice, compact layer. Sprinkle 2 tablespoons of furikake over the rice, then spread the chilled salmon mixture evenly on top.
Step 6: Bake the Dish
Place the assembled Salmon Sushi Bake in the preheated oven and bake for 10-15 minutes, until heated through and the top is slightly golden. For an extra touch, switch to the broiler for an additional 2-3 minutes to caramelize the top. Keep a close eye to prevent burning and ensure a beautifully finished dish.
Step 7: Add Final Touches
Once baked and slightly cooled, drizzle the unagi sauce generously over the top of the Salmon Sushi Bake. Then, add dollops of the spicy mayo for a burst of flavor. Garnish with fresh avocado slices, cucumber, sesame seeds, and chopped green onions for an appealing presentation. Serve with nori sheets for a delightful sushi experience at home.
What to Serve with Salmon Sushi Bake
Looking to create a full spread around your warm, creamy dish? Let’s explore delectable companions that enhance every bite.
-
Crispy Edamame: These lightly salted, green bites add a fun crunch and a protein boost, making them a perfect starter or side.
-
Miso Soup: A classic Japanese soup that balances the richness of the sushi bake, providing a warming and comforting contrast.
-
Japanese Pickles (Tsukemono): Their tangy and refreshing flavor cuts through the creaminess, adding a delightful zing to your meal.
-
Seaweed Salad: This cool, slightly sweet salad adds texture and a burst of umami flavor, beautifully complementing the sushi bake.
-
Cucumber Sushi Rolls: Pair your bake with these refreshing, crunchy bites for a fun and thematic experience—they’re light and airy.
-
Future-Friendly Teriyaki Chicken: Serving a side of teriyaki chicken offers a savory alternative with a sweet glaze that beautifully contrasts the sushi flavors.
-
Sake or Green Tea: These beverages enhance the whole experience, with sake offering a smooth pairing and green tea cleansing the palate.
-
Fruit Sorbet: For dessert, consider a light fruit sorbet, which provides a sweet, refreshing touch to round off your meal.
-
Spicy Mai Tai: This cocktail introduces unique tropical flavors, connecting the dish to a lively dinner atmosphere, perfect for gatherings.
-
Chilled Coconut Rice Pudding: As a dessert, it’s creamy, lightly sweet, and brings in an exciting tropical flavor that is fitting alongside your sushi bake.
Make Ahead Options
These Creamy Salmon Sushi Bake preparations are perfect for meal prep enthusiasts! You can prepare the sushi rice and the salmon mixture up to 24 hours in advance. Simply rinse and cook the sushi rice, then mix it with rice vinegar and let it cool; store it in an airtight container in the refrigerator. For the salmon mixture, combine the diced salmon, imitation crab, Kewpie mayo, cream cheese, sriracha, soy sauce, and green onions, then refrigerate it until you’re ready to bake. When you’re ready to serve, assemble the bake and pop it in the oven; it will come out just as delicious while saving you valuable time on busy nights!
Expert Tips for Salmon Sushi Bake
• Rinse Rice Thoroughly: Rinse sushi rice until the water runs clear to remove excess starch, which helps achieve the perfect chewy texture in your Salmon Sushi Bake.
• Mix Warm Vinegar: When adding rice vinegar to the warm rice, the grains absorb the flavor better, enhancing the overall taste of the dish.
• Broil with Care: To achieve a golden finish, switch to broil for the last few minutes, but watch closely to prevent burning—it’s a fine line between perfect and charred!
• Prep Ahead: Make sauces and chop toppings in advance to streamline your cooking process. This can save you time during busy weeknight dinners.
• Check Labels for Gluten-Free: If you’re watching your gluten intake, ensure all sauces, especially soy sauce and imitation crab, are gluten-free for your Salmon Sushi Bake.
Salmon Sushi Bake Variations & Substitutions
Feel free to experiment and make this delicious dish truly your own with these tempting variations!
-
Seafood Swap: Use shrimp or tuna instead of salmon for different flavors. Shrimp adds a sweet, tender bite while tuna offers a meaty texture.
-
Vegetarian Delight: Substitute grilled vegetables or tofu for the seafood. These ingredients will absorb the same delicious flavors, ensuring every bite is satisfying.
-
Gluten-Free Alternative: Ensure all sauces are gluten-free, especially soy sauce. Coconut aminos works beautifully as a substitute, maintaining the savory flavor.
-
Rice Option: Swap sushi rice for jasmine or brown rice for a different nutritional profile. Brown rice will add a slightly nuttier flavor and heartier texture.
-
Creaminess Boost: Add avocado to the salmon mixture for extra creaminess. The rich texture blends perfectly into the dish.
-
Heat Level: Increase the amount of sriracha for a spicier version or replace it with a milder hot sauce if you prefer less heat.
-
Dressing Varieties: Make a zesty sauce by combining lemon juice with the mayo and sriracha for a refreshing twist. It’s great for those sunny days!
-
Fresh Toppings: Try different toppings like radishes or pickled ginger for a unique garnish. These can elevate the flavor profile while adding a new texture that everyone will enjoy, reminiscent of our Easy No-Bake Peach Custard Mini Tarts.
Feel inspired? These simple swaps will help you create your perfect Salmon Sushi Bake every time!
How to Store and Freeze Salmon Sushi Bake
Fridge: Store leftovers in an airtight container for up to 3 days to maintain freshness. Reheat in the microwave or oven until warmed through.
Freezer: This dish can be frozen before baking. Assemble and wrap tightly with plastic wrap, then foil. Store in the freezer for up to 2 months.
Reheating: If reheating from frozen, bake covered at 350°F (175°C) for about 25-30 minutes or until heated through, then uncover and broil for a few minutes to crisp the top.
Serving Cold: Leftover Salmon Sushi Bake can also be enjoyed cold, making it a delightful option for lunch or quick snacks.

Salmon Sushi Bake Recipe FAQs
How do I select the right salmon for my Salmon Sushi Bake?
Absolutely! When choosing salmon, opt for fresh or sashimi-grade fillet to ensure quality and flavor. Look for bright red or pink flesh that’s moist and has minimal dark spots. If you’re using frozen salmon, make sure it’s properly thawed before cooking to achieve the best texture in your bake.
What’s the best way to store leftover Salmon Sushi Bake?
Store any leftovers in an airtight container and keep them in the fridge for up to 3 days. Make sure the dish cools down to room temperature before sealing it to maintain its moisture. If you want to enjoy it later, the texture may be affected after reheating, so try rewarming in the oven for a better result, retaining the dish’s creamy goodness.
Can I freeze my Salmon Sushi Bake?
Very! You can freeze the bake before baking it. Assemble the dish as directed, then wrap it tightly with plastic wrap and then aluminum foil to prevent freezer burn. It should last up to 2 months. When you’re ready to enjoy, bake it directly from the freezer at 350°F (175°C) covered for 25-30 minutes, then uncover and broil for a few minutes for optimal crispiness.
What are some common issues I might encounter while making Salmon Sushi Bake?
If your rice isn’t sticky enough, it may not hold together well in the bake. Make sure to rinse the rice thoroughly to remove excess starch before cooking. If the top of your bake isn’t browning as expected, try broiling for a few minutes at the end, but keep a close watch to avoid burning. Additionally, ensure your cream cheese is softened for easy mixing to avoid lumps in your salmon mixture!
Is this Salmon Sushi Bake suitable for anyone with dietary restrictions?
Absolutely! To accommodate dietary preferences, feel free to swap out the ingredients: use gluten-free soy sauce or tamari for a gluten-free option, or replace salmon with shrimps or even tofu for a vegetarian version. It’s great to make the dish work for everyone, so don’t hesitate to adjust as needed. Just remember to check labels for allergens like shellfish if serving to guests with allergies.
How can I enhance the flavors in my Salmon Sushi Bake?
To elevate the flavor, I recommend adding a touch more sriracha for spice or a splash of lime juice in your cream mixture for brightness. If you’re a fan of fresh herbs, top your dish with cilantro or basil after baking for an aromatic finish. Feeling adventurous? A sprinkle of sesame seeds or a drizzle of sesame oil right before serving can add an extra layer of deliciousness to this comforting dish!
Savory Salmon Sushi Bake: A Cozy Twist on Sushi Night
Ingredients
Equipment
Method
- Rinse sushi rice in cold water until clear and soak for 15 minutes. Combine rice and water in a rice cooker, cook for 20 minutes, then mix in rice vinegar.
- Dice salmon fillet and combine with imitation crab, Kewpie mayo, cream cheese, sriracha, and soy sauce. Mix well and refrigerate for 15 minutes.
- In a saucepan, combine soy sauce, mirin, sake, and sugar. Simmer for 5-7 minutes until thickened, then cool.
- Mix mayo, sriracha, lime juice, and salt for spicy mayo. Chill in the refrigerator.
- Preheat oven to 425°F (220°C). Grease and line baking dish, press rice into the base, sprinkle with furikake, and add salmon mixture on top.
- Bake for 10-15 minutes until heated through. Broil for an additional 2-3 minutes if desired.
- Drizzle unagi sauce over the baked dish, dollop with spicy mayo, and garnish with toppings. Serve with nori sheets.