
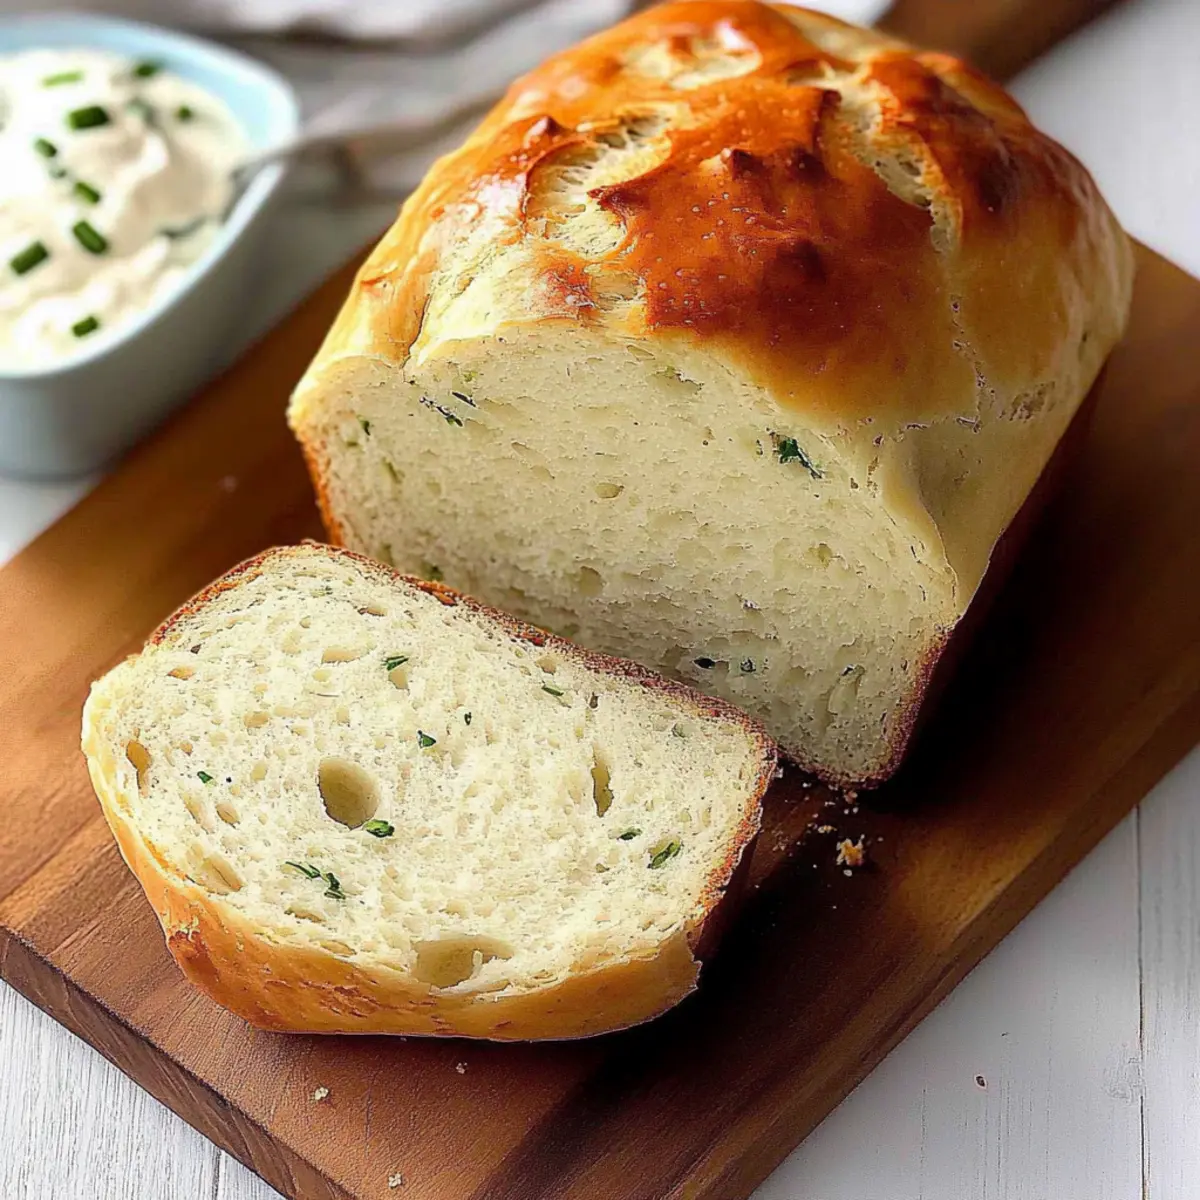
The aroma of freshly baked bread has a unique way of wrapping us in comfort, doesn’t it? Today, I’m thrilled to share an easy-to-make recipe for Sour Cream Chive Bread that transforms simple ingredients into something truly special. This savory bread, infused with the delightful flavors of sour cream and chives, results in a moist, fragrant loaf perfect for pairing with soups, salads, or even as a delightful breakfast treat when toasted. Another great perk? It can be whipped up with minimal effort, making it an ideal choice for busy weeknights. With each slice, you’ll experience a wonderful texture and a touch of gourmet flair that will impress family and friends alike. Are you ready to add this tasty creation to your bread-baking repertoire? Let’s dive in!
Why is this bread a must-try?
Elevated flavors: The combination of tangy sour cream and fresh chives infuses each slice with a delightful taste that elevates any meal.
Effortless preparation: This easy bread recipe requires minimal effort, making it perfect for both novice and experienced bakers.
Versatile serving options: Whether paired with soups or toasted for breakfast, this loaf suits any time of day. Try it alongside my Pistachio Cream Cookies for a sweet treat afterward!
Comforting aroma: Baking this bread fills your kitchen with a warm aroma that’s hard to resist.
Crowd-pleasing delight: With its soft texture and mouthwatering flavor, this bread is sure to impress family and friends at your next gathering. Enjoy it warm with butter, and get ready for compliments!
Sour Cream Chive Bread Ingredients
For the Bread
• 2/3 cup 2% milk – Adds moisture and tenderness; use whole milk for a richer loaf.
• 1/4 cup water – Hydration for dough development; can substitute with additional milk.
• 1/4 cup sour cream – Contributes tanginess and moisture; Greek yogurt can be a substitute.
• 2 tablespoons butter – Enriches flavor and moisture, essential for a tender crumb.
• 1-1/2 teaspoons sugar – Aids in browning and balancing flavors; can omit for less sweetness.
• 1-1/2 teaspoons salt – Enhances flavor; essential for bread-making, do not reduce significantly.
• 3 cups bread flour – Provides structure and chewiness; all-purpose flour can be used but may yield a denser loaf.
• 1/8 teaspoon baking soda – Assists in leavening; essential when reacting with acidic ingredients like sour cream.
• 1/4 cup minced chives – Adds a fresh, mild onion flavor; substitute with green onions if needed.
• 2-1/4 teaspoons active dry yeast – Ferments and leavens the bread; ensure yeast is fresh for best results.
Step‑by‑Step Instructions for Sour Cream Chive Bread
Step 1: Prepare the Dough Ingredients
Begin by gathering your ingredients for the Sour Cream Chive Bread. In a bread machine pan, pour in the 2/3 cup of milk, 1/4 cup of water, and 1/4 cup of sour cream. Follow this with the 2 tablespoons of softened butter and 1-1/2 teaspoons of sugar. Add 1-1/2 teaspoons of salt, 3 cups of bread flour, and 1/8 teaspoon of baking soda, ensuring they are layered appropriately for proper mixing.
Step 2: Add Yeast and Chives
Next, sprinkle 2-1/4 teaspoons of active dry yeast gently over the flour mixture before finishing off with 1/4 cup of minced chives. It’s crucial to keep the yeast away from the liquids initially, as this helps activate it effectively. Now that your mixture is prepared, close the lid of the bread machine securely to lock in the moisture.
Step 3: Select the Baking Settings
Set your bread machine to the basic bread setting, and choose your preferred crust color and loaf size. This customization will ensure your Sour Cream Chive Bread has the perfect exterior and texture to complement the savory flavors. Once the settings are selected, start the machine and prepare for the delightful aroma that will soon fill your kitchen.
Step 4: Monitor Dough Consistency
After about 5 minutes into the mixing process, open the bread machine and check the dough’s consistency. It should form a smooth ball, neither too wet nor too dry. If the dough appears too sticky, add a little more flour; if it’s too dry, incorporate a splash of water. This attention will enhance the bread’s structure as it bakes.
Step 5: Allow the Bread to Bake
Let the bread machine run its cycle, which typically lasts around 2 to 3 hours depending on the settings chosen. During this time, resist the urge to open the lid. Trust the machine to work its magic, as the heat activates the yeast, allowing the dough to rise beautifully and develop flavor.
Step 6: Cool and Serve
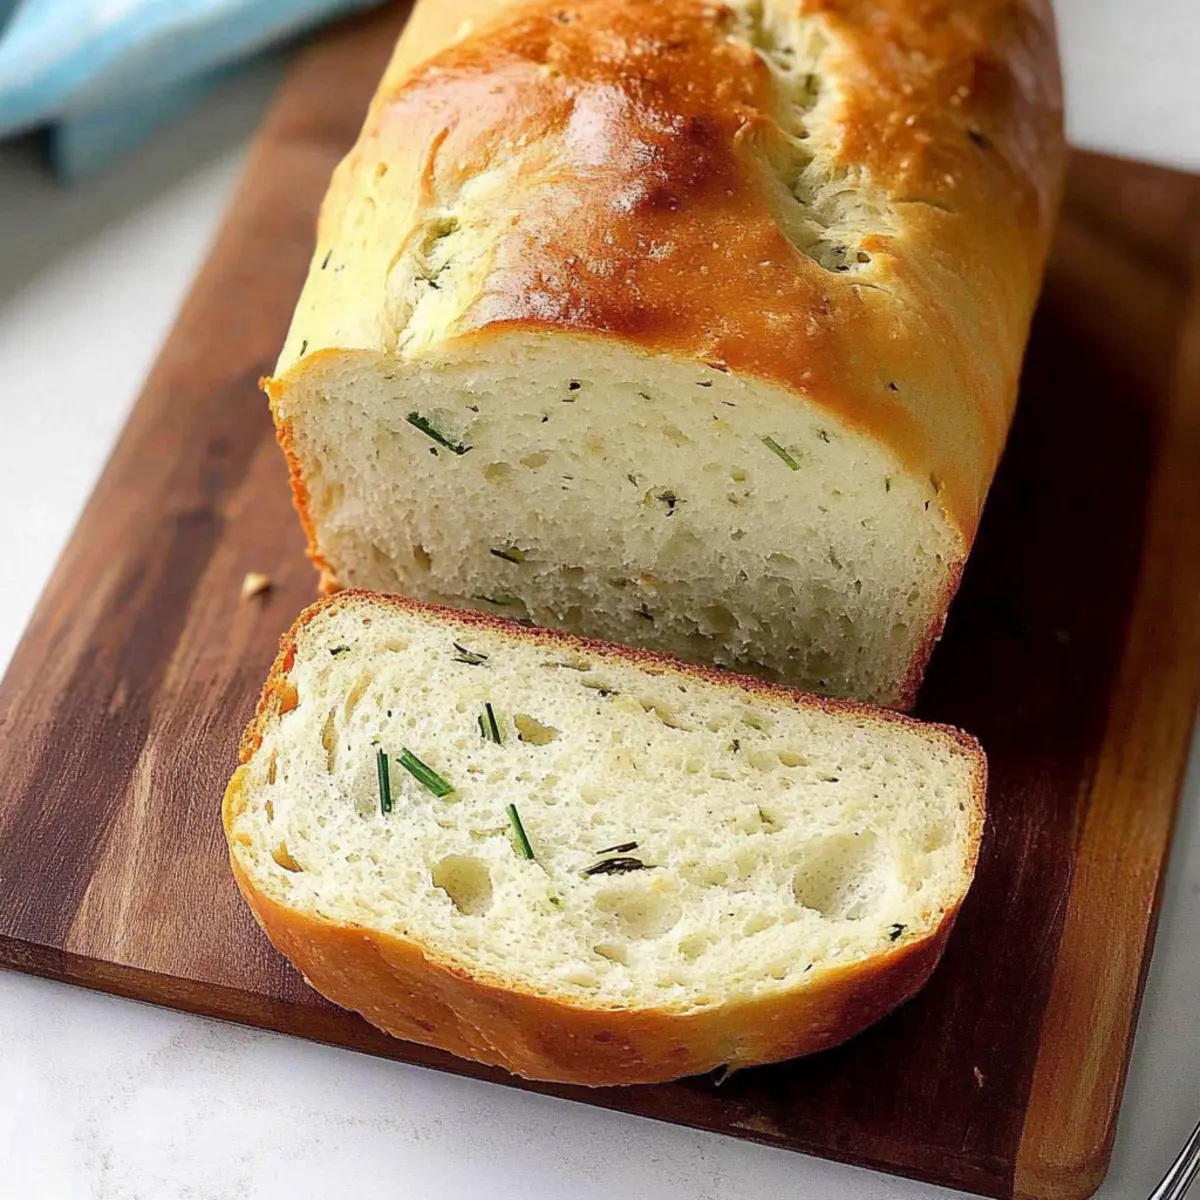
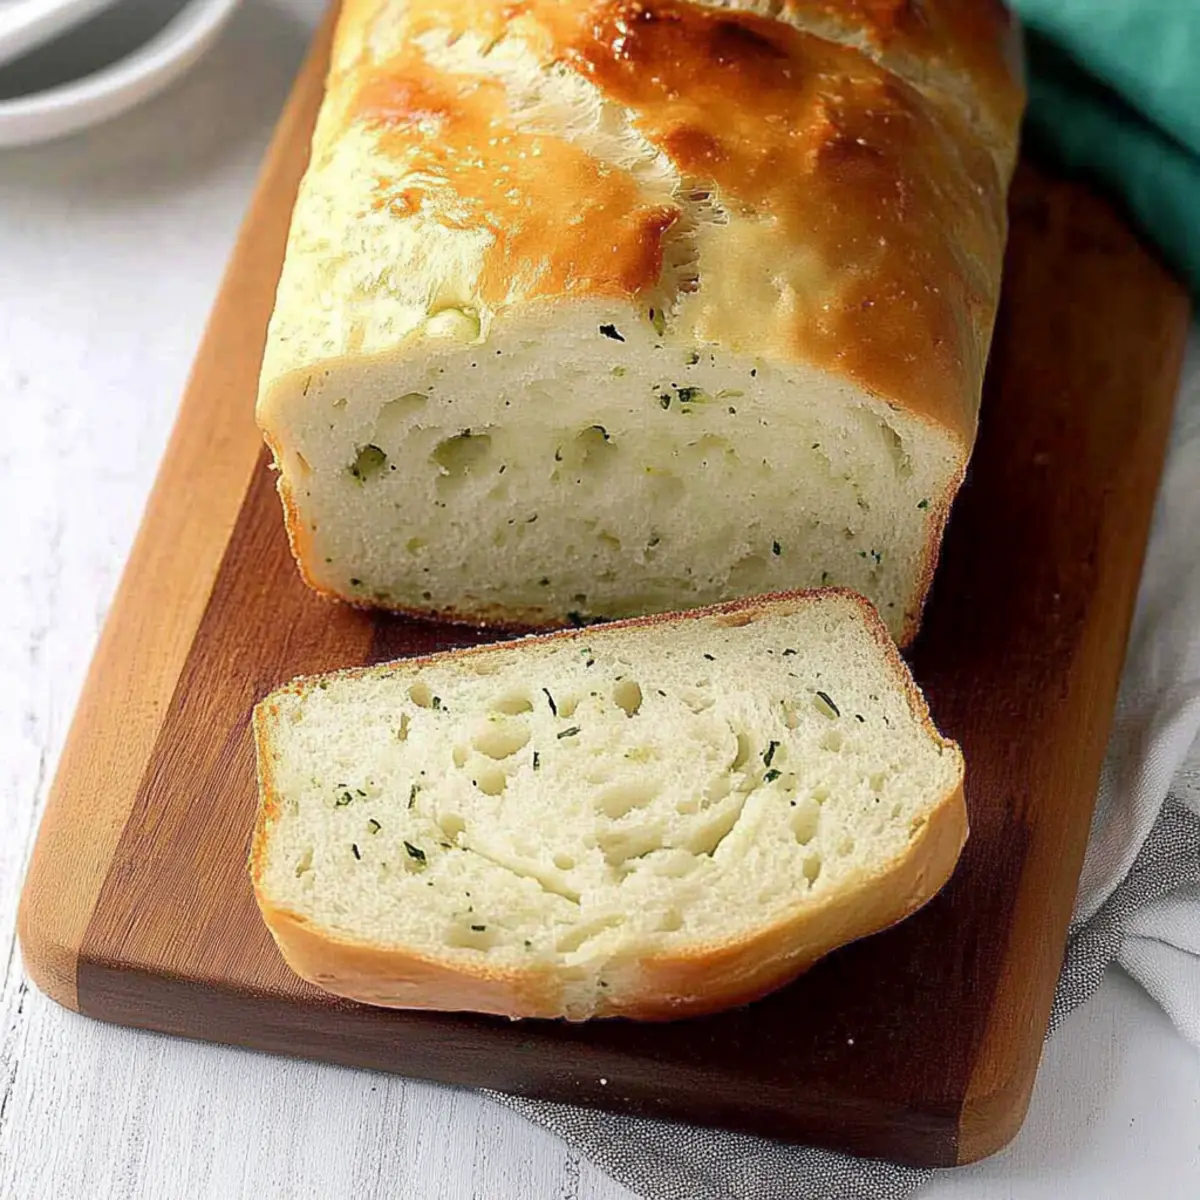
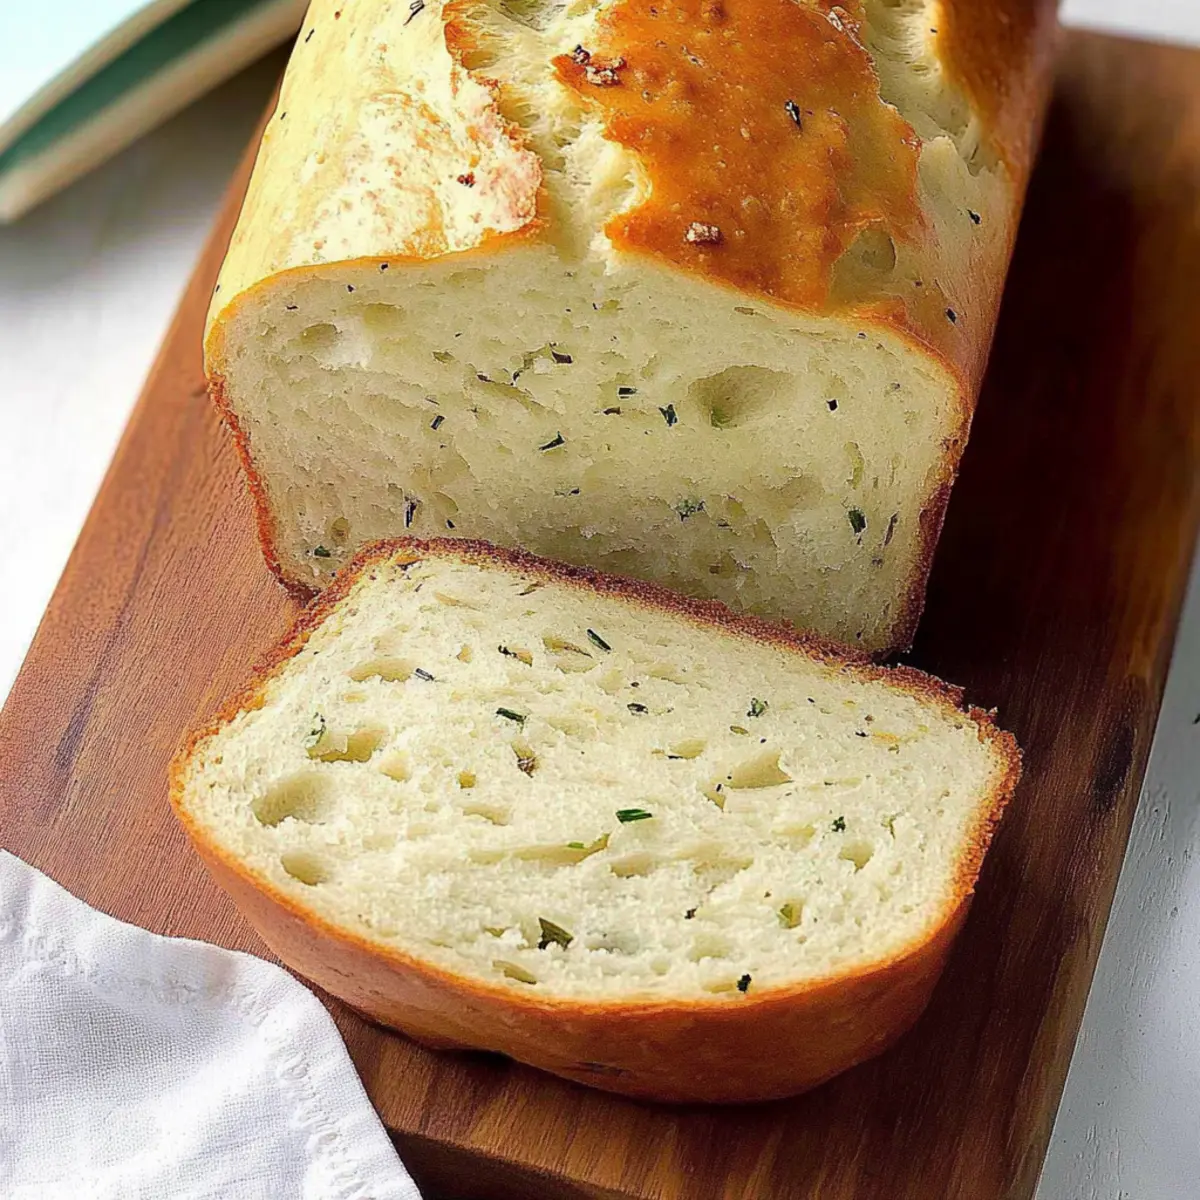
Once the baking cycle is complete and your kitchen is filled with the wonderful scent of fresh bread, carefully remove the baking pan from the machine. Allow the Sour Cream Chive Bread to cool for about 10-15 minutes before taking it out of the pan. This resting period will make it easier to slice and will also help maintain its soft, fluffy texture.
Step 7: Slice and Enjoy
Finally, once cooled slightly, slice the bread using a serrated knife for the best results. Serve warm with butter or as a side to your favorite soups and salads. This savory Sour Cream Chive Bread not only makes a delightful addition to your meals but also enhances your homemade cooking experience.
Expert Tips for Sour Cream Chive Bread
• Use Room Temperature Liquids: Ensure all liquids are at room temperature (70° to 80°F) to activate the yeast effectively for a perfect rise.
• Check Dough Texture: During the kneading phase, monitor dough consistency closely; it should be smooth but not sticky. Adjust with flour or water as needed.
• Don’t Skip the Cooling: Allow the bread to cool completely before slicing to improve texture and prevent it from becoming gummy.
• Fresh Ingredients Matter: Use fresh active dry yeast for the best results; expired yeast can lead to a dense loaf.
• Customize Your Flavor: Feel free to experiment by adding garlic powder or different herbs to create your own twist on this savory sour cream chive bread.
Sour Cream Chive Bread Variations
Feel free to get creative with your Sour Cream Chive Bread and explore different flavor profiles or dietary adaptations!
-
Garlic Lover’s Delight: Add 1-2 teaspoons of garlic powder to the dough for a savory kick. The aroma while baking will be heavenly!
-
Herbed Twist: Substitute chives with chopped fresh herbs like parsley, rosemary, or dill for a unique flavor combo. Each herb brings its own delightful note to this versatile bread.
-
Cheesy Goodness: Mix in 1 cup of shredded cheese, such as cheddar or mozzarella, for a deliciously cheesy bread. This version makes a perfect pairing with soups or a stand-alone snack.
-
Whole Wheat Option: Replace half of the bread flour with whole wheat flour to boost nutrition and add a nutty flavor. Your bread will be heartier yet still deliciously soft!
-
Spicy Kick: Incorporate finely chopped jalapeños or crushed red pepper flakes for a bit of heat. It’s a great way to add some excitement to your meal!
-
Sundried Tomato & Feta: Toss in chopped sundried tomatoes and crumbled feta cheese for an Mediterranean flair. This combination will elevate your bread experience and impress your guests!
-
Nutty Crunch: Add 1/4 cup of toasted sunflower seeds or chopped walnuts to bring a satisfying crunch to each bite. The added texture creates a wonderful contrast with the soft bread.
-
Sweet Substitution: For a slightly sweeter version, mix in 1 tablespoon of honey to the dough. This pairs beautifully with butter or cream cheese for a special breakfast treat.
When you’re ready to whip up a delicious yet comforting loaf of bread, remember to accompany your creations with delightful sides like my Hawaiian Banana Bread or indulging in my Cream Cheese Squares. Happy baking!
How to Store and Freeze Sour Cream Chive Bread
• Room Temperature: Store the bread in an airtight container at room temperature for up to 3 days to keep it fresh and flavorful.
• Fridge: For longer storage, you can keep it in the fridge for up to a week, but be mindful that this may affect the bread’s texture, making it slightly denser.
• Freezer: Freeze slices of sour cream chive bread in a freezer-safe bag for up to 3 months. Lay parchment paper between slices to prevent sticking.
• Reheating: To enjoy your bread after freezing, simply toast slices straight from the freezer or let them thaw at room temperature, then reheat in the toaster or oven.
Make Ahead Options
These Sour Cream Chive Bread delights are perfect for meal prep! You can prepare the dough up to 24 hours in advance by mixing all ingredients in your bread machine pan. Simply refrigerate the pan (before activating the yeast) until you’re ready to bake. When you’re set to enjoy your freshly baked bread, allow it to sit at room temperature for about 30 minutes, and then choose your baking settings as usual. This method ensures your bread remains just as delicious, with the same tender texture and aromatic flavors. For longer storage, the baked bread can be frozen for up to 3 months; simply thaw and toast before serving!
What to Serve with Sour Cream Chive Bread
There’s nothing like the mouthwatering scent of freshly baked bread to inspire a meal filled with warmth and comfort.
-
Creamy Tomato Soup: The tangy flavors of the bread pair beautifully with the richness of creamy tomato soup, making a cozy combination.
-
Mixed Green Salad: A crisp, refreshing salad with a light vinaigrette offers a perfect contrast, balancing the softness of the bread.
-
Savory Cheese Platter: Serve alongside a selection of your favorite cheeses. The chives in the bread will complement the cheese’s flavors perfectly.
-
Buttery Garlic Shrimp: These succulent shrimp in a garlic butter sauce marinate well with the bread for a delectable dining experience.
-
Hearty Beef Stew: Enjoy this bread as a side to a rich beef stew and soak up every drop of savory broth for ultimate satisfaction.
-
Chilled White Wine: A light, chilled white wine enhances the overall meal experience while bringing out the bread’s creamy notes.
-
Chocolate Chip Cookies: For a sweet finish, savor a warm chocolate chip cookie after your meal to round out the flavors of your cozy evening.
With these delightful pairings, your Sour Cream Chive Bread will shine as the star of any thoughtful meal!
Sour Cream Chive Bread Recipe FAQs
How do I choose ripe chives for this recipe?
Absolutely! Look for chives that are vibrant green and free from wilting or dark spots. The fresher the chives, the brighter the flavor in your bread. I often recommend checking your local farmer’s market for the best options if you can!
How should I store Sour Cream Chive Bread?
To keep your bread fresh, store it in an airtight container at room temperature for up to 3 days. If you want it to last longer, wrap the loaf in plastic wrap before placing it in the fridge for up to a week, although this may make the texture a bit denser.
Can I freeze Sour Cream Chive Bread?
Certainly! To freeze your bread, slice it first for convenience. Then, wrap each slice in plastic wrap and place them in a freezer-safe bag. This way, the bread can last up to 3 months in the freezer. You’ll be able to grab just what you need!
What if my dough is too sticky during preparation?
No worries! If you find your dough is too sticky after about 5 minutes of mixing, simply add a tablespoon of bread flour at a time until it reaches the right consistency. The goal is for a smooth dough that isn’t overly tacky.
Is this recipe suitable for those with dietary restrictions?
Absolutely! If you have a dairy allergy, you can substitute the sour cream with dairy-free yogurt or coconut cream for a similar texture and moisture. Also, anyone with gluten sensitivities can replace the bread flour with a gluten-free all-purpose blend – just be sure to check the yeast and other ingredients for gluten-free certifications!
How long should I let the bread cool after baking?
Make sure to let the bread cool for about 10-15 minutes before slicing. This resting period is crucial because it enhances the overall texture and makes it easier to cut without becoming gummy. Trust me, it’s worth the wait for that perfect slice!
Heavenly Sour Cream Chive Bread for Cozy Meal Pairings
Ingredients
Equipment
Method
- Begin by gathering your ingredients for the Sour Cream Chive Bread. In a bread machine pan, pour in the 2/3 cup of milk, 1/4 cup of water, and 1/4 cup of sour cream. Follow this with the 2 tablespoons of softened butter and 1-1/2 teaspoons of sugar. Add 1-1/2 teaspoons of salt, 3 cups of bread flour, and 1/8 teaspoon of baking soda, ensuring they are layered appropriately for proper mixing.
- Next, sprinkle 2-1/4 teaspoons of active dry yeast gently over the flour mixture before finishing off with 1/4 cup of minced chives. It’s crucial to keep the yeast away from the liquids initially, as this helps activate it effectively. Now that your mixture is prepared, close the lid of the bread machine securely to lock in the moisture.
- Set your bread machine to the basic bread setting, and choose your preferred crust color and loaf size. This customization will ensure your Sour Cream Chive Bread has the perfect exterior and texture to complement the savory flavors. Once the settings are selected, start the machine and prepare for the delightful aroma that will soon fill your kitchen.
- After about 5 minutes into the mixing process, open the bread machine and check the dough’s consistency. It should form a smooth ball, neither too wet nor too dry. If the dough appears too sticky, add a little more flour; if it's too dry, incorporate a splash of water. This attention will enhance the bread’s structure as it bakes.
- Let the bread machine run its cycle, which typically lasts around 2 to 3 hours depending on the settings chosen. During this time, resist the urge to open the lid. Trust the machine to work its magic, as the heat activates the yeast, allowing the dough to rise beautifully and develop flavor.
- Once the baking cycle is complete and your kitchen is filled with the wonderful scent of fresh bread, carefully remove the baking pan from the machine. Allow the Sour Cream Chive Bread to cool for about 10-15 minutes before taking it out of the pan. This resting period will make it easier to slice and will also help maintain its soft, fluffy texture.
- Finally, once cooled slightly, slice the bread using a serrated knife for the best results. Serve warm with butter or as a side to your favorite soups and salads. This savory Sour Cream Chive Bread not only makes a delightful addition to your meals but also enhances your homemade cooking experience.