
A Cake That Brings Back Sweet Memories
Some desserts are more than just something to satisfy a sweet tooth—they carry with them a sense of nostalgia, family traditions, and the warmth of shared moments. Chocolate Easter Egg Nest Cake is one of those special treats that instantly transports me back to childhood Easter celebrations.
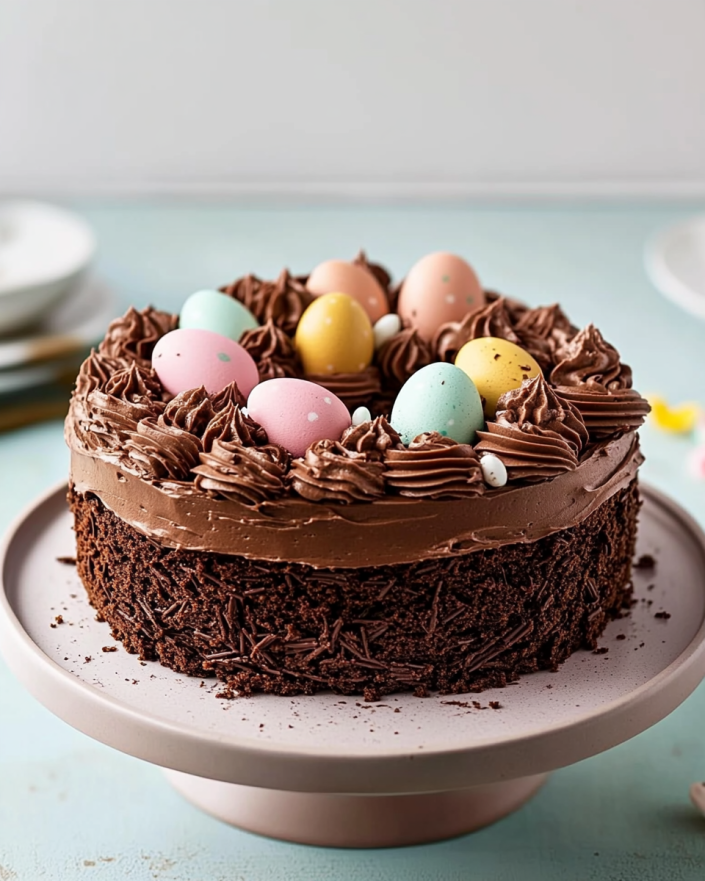
I still remember the first time I saw my grandmother place this beautiful cake on the table, its glossy chocolate ganache glistening under the light, with a delicate chocolate nest filled with colorful candy eggs sitting perfectly on top. As a child, it felt like magic—a cake that looked like an actual Easter nest, filled with the promise of chocolatey goodness in every bite.
Now, as an adult, I make this cake every Easter, not just for its delicious taste but for the memories it brings back. The smell of rich chocolate filling the kitchen, the joy of carefully assembling the delicate nest, and the final reveal—when everyone gasps at how stunning it looks—are moments that make baking truly special.
This Chocolate Easter Egg Nest Cake is more than just a dessert; it’s a celebration of spring, Easter, and the simple joys of baking. Whether you’re making it for your family, hosting a holiday gathering, or just indulging in a personal baking project, this cake is sure to impress.
Why You’ll Love This Recipe
1. A Stunning Centerpiece for Easter
With its chocolate nest filled with pastel eggs, this cake is as beautiful as it is delicious. It’s the perfect dessert to serve at any Easter celebration.
2. Decadent Chocolate Flavor in Every Bite
This cake is made with real cocoa, rich ganache, and a light yet moist texture, ensuring each bite is full of deep, velvety chocolate flavor.
3. Fun and Creative to Assemble
The handcrafted chocolate nest is an easy but impressive technique that makes this cake unique. Both kids and adults will enjoy assembling the final masterpiece.
4. Perfect for All Skill Levels
Even if you’re not an experienced baker, this recipe is straightforward and beginner-friendly, with simple steps that lead to a bakery-worthy dessert.
5. Ideal for Make-Ahead Baking
You can bake the cake layers ahead of time, store them, and assemble everything closer to your event, making this a stress-free holiday dessert.
Ingredients You’ll Need
For the Moist Chocolate Cake:
- 1 ¾ cups all-purpose flour
- ¾ cup unsweetened cocoa powder
- 2 cups granulated sugar
- 2 teaspoons baking powder
- 1 teaspoon baking soda
- ½ teaspoon salt
- 1 cup buttermilk
- ½ cup vegetable oil
- 2 large eggs
- 2 teaspoons vanilla extract
- 1 cup hot water or coffee
For the Silky Chocolate Ganache:
- 1 cup heavy cream
- 8 oz dark chocolate, chopped
- 1 tablespoon unsalted butter
For the Decorative Chocolate Nest:
- 6 oz dark chocolate, melted
- Mini chocolate eggs or candy-coated Easter eggs
Step-by-Step Directions
Baking the Chocolate Cake
- Preheat oven to 350°F (175°C) and grease a 9-inch round cake pan.
- Whisk together dry ingredients, then mix in buttermilk, oil, eggs, and vanilla.
- Slowly add hot water or coffee and stir until smooth.
- Pour into the prepared pan and bake for 30-35 minutes.
- Let cool for 10 minutes in the pan, then transfer to a wire rack.
Making the Chocolate Ganache
- Heat heavy cream until simmering, then pour over chopped dark chocolate.
- Let sit for 2-3 minutes, then stir until smooth.
- Add butter and mix until glossy.
Creating the Chocolate Nest
- Pipe melted dark chocolate onto parchment paper in crisscrossing strands to form a nest shape.
- Chill for 15-20 minutes until firm.
Assembling the Cake
- Pour chocolate ganache over the cooled cake.
- Carefully place the chocolate nest on top.
- Fill the nest with mini chocolate eggs and serve!
Nutritional Breakdown (Per Serving, Approximate)
- Calories: 201 kcal
- Protein: 5g
- Carbohydrates: 26g
- Fat: 8g
- Saturated Fat: 4g
- Cholesterol: 56mg
- Sodium: 334mg
- Fiber: 1g
- Sugar: 10g
Tips for Making the Perfect Chocolate Easter Egg Nest Cake
Use Hot Coffee for a Richer Chocolate Flavor
If you’ve never tried adding hot coffee to chocolate cake batter, now is the time. It intensifies the cocoa flavor without making the cake taste like coffee.
Let the Ganache Cool Slightly Before Pouring
To get that perfectly smooth, glossy chocolate finish, let the ganache cool slightly before pouring it over the cake. This helps it set evenly without running off the sides too quickly.
Work Quickly When Making the Chocolate Nest
Melted chocolate sets fast, so when piping the chocolate nest onto parchment paper, work quickly to create a delicate, nest-like structure before it firms up.
Use a High-Quality Dark Chocolate
Since chocolate is the star ingredient, using high-quality dark chocolate for both the cake and ganache will elevate the overall taste.
Customize with Fun Easter Decorations
Sprinkle crushed cookies inside the nest for added crunch, add edible gold dust for a fancy touch, or place small sugar flowers around the nest for extra Easter charm.
Fun Variations to Try
Make It a White Chocolate Delight
- Use white chocolate instead of dark for a snowy, elegant version of this cake.
- Swap the cocoa in the cake batter for extra vanilla extract for a lighter flavor.
Add a Fruit Twist
- Raspberry filling between the cake layers adds a tart contrast to the rich chocolate.
- Top with fresh berries around the nest for a fresh, colorful touch.
Try a Nutty Version
- Add chopped hazelnuts or almonds to the ganache for a crunchy texture.
- Use Nutella or peanut butter frosting as an additional layer between the cake and ganache.
Make It a Mini Nest Cake
- Instead of one large cake, bake cupcakes and top each with a tiny chocolate nest, creating individual servings for guests.
How to Store and Serve Chocolate Easter Egg Nest Cake
Best Ways to Serve
- Pair with a cup of coffee or tea to enhance the chocolate flavor.
- Serve slightly warm for a gooey ganache experience.
- Add a scoop of vanilla ice cream for a refreshing contrast.
Storage Tips
- Refrigerate for up to 5 days in an airtight container.
- Freeze the cake layers (without ganache) for up to 2 months, then thaw and assemble before serving.
- Keep the chocolate nest separate until serving to maintain its shape.
Frequently Asked Questions
1. Can I Make This Cake Ahead of Time?
Yes! You can bake the cake up to 2 days in advance and store it tightly wrapped. The ganache and chocolate nest can be made the night before assembling.
2. What If I Don’t Have an Easter Egg Mold?
No problem! You can:
- Pipe the chocolate nest freehand onto parchment paper.
- Use a cupcake liner to shape small nest-like structures.
3. Can I Use Milk Chocolate Instead of Dark Chocolate?
Yes, but keep in mind that milk chocolate is sweeter, so you may want to reduce the sugar slightly in the cake to balance the flavors.
4. What’s the Best Way to Get a Smooth Ganache Finish?
- Use a warm offset spatula to spread it evenly.
- Let it sit for 5 minutes before pouring to thicken slightly.
- Tap the cake gently on the counter to remove air bubbles.
5. Can I Make a Gluten-Free Version?
Yes! Swap the all-purpose flour for a gluten-free flour blend, and ensure that your chocolate and cocoa powder are gluten-free.
6. How Do I Keep the Cake from Drying Out?
- Use buttermilk, which keeps the cake extra moist.
- Store in an airtight container when refrigerating.
Final Thoughts: The Ultimate Easter Celebration Cake
Easter is a time of joy, renewal, and gathering with loved ones, and what better way to celebrate than with a dessert that’s as festive as it is delicious?
This Chocolate Easter Egg Nest Cake is the perfect combination of rich, indulgent flavors and creative presentation. It’s a cake that’s not just about taste—it’s about the experience of making something beautiful, of bringing people together, and of celebrating the season with a little extra sweetness.
So whether you’re hosting an Easter brunch, surprising your family with a homemade dessert, or simply baking for the love of chocolate, this cake is guaranteed to impress.
Once you take that first bite—where the soft chocolate cake meets the silky ganache and the crispy chocolate nest adds the final crunch—you’ll know why this cake deserves a place at every Easter table.
Print
Chocolate Easter Egg Nest Cake: A Decadent Showstopper for Spring
- Total Time: 1 hour 35 minutes
- Yield: 12 servings
Description
This Chocolate Easter Egg Nest Cake is more than just a delicious treat—it’s an Easter celebration on a plate! With its moist chocolate cake, glossy ganache, and delicate chocolate nest filled with candy eggs, this dessert is both stunning and indulgent. Whether you’re making it for a family gathering, an Easter brunch, or simply for the joy of baking, this cake is guaranteed to impress.
Ingredients
For the Moist Chocolate Cake:
- 1 ¾ cups all-purpose flour
- ¾ cup unsweetened cocoa powder
- 2 cups granulated sugar
- 2 teaspoons baking powder
- 1 teaspoon baking soda
- ½ teaspoon salt
- 1 cup buttermilk
- ½ cup vegetable oil
- 2 large eggs
- 2 teaspoons vanilla extract
- 1 cup hot water or brewed coffee
For the Silky Chocolate Ganache:
- 1 cup heavy cream
- 8 oz dark chocolate, chopped
- 1 tablespoon unsalted butter
For the Decorative Chocolate Nest:
- 6 oz dark chocolate, melted
- Mini chocolate eggs or candy-coated Easter eggs
Instructions
Step 1: Bake the Chocolate Cake
- Preheat oven to 350°F (175°C). Grease and line a 9-inch round cake pan with parchment paper.
- In a large bowl, whisk together flour, cocoa powder, sugar, baking powder, baking soda, and salt.
- Add buttermilk, vegetable oil, eggs, and vanilla extract. Mix until just combined.
- Slowly pour in hot water or coffee, stirring until smooth. The batter will be thin—this is normal!
- Pour into the prepared cake pan and bake for 30-35 minutes, or until a toothpick inserted in the center comes out clean.
- Let cool for 10 minutes in the pan, then transfer to a wire rack to cool completely.
Step 2: Make the Chocolate Ganache
- Heat the heavy cream in a small saucepan over medium heat until it just starts to simmer (do not boil).
- Pour the hot cream over the chopped dark chocolate in a heatproof bowl. Let sit for 2-3 minutes.
- Stir gently until the chocolate is fully melted and smooth.
- Add butter and mix until the ganache is glossy. Let cool slightly before using.
Step 3: Create the Chocolate Nest
- Line a small bowl or a plate with parchment paper.
- Transfer melted dark chocolate to a piping bag (or use a spoon) and drizzle it in a crisscross pattern to form a nest shape.
- Chill in the refrigerator for 15-20 minutes, until firm.
Step 4: Assemble the Cake
- Place the cooled chocolate cake on a serving plate.
- Pour the chocolate ganache over the cake, letting it drip naturally over the edges.
- Carefully place the chilled chocolate nest on top of the cake.
- Fill the nest with mini chocolate eggs or candy-coated Easter eggs for a festive touch.
Step 5: Serve and Enjoy!
- Let the cake sit for 10 minutes before slicing to allow the ganache to set slightly.
- Serve at room temperature or slightly warmed for a gooey ganache experience.
Notes
-
Use Hot Coffee for a Richer Chocolate Flavor
Adding hot coffee to the batter enhances the cocoa flavor, making the cake even more decadent. -
Let the Ganache Cool Slightly Before Pouring
This prevents it from running off the cake too quickly and ensures a smooth, even coating. -
Work Quickly When Making the Chocolate Nest
Melted chocolate sets fast, so pipe or drizzle it quickly onto the parchment before it firms up.
- Prep Time: 30 minutes
- Chill Time: 30 minutes
- Cook Time: 35 minutes
- Category: Dessert
- Method: Baking
- Cuisine: American