
As I stirred the vivid blue gelatin, I couldn’t help but feel like a kid again, lost in daydreams of exploring underwater worlds. These Edible Aquarium Terrariums are more than just a delightful dessert; they’re a whimsical journey perfect for unleashing creativity in the kitchen. With no baking required, this fun project comes together easily, making it ideal for a relaxing afternoon with friends or a memorable family gathering. Plus, it’s completely customizable—add your favorite candies or even fresh fruit for a delightful twist! Excited to dive into this colorful adventure? Let’s make some magic together!
Why Are Edible Aquarium Terrariums So Fun?
Imagination Unleashed: These Edible Aquarium Terrariums aren’t just desserts; they’re a creative canvas for both kids and adults. Imagine layering vibrant colors and textures to mimic an underwater adventure!
No-Bake Wonder: With no baking required, you can whip these up in no time, making them the perfect last-minute treat.
Customizable Ingredients: Tailor them to your taste! Use your favorite gelatin flavors, cookies, or even fresh fruits to create your own unique underwater scene.
Interactive Experience: Kids love the hands-on approach of assembling their own terrarium, making it a fun family activity that brings everyone together.
Visually Stunning: Their bright colors and playful design not only taste delicious but are also sure to impress at any gathering!
Edible Aquarium Terrarium Ingredients
Discover the essential ingredients for creating your magical Edible Aquarium Terrariums!
For the Water Layer
- Blue Gelatin – Provides the “water” effect and sweetness. Substitution: Use fruit juice for a naturally flavored gelatin.
For the Sand Base
- Vanilla Cookies (Crushed) – Acts as “sand” for the aquarium. Substitution: Graham crackers can be used for a similar texture and taste.
For the Aquatic Friends
- Gummy Sea Creatures – Adds a playful, fun element to the dessert. Note: Use fruit-shaped gummies or even fresh fruit pieces if looking for alternatives.
For Topping (Optional)
- Dairy Whipped Cream – Adds creaminess and a topping option. Substitution: For a dairy-free version, use dairy-free whipped topping or omit entirely.
Step‑by‑Step Instructions for Edible Aquarium Terrariums
Step 1: Prepare the Gelatin
Begin by preparing the blue gelatin according to the package instructions, usually involving dissolving it in boiling water. Stir until fully dissolved, then add cold water as directed. Let the mixture cool for about 15-20 minutes until it’s slightly warm but not hot. This step is crucial to ensure your Edible Aquarium Terrariums have that beautiful, wavy water effect.
Step 2: Crush the Cookies
While the gelatin cools, take your vanilla cookies and crush them into fine crumbs, resembling soft sand. You can use a food processor or place them in a zip-top bag and crush with a rolling pin. Aim for a texture that’s slightly crumbly but not powdery. Set the crumbs aside, ready to form the sandy base of your adorable aquarium.
Step 3: Layer the Sand
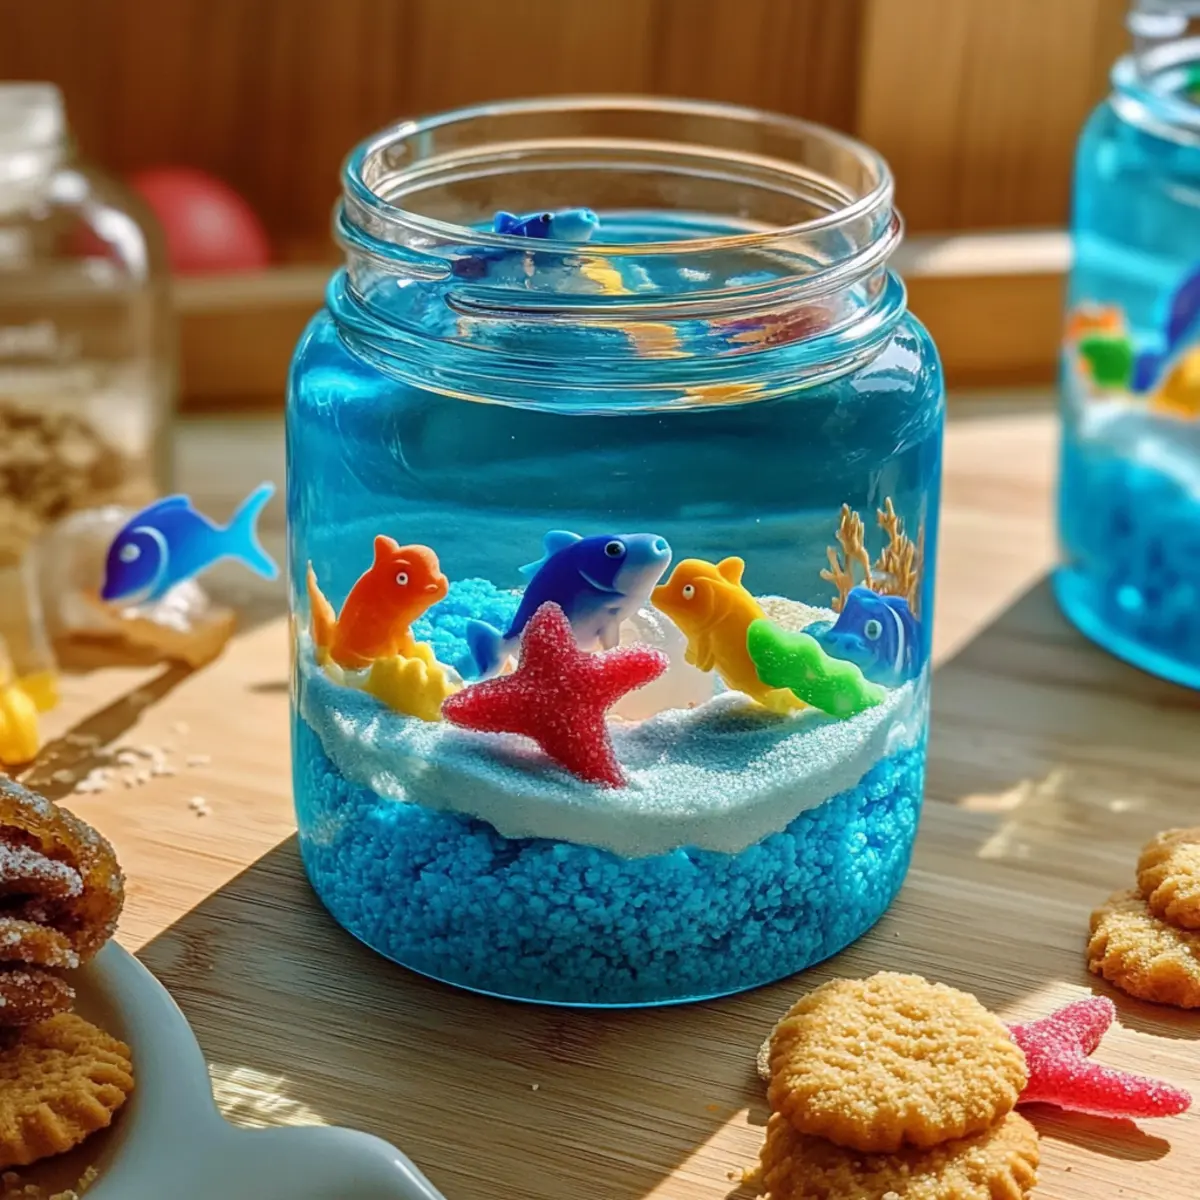
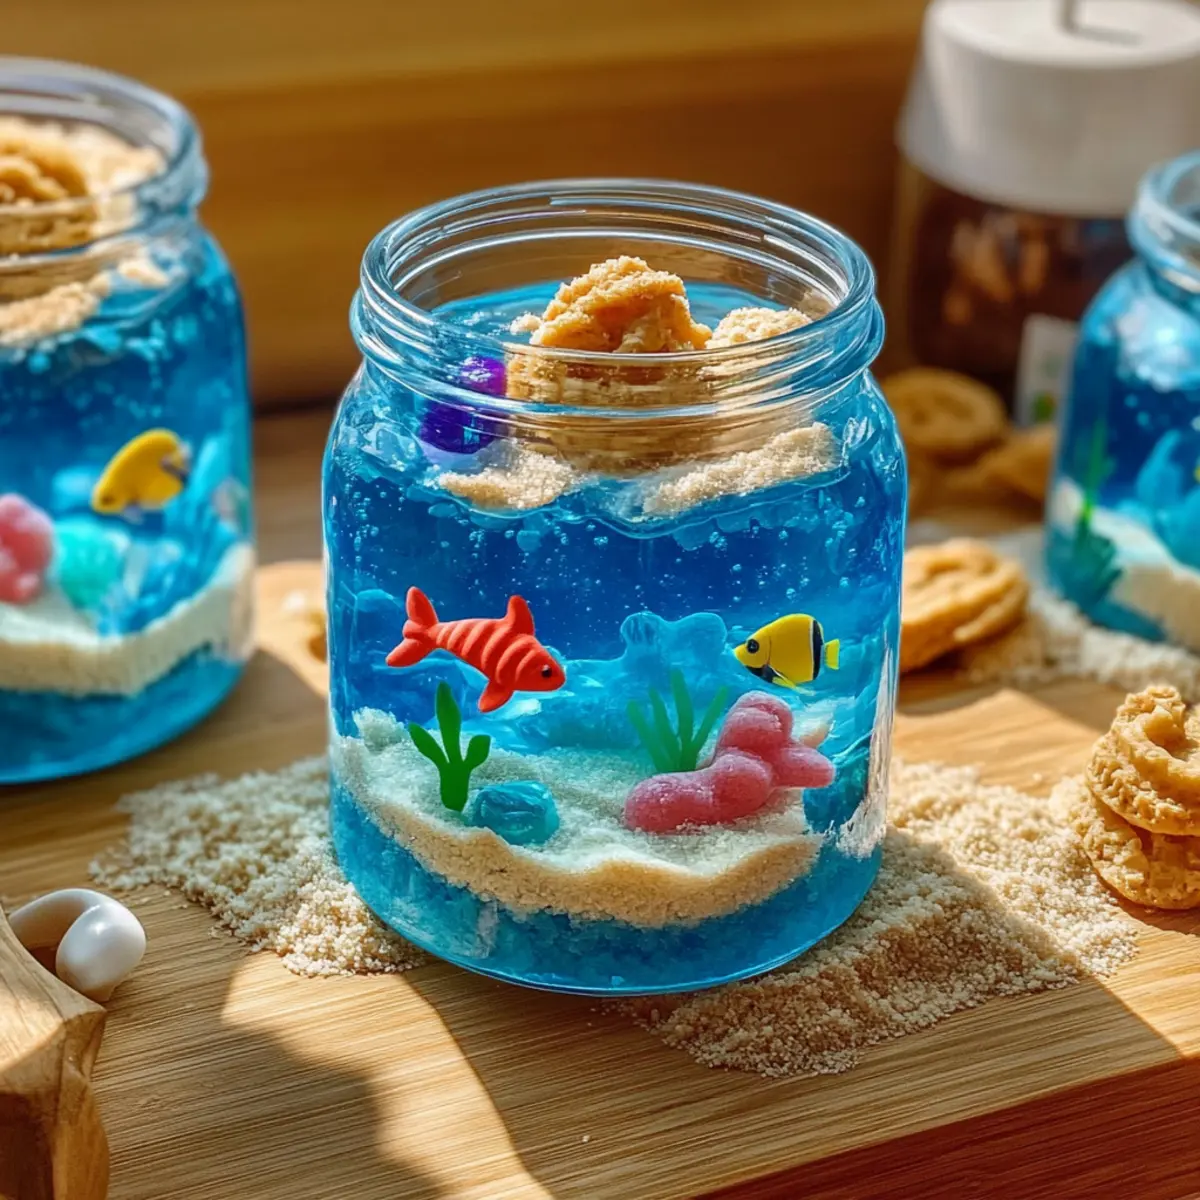
Grab your mason jars or dessert cups and start layering the crushed vanilla cookies at the bottom. Use about one inch of the cookie crumbs to create the “sand” layer for your Edible Aquarium Terrariums. Press down gently to ensure it holds together, providing a solid foundation for the spectacular layers to come. Visualize adding colorful layers just like a real underwater scene!
Step 4: Pour the Gelatin
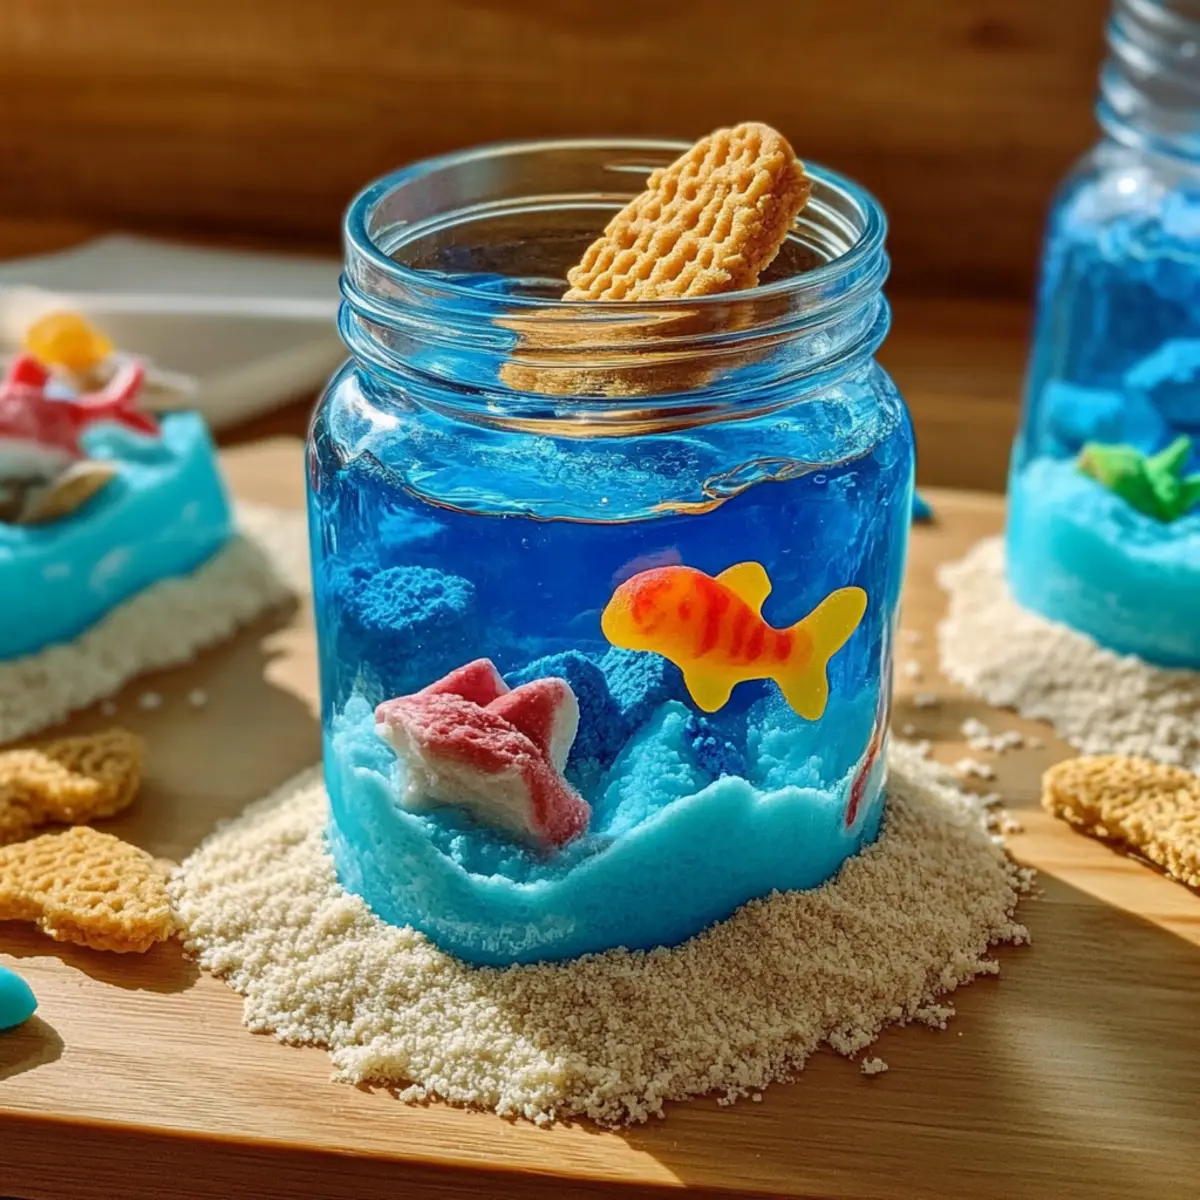
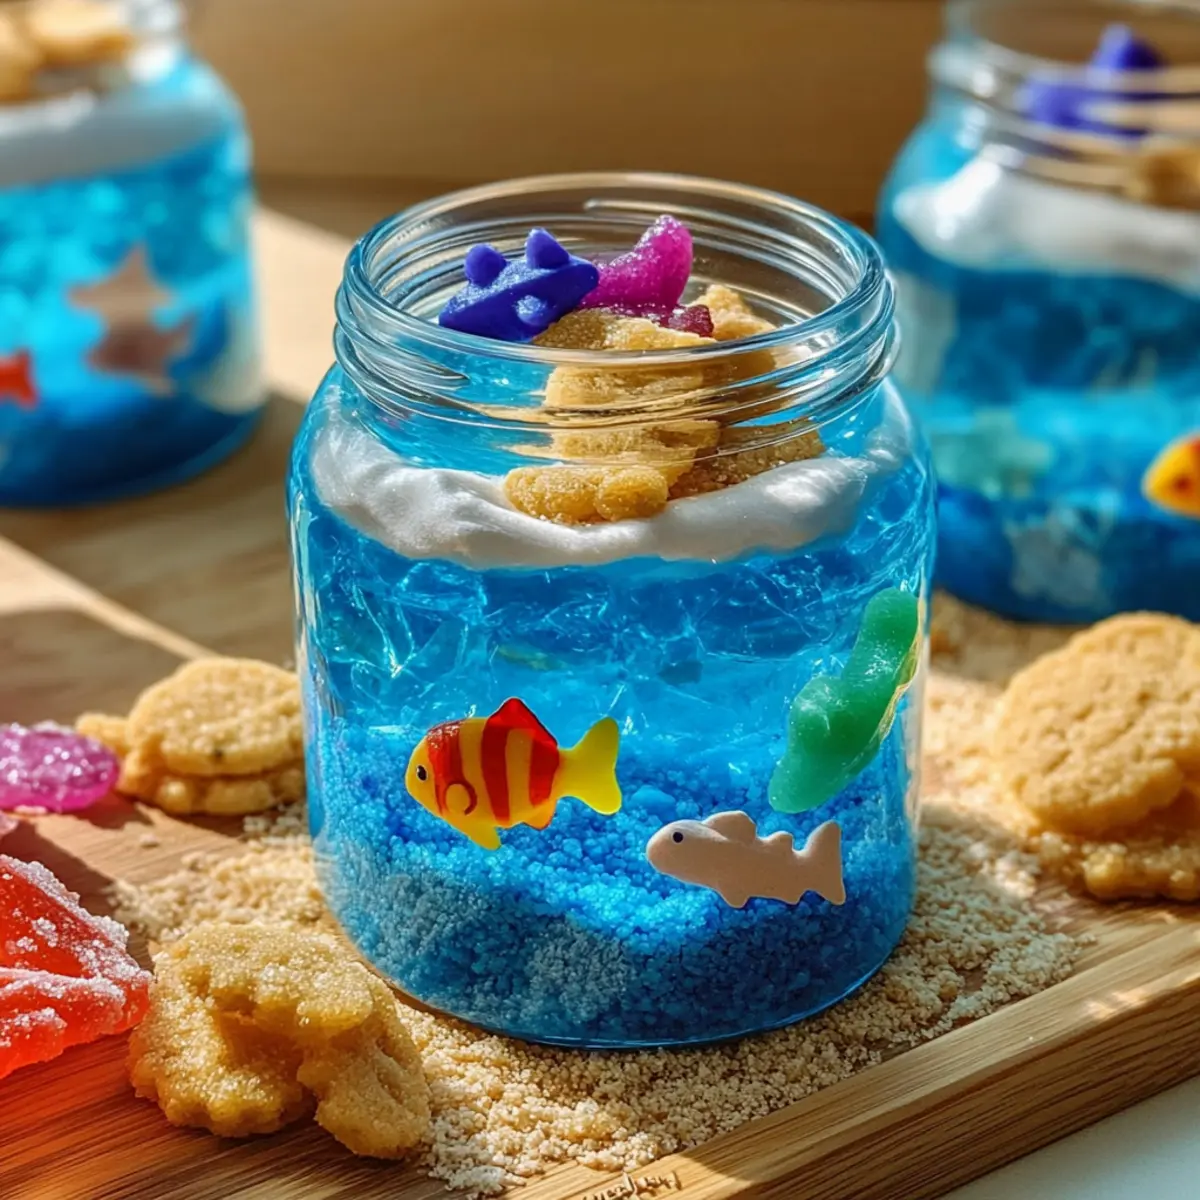
Once your cookie base is ready, pour the slightly cooled blue gelatin over the cookie layer in each jar. Pour slowly to avoid disturbing the cookie crumbs and creating a muddy mix. Fill the jars about three-quarters full, leaving some space at the top. This step forms the vibrant water layer above the sandy base, crafting a beautiful aquatic aesthetic.
Step 5: Add the Gummies
Allow the gelatin to set for approximately 30 minutes in the refrigerator until it’s partially set but still slightly jiggly. This will be the perfect time to press your gummy sea creatures into the gooey surface, creating an enchanting underwater landscape within your Edible Aquarium Terrariums. Be gentle so you don’t disrupt the layering, placing them strategically for visual appeal.
Step 6: Refrigerate Until Set
After adding the gummies, cover the jars with plastic wrap and place them back in the refrigerator. Let them chill for at least 2 hours until the gelatin is fully set, firm, and maintains its playful shape. This will ensure that your Edible Aquarium Terrariums are ready for serving, just like a complete aquatic masterpiece.
Step 7: Serve with a Splash
Just before serving, add a dollop of dairy whipped cream on top for that frothy ocean wave effect. If you want a dairy-free variation, simply omit this step. This delightful topping enhances both flavor and presentation, turning your Edible Aquarium Terrariums into an irresistibly charming addition to any gathering. Enjoy the wide-eyed excitement on everyone’s faces as you reveal these fun creations!
Storage Tips for Edible Aquarium Terrariums
Fridge: Store assembled Edible Aquarium Terrariums in the refrigerator for up to 3 days to ensure they stay fresh and tasty.
Airtight Container: If you’d like to keep them longer or prevent any odors, consider placing them in an airtight container to maintain their vibrant look and flavor.
Make-Ahead: Prepare individual components in advance and assemble your terrariums when ready to serve to maximize freshness, especially the whipped cream topping.
Reheating: There’s no need to reheat; these delicious treats are best enjoyed chilled right from the fridge!
Make Ahead Options
These Edible Aquarium Terrariums are perfect for busy home cooks looking to save time without sacrificing fun! You can prepare the blue gelatin and layer the crushed cookies up to 24 hours in advance. Simply store the assembled jars in the refrigerator, ensuring they’re covered with plastic wrap to maintain freshness. When you’re ready to serve, allow the gelatin to set completely (about 2 hours) if it hasn’t yet, then gently press the gummy sea creatures into the gelatin for that enchanting look. Just before serving, top each terrarium with a dollop of whipped cream for a frothy finish and watch the smiles appear as everyone enjoys these delightful, no-bake treats!
Expert Tips for Edible Aquarium Terrariums
Perfect Layering: Pour the gelatin slowly and carefully to maintain distinct layers, preventing muddying between the “sand” and “water.”
Cool Before Gummies: Make sure the gelatin is just warm, not hot, to avoid melting your gummy sea creatures, ensuring they stay intact and colorful.
Preparation Schedule: Assemble your Edible Aquarium Terrariums up to 24 hours in advance, but add whipped cream just before serving for the freshest taste and texture.
Check Gelatin Consistency: To determine if the gelatin is ready for gummy placement, use your finger—if it feels jiggly but firm, it’s perfect!
Customization Galore: Feel free to experiment with different flavored gelatins and toppings to create unique versions of your Edible Aquarium Terrariums that suit various preferences.
What to Serve with Edible Aquarium Terrariums?
As you create these whimsical treats, think about delightful side dishes that can enhance your ocean-inspired gathering and create a joyful dining experience.
- Tropical Fruit Salad: A vibrant mix of fresh fruits like pineapple, mango, and kiwi offers a refreshing contrast, adding natural sweetness and color to your table.
- Shell-Shaped Pasta Salad: The playful shapes echo the ocean theme, while a zesty vinaigrette brings a burst of flavor to balance the sweetness of the terrariums.
- Ocean Breeze Mocktail: A light blue drink made with lemonade and blue food coloring, it ties in the oceanic theme and refreshes the palate after sweet bites.
- Coconut Whipped Cream Dip: This fluffy dip pairs perfectly with fruit for a creamy complement, making it an ideal accompaniment for a sweet treat-centric meal.
- Sea Salt Caramel Brownies: Indulgent and fudgy, these brownies add a rich contrast to the lightness of the terrariums while keeping the dessert theme flowing.
- Colorful Veggie Platter: Fresh, crunchy vegetables with a ranch dip can provide a savory crunch, balancing the sweetness of the terrariums beautifully.
- Gummy Bear Fruit Skewers: Enhance the fun factor by pairing the sweet theme with fruity gems on a stick—ask your kids to help build these edible creations!
- Ocean-Themed Cake Pops: Little bites of cake coated in colorful icing, appearing like ocean creatures, make for an enticing dessert option for your gathering.
- Flavored Sparkling Water: A refreshing, fizzy drink option, this will cleanse the palate while keeping things festive and refreshing between dessert bites.
Explore these combinations to create a delightful spread that complements your Edible Aquarium Terrariums!
Edible Aquarium Terrarium Variations
Feel free to get creative and make these delightful Edible Aquarium Terrariums your own with these fun twists!
-
Fruit Juice Gelatin: Swap out blue gelatin for fruit juice mixed with gelatin for a naturally sweetened treat. This twist enhances the flavor while keeping the vibrant color.
-
Graham Cracker Sand: Use crushed graham crackers instead of vanilla cookies for a slightly different taste that pairs wonderfully with the gelatin. The sweetness complements the ocean-themed flavor perfectly.
-
Sugar-Free Options: Try sugar-free gelatin and sugar-free candies for a healthier version that doesn’t skimp on flavor. This adaptation allows everyone to enjoy without the extra sugar crash!
-
Tropical Twist: Incorporate pineapple or mango-flavored gelatin for a beachy vibe. The floral flavors elevate your terrariums, making them a tropical escape in a jar.
-
Layered Colors: Use different colors of gelatin, like green or clear, for a multi-layered effect. This can create more depth in your terrarium, resembling various depths of the ocean.
-
Fresh Fruit Topping: Top your terrariums with fresh fruit like berries for a refreshing twist. The natural sweetness and texture provide a lovely contrast to the smooth gelatin.
-
Coconut Cream Topping: Replace dairy whipped cream with coconut cream for a tropical flavor. It adds a rich and creamy texture, enhancing the overall experience of your ocean-themed treat.
-
Sour Gummies: Use sour gummy candies instead of traditional fruity gummies for a zesty surprise. The combination of sweet and sour adds a fun, unexpected flavor explosion that kids will love!
Embrace your creative side and check out our ideas for incorporating fresh fruits or toppings that resonate with your family’s taste preferences!
Edible Aquarium Terrariums Recipe FAQs
How do I select the best blue gelatin?
Absolutely! When selecting blue gelatin, look for brands that list “gelatin” or “gelatin powder” as the first ingredient for the best consistency. Make sure there are no artificial colors or preservatives if you prefer a more natural option. For a fun twist, consider using different flavors, like raspberry or blueberry, which can enhance the taste while still providing that vibrant blue color.
What is the best way to store Edible Aquarium Terrariums?
For optimal freshness, keep your assembled Edible Aquarium Terrariums in the refrigerator for up to 3 days. It’s best to store them in an airtight container if you want to prevent any unwanted odors or moisture from affecting their delightful taste and appearance. I often use mason jars with sealed lids, which maintain their colorful look beautifully!
Can I freeze Edible Aquarium Terrariums?
Freezing is not recommended for Edible Aquarium Terrariums, as the gelatin can change texture when thawed, becoming watery and losing its delightful jiggly quality. If you need to prepare in advance, assemble and store them in the refrigerator for up to 3 days. Just add whipped cream right before serving to maintain that fresh feel!
What should I do if my gelatin doesn’t set properly?
Very! If your gelatin doesn’t set, it’s typically due to not using enough gelatin or the mixture being too warm when poured. To troubleshoot, check the package instructions for the correct water-to-gelatin ratio. If you’re certain it’s correct, chill it longer in the refrigerator, ideally around 3-4 hours. If it hasn’t set by then, you may need to start over—trust me, it’ll be worth it!
Are there any dietary considerations for the ingredients?
Absolutely! When making Edible Aquarium Terrariums, it’s essential to consider any allergies—common concerns are gluten, dairy, and specific candies. For a gluten-free version, ensure your cookies are labeled as such. You can easily switch whipped cream for a dairy-free alternative, and be mindful of gummy candies as some might contain gelatin derived from non-kosher sources or allergens. Always check packaging for those sensitive ingredients!
Create Colorful Edible Aquarium Terrariums for Fun Family Treats
Ingredients
Equipment
Method
- Begin by preparing the blue gelatin according to the package instructions, typically involving dissolving it in boiling water. Stir until fully dissolved, then add cold water. Let cool for 15-20 minutes.
- Crush the vanilla cookies into fine crumbs resembling soft sand, using a food processor or a zip-top bag with a rolling pin. Set aside.
- Layer the crushed vanilla cookies in mason jars, about one inch high, creating the 'sand' base.
- Pour the slightly cooled blue gelatin over the cookie layer, filling the jars three-quarters full.
- Allow the gelatin to set in the refrigerator for approximately 30 minutes before adding gummy sea creatures.
- Cover with plastic wrap and chill for at least 2 hours until fully set.
- Add a dollop of dairy whipped cream on top before serving for a frothy ocean wave effect, omitting if preferred.