
Introduction to Rhubarb Dream Bars
Rhubarb Dream Bars are more than just a dessert; they’re a slice of nostalgia wrapped in a crumbly crust. Growing up, my grandmother would whip these up during the spring, filling the kitchen with a sweet and tangy aroma that made my mouth water. If you’re looking for a quick solution for a busy day or a dish to impress your loved ones, these bars are perfect. They’re simple to make, yet they deliver a delightful burst of flavor that will have everyone asking for seconds. Trust me, once you try them, you’ll be dreaming of rhubarb!
Why You’ll Love This Rhubarb Dream Bars
These Rhubarb Dream Bars are a game-changer for any home cook. They come together in just about 15 minutes, making them a breeze for busy weeknights or last-minute gatherings. The combination of a buttery crust and a sweet-tart filling is simply irresistible. Plus, they’re versatile enough to serve warm or chilled, ensuring they fit any occasion. Trust me, once you taste them, you’ll be hooked!
Ingredients for Rhubarb Dream Bars
Gathering the right ingredients is key to making these delightful Rhubarb Dream Bars. Here’s what you’ll need:
- All-purpose flour: This forms the base of both the crust and the filling, giving structure to your bars.
- Granulated sugar: Sweetens the crust and filling, balancing the tartness of the rhubarb.
- Salt: Just a pinch enhances the flavors and brings out the sweetness.
- Unsalted butter: Adds richness to the crust, making it crumbly and delicious.
- Fresh rhubarb: The star of the show! Its tangy flavor is what makes these bars so special.
- Eggs: Help bind the filling together, giving it a lovely texture.
- Vanilla extract: A splash of this adds warmth and depth to the filling.
- Baking powder: A leavening agent that helps the filling rise slightly, creating a nice texture.
For those looking to mix things up, consider adding a teaspoon of cinnamon to the filling for a warm spice note. You can also swap out the rhubarb for strawberries or a mix of berries for a different fruity twist. If you’re in a pinch, frozen rhubarb works too—just make sure to thaw and drain it well before using.
Exact measurements for these ingredients can be found at the bottom of the article, ready for printing!
How to Make Rhubarb Dream Bars
Creating these Rhubarb Dream Bars is a delightful journey that’s as easy as pie—well, easier! Follow these simple steps, and you’ll have a delicious dessert ready to impress.
Step 1: Preheat the Oven
First things first, preheat your oven to 350°F (175°C). This ensures that your bars bake evenly. While the oven warms up, prepare your baking pan. Grease a 9×9-inch pan or line it with parchment paper for easy removal later. Trust me, you’ll thank yourself when it’s time to cut those bars!
Step 2: Prepare the Crust
In a medium bowl, combine the all-purpose flour, granulated sugar, and salt. Stir them together until well mixed. Then, pour in the melted butter. Mix until the texture resembles coarse crumbs. This crumbly mixture is the foundation of your Rhubarb Dream Bars, so make sure it’s just right!
Step 3: Form the Crust
Now, take that crumbly mixture and press it firmly into the bottom of your prepared baking pan. Use your fingers or the back of a measuring cup to create an even layer. This solid base will hold all that delicious rhubarb filling, so don’t skip this step!
Step 4: Make the Filling
In another bowl, mix the chopped rhubarb with the granulated sugar, eggs, flour, vanilla extract, and baking powder. Stir until everything is well combined. The rhubarb should be evenly coated in the sweet mixture, creating a beautiful filling that’s both sweet and tangy.
Step 5: Assemble the Bars
Pour the rhubarb filling over the crust in the baking pan. Make sure to spread it out evenly. This ensures that every bite of your Rhubarb Dream Bars is packed with that delightful filling. It’s like a sweet surprise waiting to happen!
Step 6: Bake
Place the pan in your preheated oven and bake for 30-35 minutes. Keep an eye on it! You’ll know it’s done when the filling is set and the top is lightly golden. The aroma wafting through your kitchen will be irresistible!
Step 7: Cool and Cut
Once baked, remove the pan from the oven and let it cool completely on a wire rack. Patience is key here! Once cooled, cut the bars into squares. You’ll have a beautiful batch of Rhubarb Dream Bars ready to be devoured!
Tips for Success
- Use fresh rhubarb for the best flavor; it makes a world of difference.
- Don’t skip the cooling step; it helps the bars set properly.
- For a cleaner cut, use a sharp knife and wipe it between slices.
- Experiment with different fruits for a unique twist on the filling.
- Store leftovers in an airtight container to keep them fresh longer.
Equipment Needed
- 9×9-inch baking pan: Essential for baking your bars. A similar-sized dish works too.
- Mixing bowls: Use any size you have on hand for combining ingredients.
- Measuring cups and spoons: Accurate measurements are key; a kitchen scale can also help.
- Wire rack: Perfect for cooling; a plate can work in a pinch.
Variations
- Berry Blend: Swap out rhubarb for a mix of strawberries, blueberries, or raspberries for a fruity twist.
- Gluten-Free Option: Use a gluten-free flour blend in place of all-purpose flour for a gluten-free version.
- Vegan Delight: Replace eggs with flaxseed meal mixed with water and use coconut oil instead of butter.
- Cinnamon Spice: Add a teaspoon of cinnamon to the filling for a warm, cozy flavor.
- Nutty Crunch: Incorporate chopped nuts like walnuts or pecans into the crust for added texture.
Serving Suggestions
- Serve warm with a scoop of vanilla ice cream for a delightful contrast.
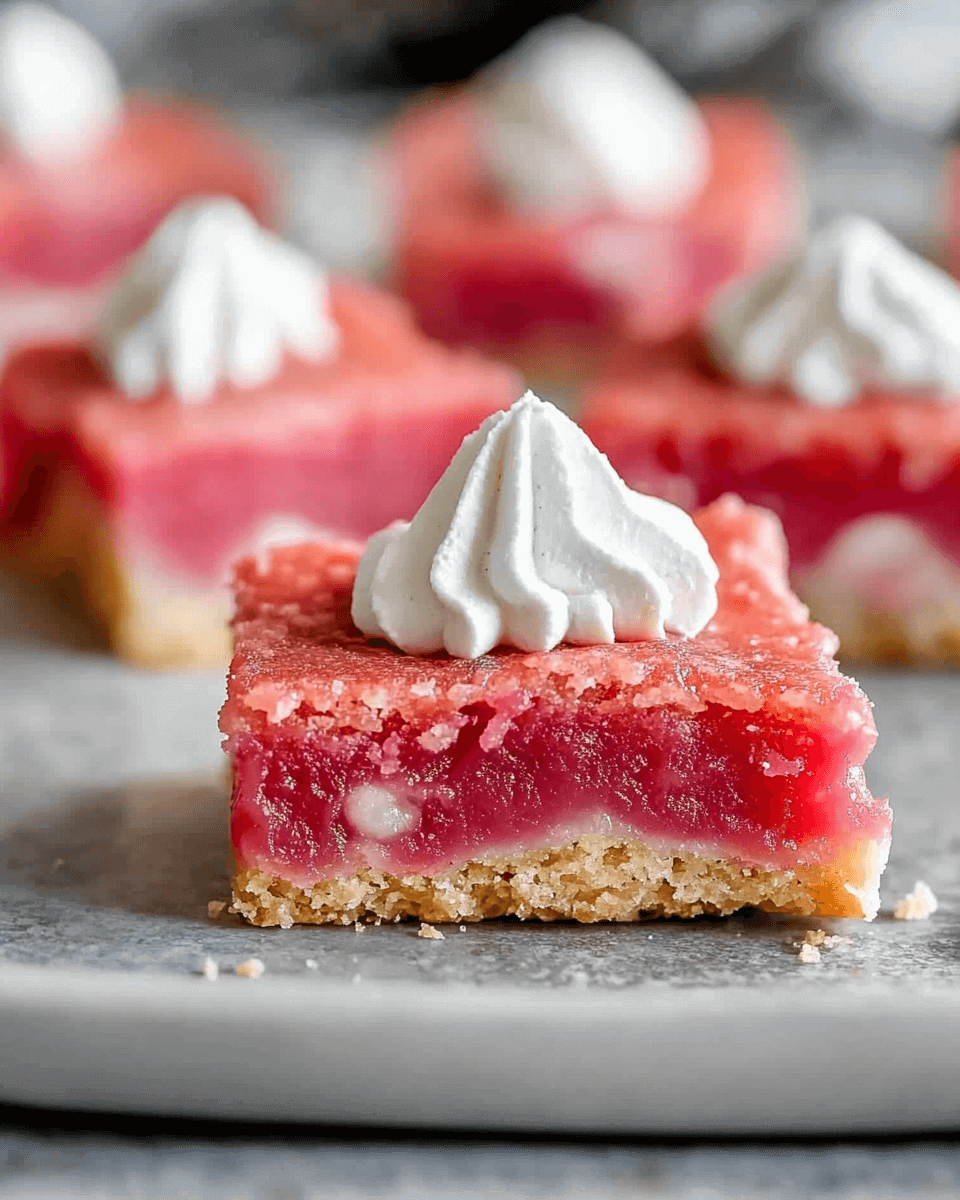
- Pair with a dollop of whipped cream to enhance the creamy texture.
- Drizzle with a bit of caramel sauce for an extra touch of sweetness.
- Enjoy with a cup of herbal tea for a cozy afternoon treat.
- Garnish with fresh mint leaves for a pop of color and freshness.
FAQs about Rhubarb Dream Bars
Curious about Rhubarb Dream Bars? You’re not alone! Here are some common questions I’ve encountered, along with answers to help you on your baking journey.
Can I use frozen rhubarb for this recipe?
Absolutely! Just make sure to thaw and drain the frozen rhubarb well before using it. This will prevent excess moisture in your filling.
How do I store leftover Rhubarb Dream Bars?
Store any leftovers in an airtight container at room temperature for up to three days. For longer storage, refrigerate them for up to a week.
Can I make these bars ahead of time?
Yes! You can prepare the bars a day in advance. Just cool them completely, cover, and refrigerate. They taste even better the next day!
What can I substitute for eggs in this recipe?
If you’re looking for an egg substitute, try using flaxseed meal mixed with water. One tablespoon of flaxseed meal combined with three tablespoons of water works well!
Are Rhubarb Dream Bars suitable for a gluten-free diet?
Yes! Simply swap the all-purpose flour for a gluten-free flour blend, and you’ll have a delicious gluten-free treat that everyone can enjoy.
Final Thoughts
Making Rhubarb Dream Bars is more than just baking; it’s about creating memories and sharing joy. The sweet-tart flavor of rhubarb combined with a buttery crust brings a sense of nostalgia that warms the heart. Whether you’re serving them at a family gathering or enjoying a quiet evening at home, these bars are sure to delight. They’re easy to whip up, making them a perfect choice for any occasion. So, roll up your sleeves, embrace the process, and let the delightful aroma fill your kitchen. You’ll find that every bite is a little piece of happiness!
PrintRhubarb Dream Bars: Discover This Delicious Recipe!
- Total Time: 50 minutes
- Yield: 9 servings
- Diet: Vegetarian
Description
Rhubarb Dream Bars are a delicious dessert featuring a crumbly crust topped with a sweet and tangy rhubarb filling.
Ingredients
- 1 ½ cups all-purpose flour
- ½ cup granulated sugar
- ½ teaspoon salt
- ½ cup unsalted butter, melted
- 2 cups fresh rhubarb, chopped (about 4-5 stalks)
- 1 cup granulated sugar (for filling)
- 2 large eggs
- 2 tablespoons all-purpose flour (for filling)
- 1 teaspoon vanilla extract
- ½ teaspoon baking powder
Instructions
- Preheat your oven to 350°F (175°C). Grease a 9×9-inch baking pan or line it with parchment paper for easy removal.
- In a medium bowl, combine 1 ½ cups flour, ½ cup sugar, and salt. Stir in the melted butter until the mixture is crumbly.
- Press this mixture firmly into the bottom of the prepared baking pan to form the crust.
- In another bowl, mix the chopped rhubarb with 1 cup sugar, eggs, 2 tablespoons flour, vanilla extract, and baking powder until well combined.
- Pour this rhubarb filling over the crust in the baking pan.
- Bake in the preheated oven for 30-35 minutes, or until the filling is set and the top is lightly golden.
- Allow the bars to cool completely in the pan on a wire rack before cutting into squares.
Notes
- These bars can be served warm or chilled.
- For a refreshing twist, consider serving them with a scoop of vanilla ice cream or a dollop of whipped cream.
- For a sweeter flavor, add a teaspoon of cinnamon to the filling mixture.
- You can substitute the rhubarb with strawberries or a mix of berries for a different fruity twist.
- Prep Time: 15 minutes
- Cook Time: 30-35 minutes
- Category: Dessert
- Method: Baking
- Cuisine: American
Nutrition
- Serving Size: 1 bar
- Calories: 180
- Sugar: 10g
- Sodium: 100mg
- Fat: 8g
- Saturated Fat: 5g
- Unsaturated Fat: 3g
- Trans Fat: 0g
- Carbohydrates: 24g
- Fiber: 1g
- Protein: 2g
- Cholesterol: 50mg