
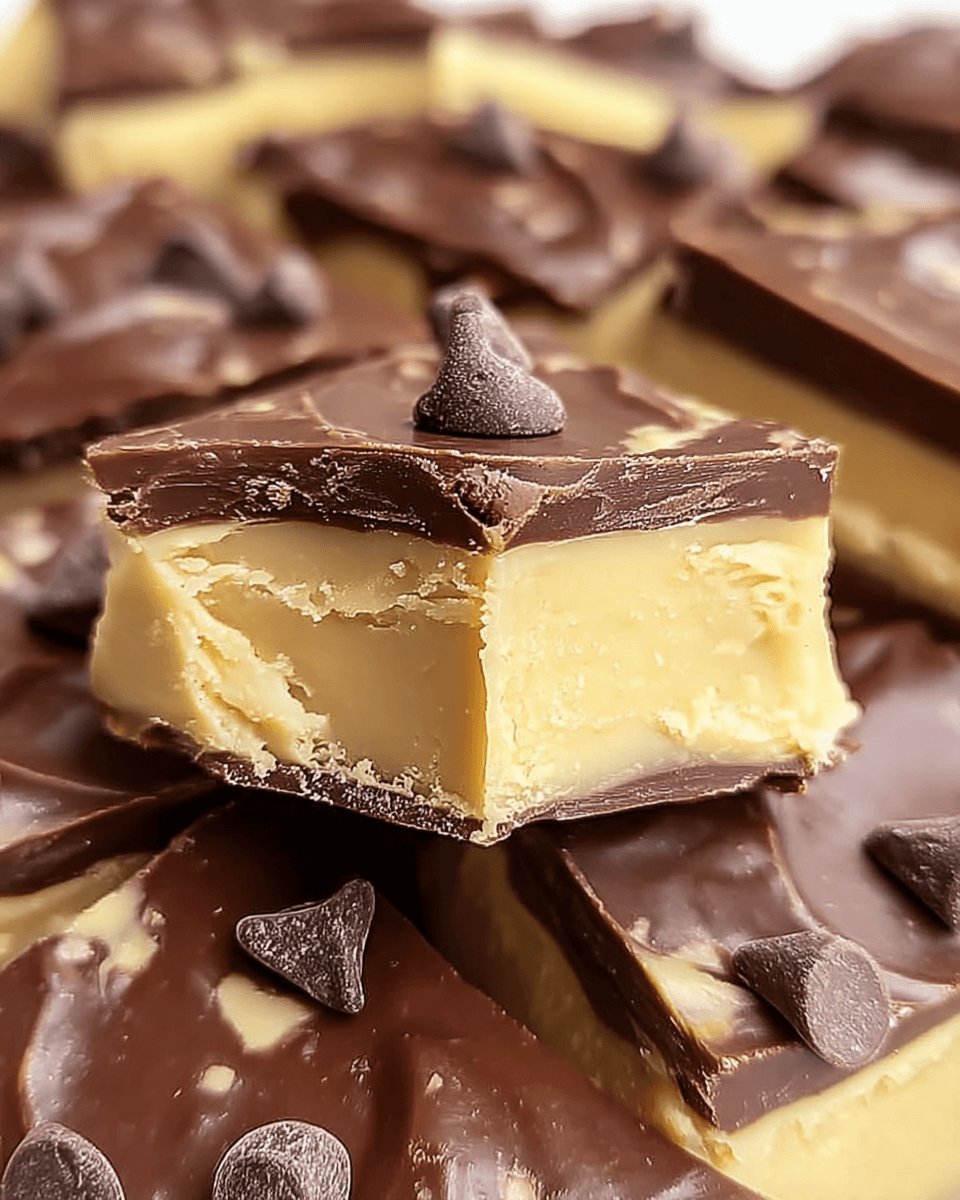
Introduction to Boston Cream Fudge
There’s something magical about the combination of chocolate and vanilla that takes me back to my childhood. Boston Cream Fudge is a delightful treat that captures that nostalgia perfectly. It’s rich, creamy, and oh-so-satisfying, making it an ideal dessert for any occasion. Whether you’re looking to impress your friends at a gathering or simply want to indulge after a long day, this recipe is your go-to solution. With just a few simple ingredients and minimal effort, you can whip up a batch of this irresistible fudge that will have everyone asking for seconds!
Why You’ll Love This Boston Cream Fudge
This Boston Cream Fudge is a dream come true for anyone craving a quick and delicious dessert. It’s incredibly easy to make, requiring just a handful of ingredients and minimal time. In about 25 minutes, you can create a rich, creamy treat that satisfies your sweet tooth. Plus, the combination of chocolate and vanilla flavors is simply irresistible, making it a hit with family and friends alike!
Ingredients for Boston Cream Fudge
Gathering the right ingredients is the first step to creating your Boston Cream Fudge masterpiece. Here’s what you’ll need:
- Granulated sugar: This is the sweet foundation of your fudge, providing that delightful sugary goodness.
- Heavy cream: Adds richness and creaminess, making your fudge melt in your mouth.
- Unsweetened cocoa powder: This brings the deep chocolate flavor that pairs beautifully with the vanilla.
- Unsalted butter: Enhances the texture and adds a touch of richness without the extra salt.
- Vanilla extract: A must-have for that warm, aromatic flavor that elevates the fudge.
- Salt: Just a pinch to balance the sweetness and enhance the overall flavor.
- Semi-sweet chocolate chips: These little gems add extra chocolatey goodness and a delightful texture.
- Powdered sugar: For dusting, this adds a lovely finishing touch and a bit of sweetness.
For those looking to mix things up, consider adding chopped walnuts or pecans for a nutty crunch. If you prefer a creamier texture, you can substitute half of the heavy cream with sweetened condensed milk. All ingredient quantities are listed at the bottom of the article for easy printing!
How to Make Boston Cream Fudge
Making Boston Cream Fudge is a straightforward process that anyone can master. Follow these simple steps, and you’ll have a delicious treat ready to impress your family and friends. Let’s dive into the sweet details!
Step 1: Combine Ingredients
Start by grabbing a medium saucepan. In it, combine the granulated sugar, heavy cream, unsweetened cocoa powder, unsalted butter, and salt. Stir everything together until well mixed. The key here is to ensure that the cocoa powder is fully incorporated, so you don’t end up with clumps. This mixture is the base of your fudge, and it’s where the magic begins!
Step 2: Boil and Simmer
Now, place the saucepan over medium heat. Bring the mixture to a gentle boil, stirring constantly. This step is crucial! Stirring helps prevent the sugar from burning and ensures a smooth texture. Once it reaches a boil, reduce the heat to low and let it simmer for about five minutes. Keep stirring! This will help thicken the fudge and develop that rich, creamy consistency we all love.
Step 3: Add Flavorings
After simmering, it’s time to add the flavor! Remove the saucepan from the heat and stir in the vanilla extract and semi-sweet chocolate chips. The chocolate chips will melt into the warm mixture, creating a luscious, chocolatey blend. Make sure to stir until everything is smooth and well combined. This is where your Boston Cream Fudge starts to shine!
Step 4: Pour and Set
Next, grab your greased 8×8-inch square baking dish. Carefully pour the fudge mixture into the dish, spreading it evenly with a spatula. This step is all about getting that perfect thickness. Once poured, let the fudge cool at room temperature for about two hours or until it’s fully set. Patience is key here; the wait will be worth it!
Step 5: Cut and Serve
Once the fudge has set, it’s time for the fun part—cutting and serving! Use a sharp knife to cut the fudge into squares. For a beautiful finish, dust the top with powdered sugar. This adds a touch of sweetness and makes your fudge look even more tempting. Now, it’s ready to be enjoyed! Share it with friends or keep it all to yourself—no judgment here!
Tips for Success
- Make sure to stir constantly while boiling to prevent burning.
- Use a candy thermometer to check for the right temperature, aiming for 234°F for perfect fudge.
- Let the fudge cool completely before cutting for cleaner edges.
- Store leftovers in an airtight container to keep them fresh.
- Experiment with flavors by adding a pinch of espresso powder for a mocha twist!
Equipment Needed
- Medium saucepan: A sturdy pot works well; just ensure it has a heavy bottom to prevent burning.
- Spatula: A silicone spatula is great for mixing and scraping the sides.
- Baking dish: An 8×8-inch square dish is ideal; you can also use a similar-sized pan.
- Sharp knife: For cutting the fudge into perfect squares.
Variations
- Nutty Delight: Add 1/2 cup of chopped walnuts or pecans for a crunchy texture and nutty flavor.
- Mint Chocolate: Stir in 1/2 teaspoon of peppermint extract for a refreshing twist on the classic fudge.
- Peanut Butter Swirl: Mix in 1/2 cup of creamy peanut butter before pouring into the baking dish for a rich, nutty flavor.
- Vegan Option: Substitute heavy cream with coconut cream and use dairy-free chocolate chips for a vegan-friendly treat.
- Spicy Kick: Add a pinch of cayenne pepper or chili powder for a surprising heat that complements the chocolate.
Serving Suggestions
- Pair your Boston Cream Fudge with a scoop of vanilla ice cream for a delightful contrast.
- Serve alongside a rich cup of coffee or a creamy latte to enhance the chocolate flavors.
- For a festive touch, arrange fudge squares on a decorative platter with fresh berries.
- Drizzle with caramel sauce for an extra layer of sweetness and visual appeal.
FAQs about Boston Cream Fudge
Can I make Boston Cream Fudge ahead of time?
Absolutely! Boston Cream Fudge can be made a few days in advance. Just store it in an airtight container at room temperature. This allows the flavors to meld beautifully, making it even more delicious when you’re ready to serve.
What’s the best way to store leftover fudge?
To keep your fudge fresh, store it in an airtight container. You can also layer the fudge squares with parchment paper to prevent sticking. It should last for about a week, but I doubt it will last that long!
Can I use different types of chocolate?
Definitely! While semi-sweet chocolate chips are a classic choice, feel free to experiment with dark chocolate or even white chocolate for a unique twist. Just remember that the flavor will change slightly based on your choice.
Why is my fudge too soft?
If your fudge is too soft, it may not have reached the right temperature during cooking. Make sure to stir constantly and check the temperature with a candy thermometer. Aim for 234°F for that perfect fudge consistency!
Can I add flavors to my Boston Cream Fudge?
Yes! You can easily customize your fudge by adding flavors like mint extract, espresso powder, or even a swirl of peanut butter. Get creative and make it your own!
Final Thoughts
Creating Boston Cream Fudge is more than just whipping up a dessert; it’s about crafting a moment of joy. The rich, creamy texture and the delightful blend of chocolate and vanilla can turn an ordinary day into something special. Whether you’re sharing it with loved ones or savoring it solo, each bite is a reminder of the simple pleasures in life. This recipe invites you to indulge your sweet tooth while also bringing a touch of nostalgia to your kitchen. So, roll up your sleeves and dive into this delicious adventure—you won’t regret it!
Boston Cream Fudge: Discover This Irresistible Recipe!
Ingredients
Method
- In a medium saucepan, combine granulated sugar, heavy cream, cocoa powder, butter, and salt. Stir over medium heat until the mixture comes to a boil.
- Once boiling, reduce the heat to low and let it simmer for about 5 minutes, stirring constantly.
- Remove the saucepan from heat and stir in the vanilla extract and chocolate chips until melted and smooth.
- Pour the fudge mixture into a greased 8x8-inch square baking dish, spreading it evenly.
- Allow the fudge to cool at room temperature for about 2 hours or until set.
- Once set, cut the fudge into squares and dust with powdered sugar before serving.
Nutrition
Notes
- For a nutty flavor, add 1/2 cup of chopped walnuts or pecans to the fudge mixture before pouring it into the baking dish.
- For a creamier texture, substitute half of the heavy cream with sweetened condensed milk.