
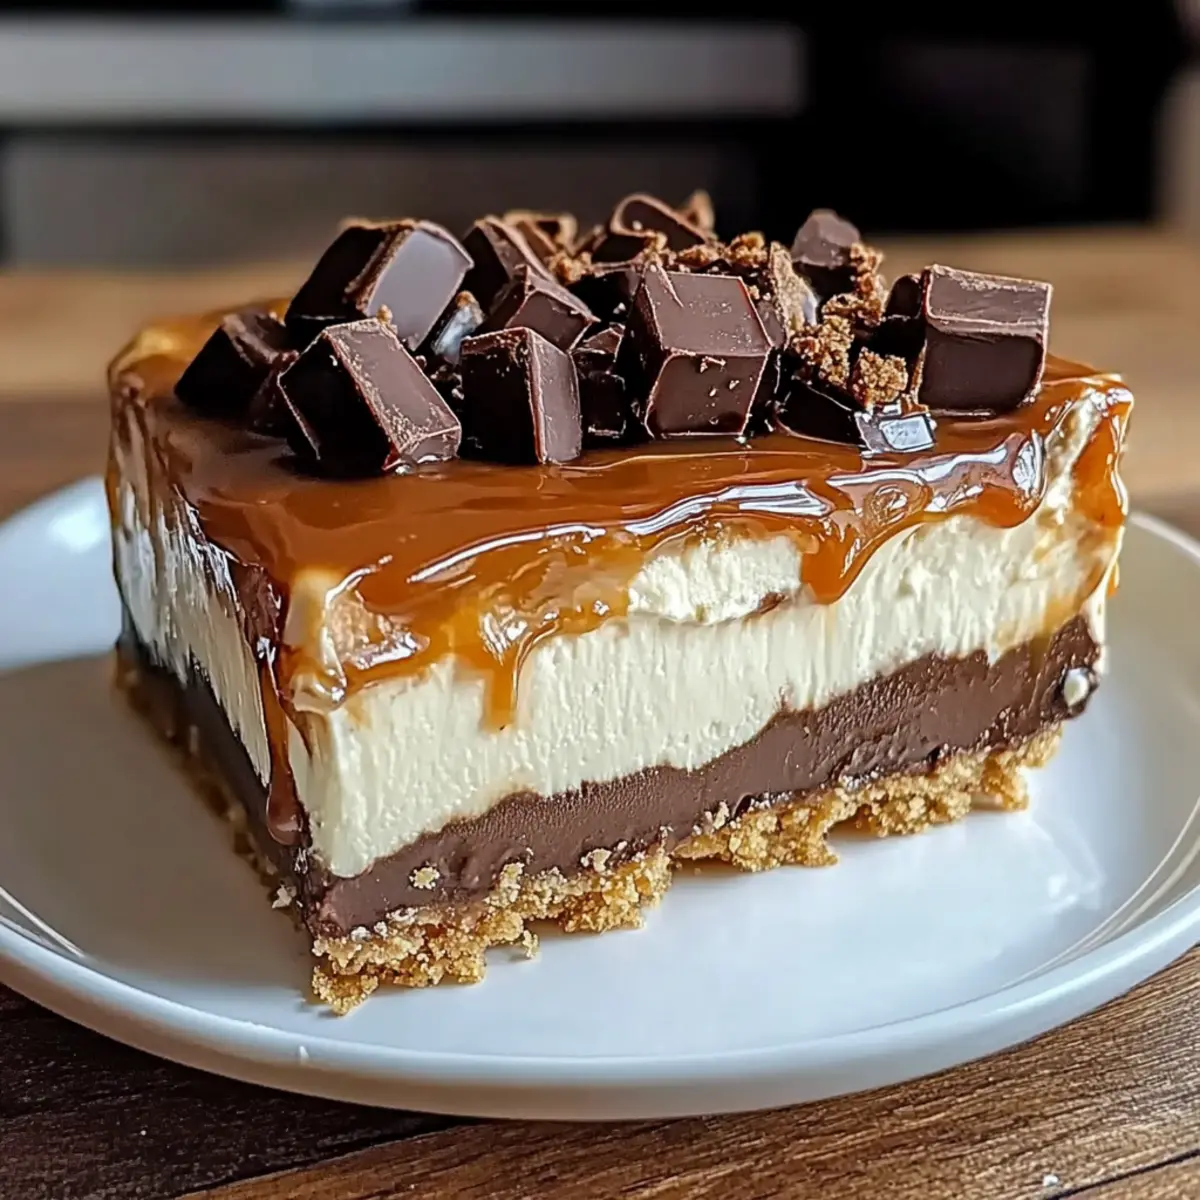
As I pulled the chilled cheesecake from the fridge, I could practically hear the cheers from my family waiting at the table. This Homemade No-Bake Twix Cheesecake has quickly become my go-to dessert for any gathering, effortlessly blending creamy cheesecake, sweet caramel, and rich chocolate. The best part? It’s a breeze to whip up, making it perfect for both seasoned home chefs and those just starting their culinary journey. Plus, with gluten-free and potential dairy-free swaps, everyone can enjoy a slice of this delightful treat. Ready to dive into a dessert that feels indulgent yet surprisingly simple? Let’s get started!
Why Is This Cheesecake So Irresistible?
No-Bake Convenience: No need for baking! This cheesecake comes together easily, making it perfect for quick gatherings.
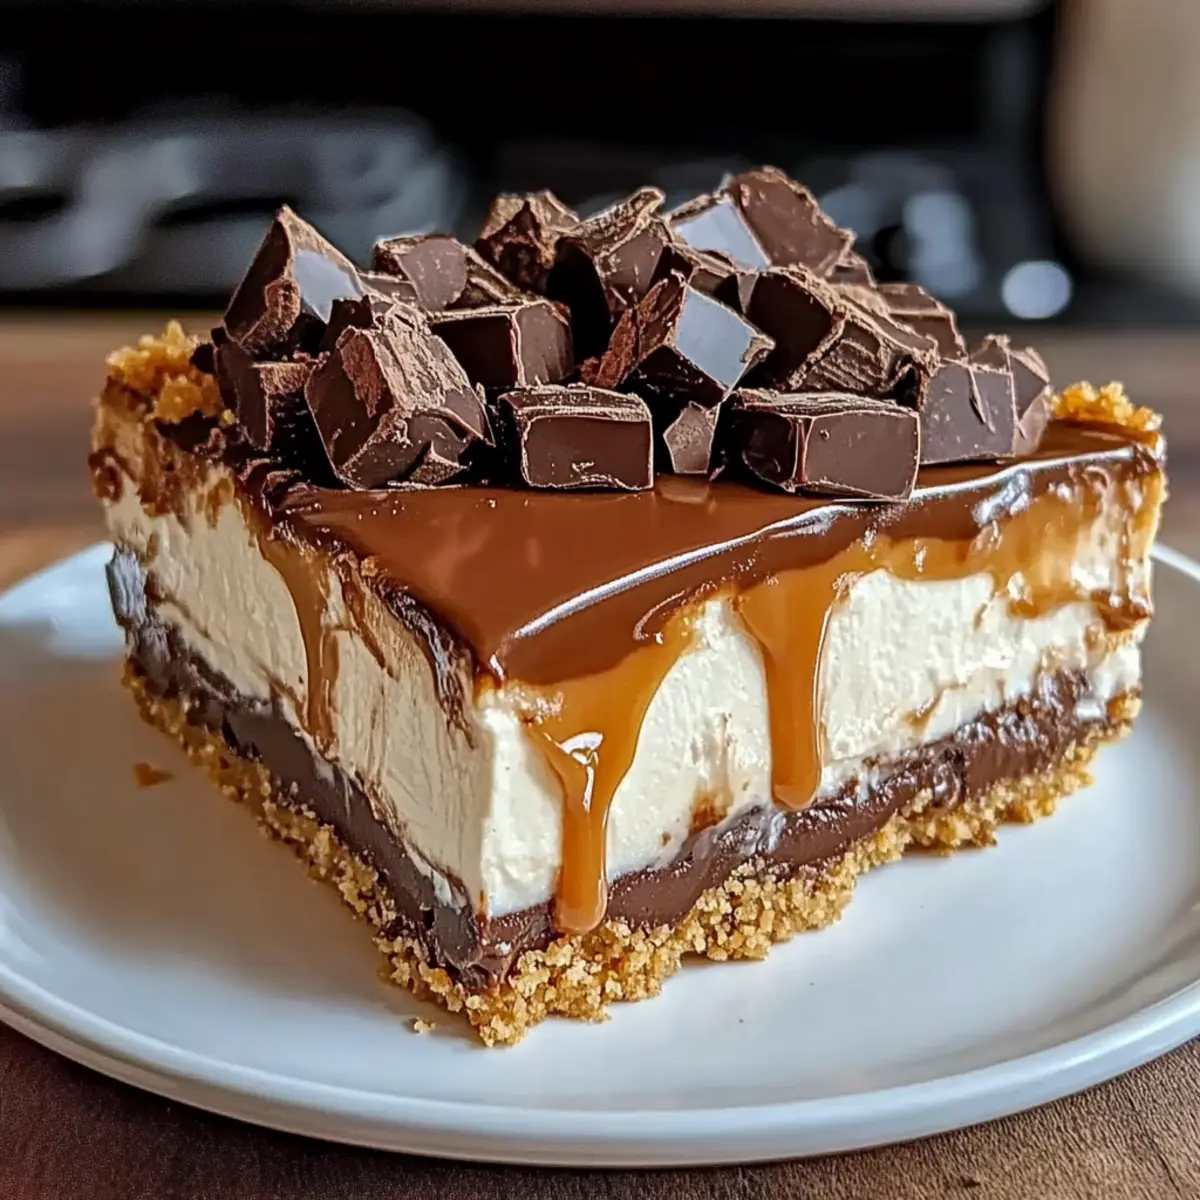
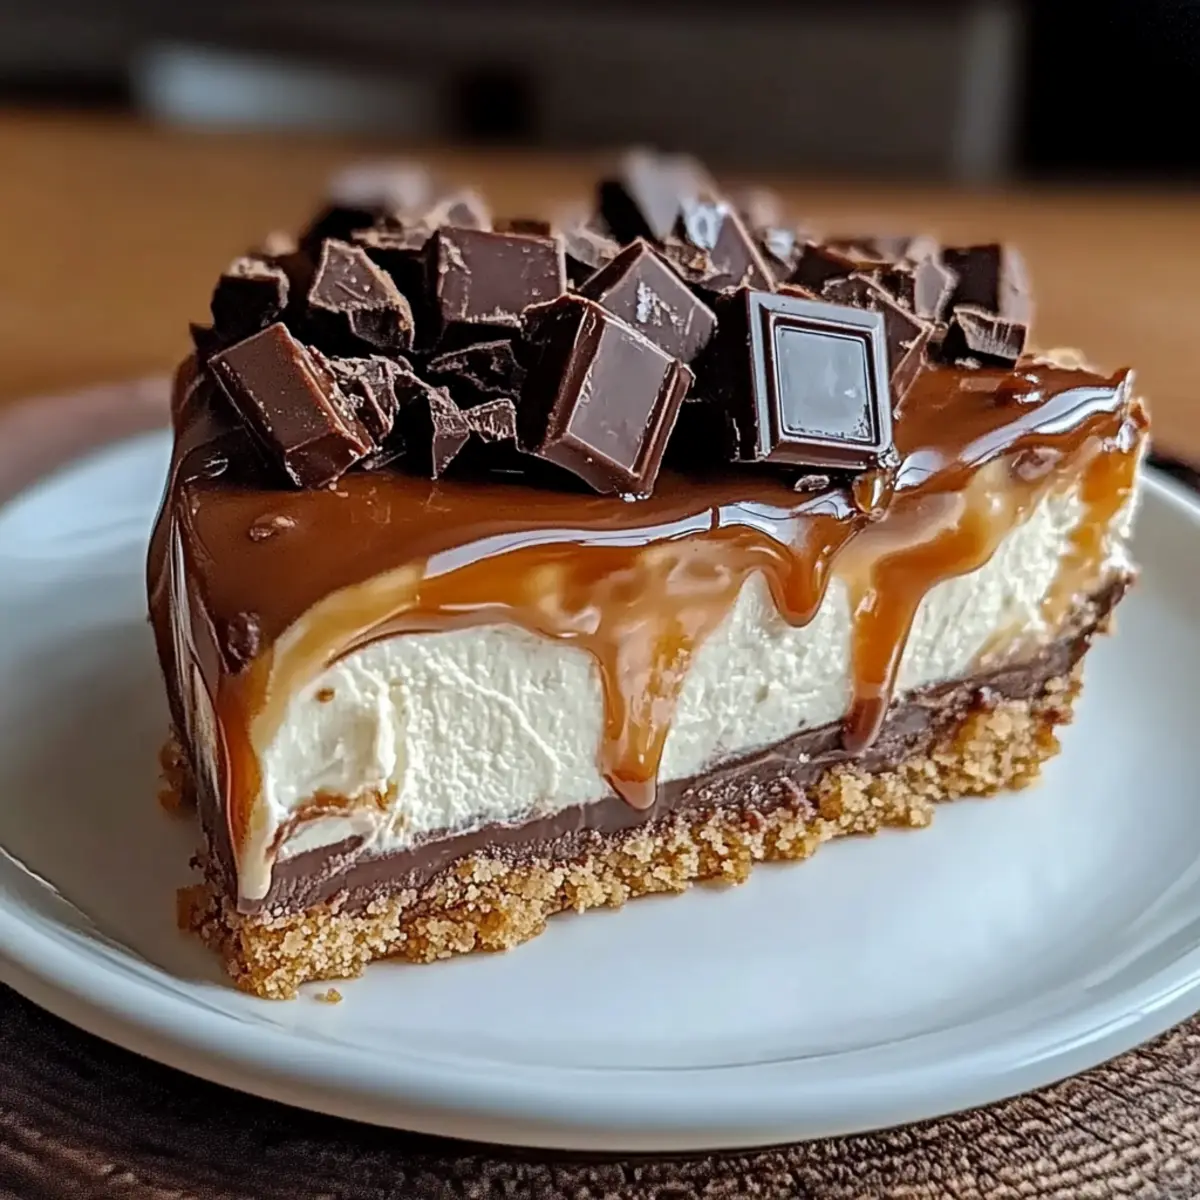
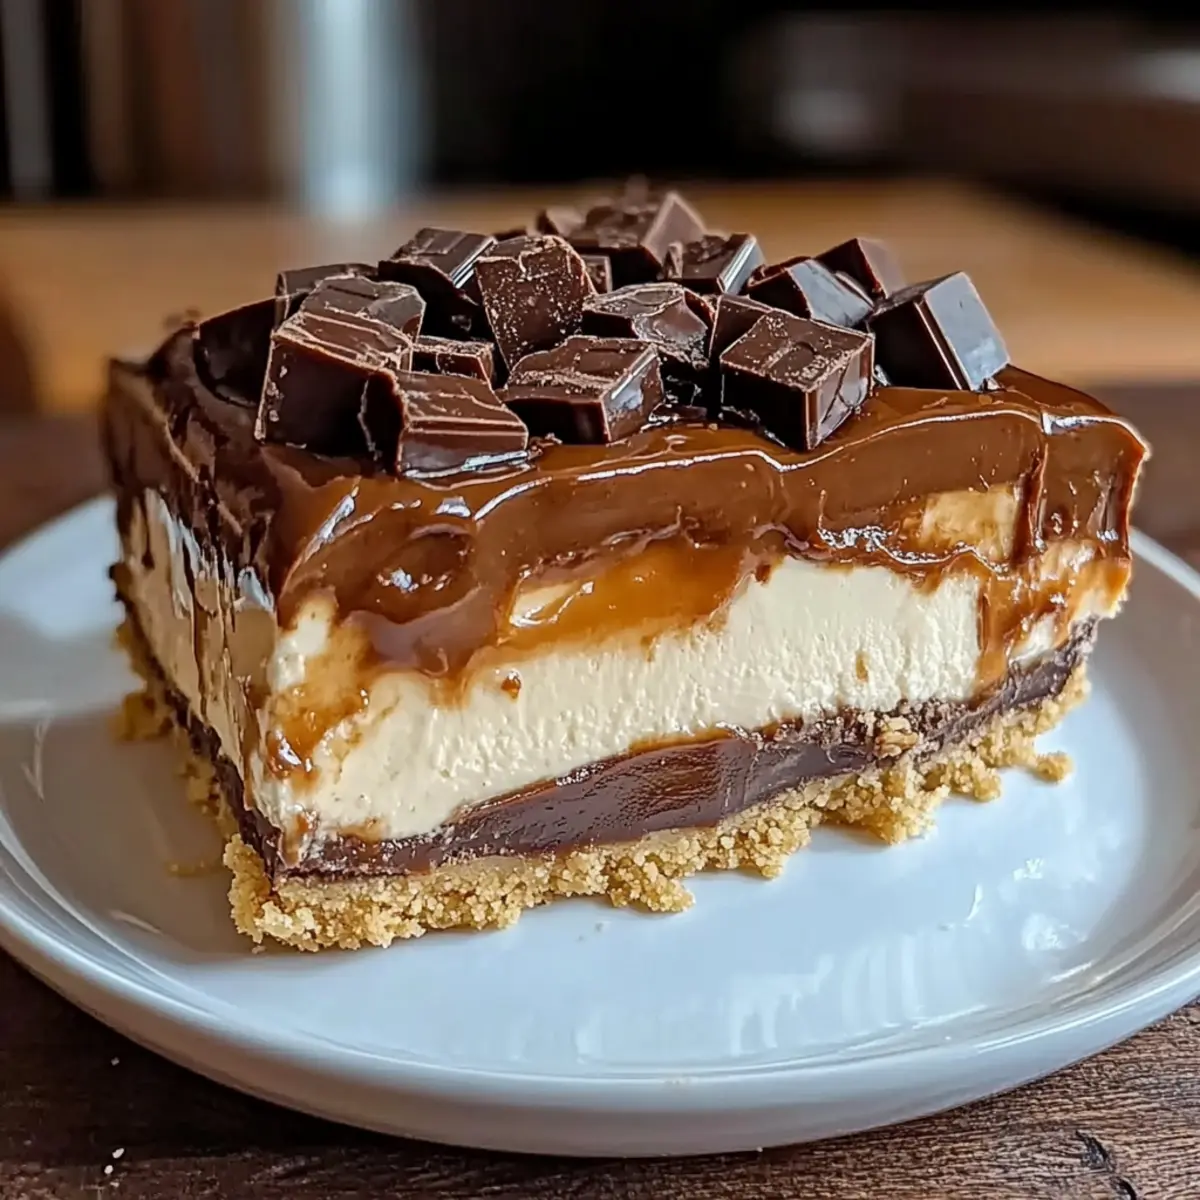
Decadent Layers: With creamy cheesecake, gooey caramel, and rich chocolate, every slice is a burst of flavor.
Adaptable Recipe: Easily make it gluten-free or dairy-free without sacrificing taste. Your friends will never know it’s healthier!
Crowd-Pleaser: Whether it’s a family dinner or a potluck, this cheesecake will have everyone asking for seconds.
Impressive Presentation: The layered look and optional chocolate drizzle make it a stunning centerpiece that’ll wow your guests.
Delight your taste buds with a slice, and if you’re in the mood for more sweet indulgences, check out Apple Crumble Cheesecake or Butterfinger Cheesecake Bars for delightful variations!
No-Bake Twix Cheesecake Ingredients
For the Crust
• Graham Cracker Crumbs – Provides a crunchy base; substitute with gluten-free graham crackers if needed.
• Melted Butter – Binds the crust together; make sure it’s fully melted for smooth mixing.
For the Chocolate Layer
• Chocolate Chips (1 cup) – Adds richness to the layer; choose dark or milk chocolate based on your preference.
• Heavy Cream (½ cup) – Enhances creaminess; can use dairy-free cream for a vegan option.
For the Cheesecake Filling
• Cream Cheese (2 cups, softened) – The heart of the filling for a smooth texture; let it warm at room temperature to avoid lumps.
• Powdered Sugar (½ cup) – Sweetens the filling; adjust for your desired level of sweetness.
• Vanilla Extract (1 tsp) – Adds depth of flavor to the cheesecake.
• Whipped Cream (1 cup) – Lightens up the filling for a fluffy texture; substitute with dairy-free whipped cream if needed.
For the Topping
• Caramel Sauce (1 cup) – Adds gooey sweetness that ties all the flavors together; can be swapped with dulce de leche for a twist.
• Optional Drizzle Ingredients:
- Chocolate Chips (¼ cup) + Heavy Cream (1 tbsp) – Melt together for an elegant swirl on top.
Step‑by‑Step Instructions for No-Bake Twix Cheesecake
Step 1: Make the Crust
In a mixing bowl, combine graham cracker crumbs and melted butter until they resemble wet sand. Press this mixture firmly into the base of a springform pan, ensuring it’s evenly distributed. This will form the crust for your No-Bake Twix Cheesecake. Refrigerate the crust for 10 minutes to allow it to set and harden.
Step 2: Prepare the Chocolate Layer
In a microwave-safe bowl, combine the chocolate chips and heavy cream. Heat the mixture in 20-second intervals, stirring well after each interval until the chocolate is completely melted and smooth. Once ready, carefully spread the chocolate mixture over the chilled crust, creating a luscious layer. Refrigerate for 15-20 minutes until the chocolate is set.
Step 3: Make the Cheesecake Filling
In a large mixing bowl, beat the softened cream cheese with powdered sugar and vanilla extract until the mixture is creamy and smooth, free from lumps. This step is crucial for a delightful texture in your No-Bake Twix Cheesecake. Gently fold in the whipped cream until fully incorporated, creating a fluffy filling.
Step 4: Assemble the Layers
Spread the prepared cheesecake filling evenly over the set chocolate layer, using a spatula to smooth it out. Drizzle the caramel sauce on top, ensuring it is evenly distributed for a sweet contrast. This adds not just flavor but also a beautiful appearance to the cheesecake.
Step 5: Final Touch
For an elegant finish, melt the optional chocolate chips with heavy cream in a small bowl, stirring until smooth. Drizzle this mixture over the caramel layer, adding a decorative touch. Cover the cheesecake and refrigerate for at least 4 hours, or until firm, allowing all the flavors to meld beautifully.
Expert Tips for No-Bake Twix Cheesecake
-
Room Temperature Cream Cheese: Ensure your cream cheese is at room temperature for a smooth, lump-free filling. This makes a world of difference in texture!
-
Chill for Flavor: Allow the cheesecake to chill for at least 4 hours, or even better, overnight. This enhances the flavors and gives it the ideal texture.
-
Warm Knife Slices: Dip your knife in hot water before slicing the cheesecake. This helps achieve clean, beautiful cuts without messy edges.
-
Quality Chocolate Matters: Using high-quality chocolate for the chocolate layer elevates the flavor, making your No-Bake Twix Cheesecake truly decadent.
-
Adjust Sweetness: Taste your filling before spreading it over the crust. Feel free to adjust the powdered sugar according to your preferences—some like it sweeter than others!
-
Gluten-Free Living: For gluten-free needs, substitute graham crackers with gluten-free versions and double-check all ingredients for hidden gluten.
How to Store and Freeze No-Bake Twix Cheesecake
Fridge: Store leftovers in an airtight container for up to 5 days. It’s best enjoyed chilled, so keep it refrigerated until you’re ready to serve.
Freezer: For longer storage, wrap individual slices in foil and freeze for up to 3 months. When you’re ready to enjoy a slice, simply thaw it in the fridge overnight.
Reheating: This cheesecake is served cold, so there’s no reheating required. Just slice, serve, and savor the luscious layers of your No-Bake Twix Cheesecake!
Make-Ahead: Feel free to prepare the cheesecake up to 2 days in advance. The flavors meld beautifully as it chills, making it even more delicious!
Make Ahead Options
These Homemade No-Bake Twix Cheesecakes are perfect for meal prep enthusiasts! You can prepare the crust and chocolate layer up to 24 hours in advance. Simply mix the graham cracker crumbs with melted butter, press into your springform pan, and refrigerate. For the chocolate layer, melt the chocolate chips and heavy cream, spread over the chilled crust, and refrigerate again. When you’re ready to serve, whip up the cheesecake filling by beating the cream cheese with powdered sugar and vanilla, fold in whipped cream, and assemble the layers. This way, the flavors meld beautifully, and your dessert will be just as delicious, making it ideal for busy weeknights or gatherings!
No-Bake Twix Cheesecake Variations
Feel free to tailor your dessert experience with these delightful twists and substitutions!
- Gluten-Free: Use gluten-free graham crackers for the crust while ensuring all other ingredients are gluten-free.
- Dairy-Free: Swap the cream cheese and whipped cream for dairy-free alternatives, making this cheesecake perfect for vegan diets.
- Chocolate Lovers: Add an extra layer of your favorite chocolate ganache or chocolate sauce for a more intense flavor experience.
- Nutty Crunch: Mix in chopped nuts, like almonds or pecans, into the crust for an added crunch and flavor twist. Think of it as a delightful surprise!
- Salted Caramel: Instead of regular caramel sauce, drizzle with salted caramel for that sweet-and-salty combination that everyone adores.
- Fruit Toppings: Enhancing with fresh fruit, such as sliced strawberries or raspberries, adds a beautiful pop of color and freshness to each slice.
- Lemon Zest: Incorporate lemon zest into the cream cheese filling to provide a refreshing tang that balances the sweetness beautifully.
- Flavor Fusion: Try adding a hint of coffee or espresso powder to the chocolate layer for a mocha kick that takes your cheesecake to a whole new level.
For more sweet inspirations, you might love our Carrot Cake Cheesecake or want to dive into Red Velvet Cheesecake, each offering unique flavors for every occasion!
What to Serve With No-Bake Twix Cheesecake
Imagine a dreamy dessert experience where creamy layers dance on your palate, paired brilliantly with the right companions.
- Fresh Berries: The tartness of strawberries or raspberries cuts through the sweetness, adding a refreshing contrast that brightens each bite.
- Whipped Cream: A light dollop on top adds a fluffy texture that complements the cheesecake’s rich creaminess, taking indulgence to the next level.
- Coffee or Espresso: The bitter notes from coffee enhance the sweetness of the cheesecake, creating a balanced flavor explosion that warms the soul.
- Chocolate-Covered Pretzels: Their salty crunch offers a delightful contrast to the smooth layers of the cheesecake, providing a fun textural experience.
- Vanilla Ice Cream: A scoop of creamy vanilla ice cream adds an additional layer of smoothness and coldness, making every bite feel even more decadent.
- Caramel Drizzle: Extra caramel on the plate stacks sweetness and richness, while drawing out the cheesecake’s flavors beautifully.
- Nutty Biscotti: Dipping crunchy biscotti into the cheesecake adds a satisfying crunch and a nutty flavor that complements the dessert’s sweetness.
- Mint Leaves: A sprig of fresh mint as garnish brightens the presentation, adding an aromatic element that refreshes the palate.
- Pecan Pie Bars: Their sweet, nutty texture beautifully pairs with the cheesecake, creating a delightful dessert duo for gatherings or celebrations.
No-Bake Twix Cheesecake Recipe FAQs
What kind of graham cracker crumbs should I use for the crust?
You can use regular graham cracker crumbs, but if you’re looking for a gluten-free option, I recommend using gluten-free graham crackers. They provide the same crunch and flavors without the gluten, ensuring everyone can enjoy the cheesecake!
How should I store my No-Bake Twix Cheesecake?
Store any leftovers in an airtight container in the refrigerator for up to 5 days. It’s best enjoyed chilled, so remember to keep it cold until you’re ready to serve. Just slice it, and the cheesecake will remain tasty and fresh!
Can I freeze No-Bake Twix Cheesecake?
Absolutely! To freeze, wrap individual slices tightly in foil and place them in a freezer-safe bag. The cheesecake can be frozen for up to 3 months. When you’re ready to indulge, simply transfer a slice to the refrigerator and let it thaw overnight.
What should I do if my cheesecake filling is lumpy?
If your cheesecake filling ends up lumpy, don’t worry! Make sure your cream cheese is completely softened before mixing; this helps a lot. If you still find lumps, you can use a hand mixer or stand mixer to beat it more thoroughly until smooth. Another tip is to ensure that you’re folding the whipped cream gently to maintain that light, airy texture.
Is this cheesecake safe for pets or people with dietary restrictions?
This No-Bake Twix Cheesecake is not safe for pets, especially dogs, as chocolate and certain ingredients like cream can be harmful to them. For those with dietary restrictions, you can easily make it dairy-free by using plant-based cream cheese and whipped cream alternatives. Always check labels for potential allergens to ensure everyone’s safety!
Irresistible No-Bake Twix Cheesecake for Sweet Tooth Cravings
Ingredients
Equipment
Method
- In a mixing bowl, combine graham cracker crumbs and melted butter until they resemble wet sand. Press this mixture firmly into the base of a springform pan, ensuring it's evenly distributed. Refrigerate the crust for 10 minutes to allow it to set and harden.
- In a microwave-safe bowl, combine the chocolate chips and heavy cream. Heat the mixture in 20-second intervals, stirring well after each interval until the chocolate is completely melted and smooth. Once ready, carefully spread the chocolate mixture over the chilled crust, creating a luscious layer. Refrigerate for 15-20 minutes until the chocolate is set.
- In a large mixing bowl, beat the softened cream cheese with powdered sugar and vanilla extract until the mixture is creamy and smooth, free from lumps. Gently fold in the whipped cream until fully incorporated, creating a fluffy filling.
- Spread the prepared cheesecake filling evenly over the set chocolate layer, using a spatula to smooth it out. Drizzle the caramel sauce on top, ensuring it is evenly distributed.
- Melt the optional chocolate chips with heavy cream in a small bowl, stirring until smooth. Drizzle this mixture over the caramel layer, adding a decorative touch. Cover the cheesecake and refrigerate for at least 4 hours, allowing all the flavors to meld beautifully.