
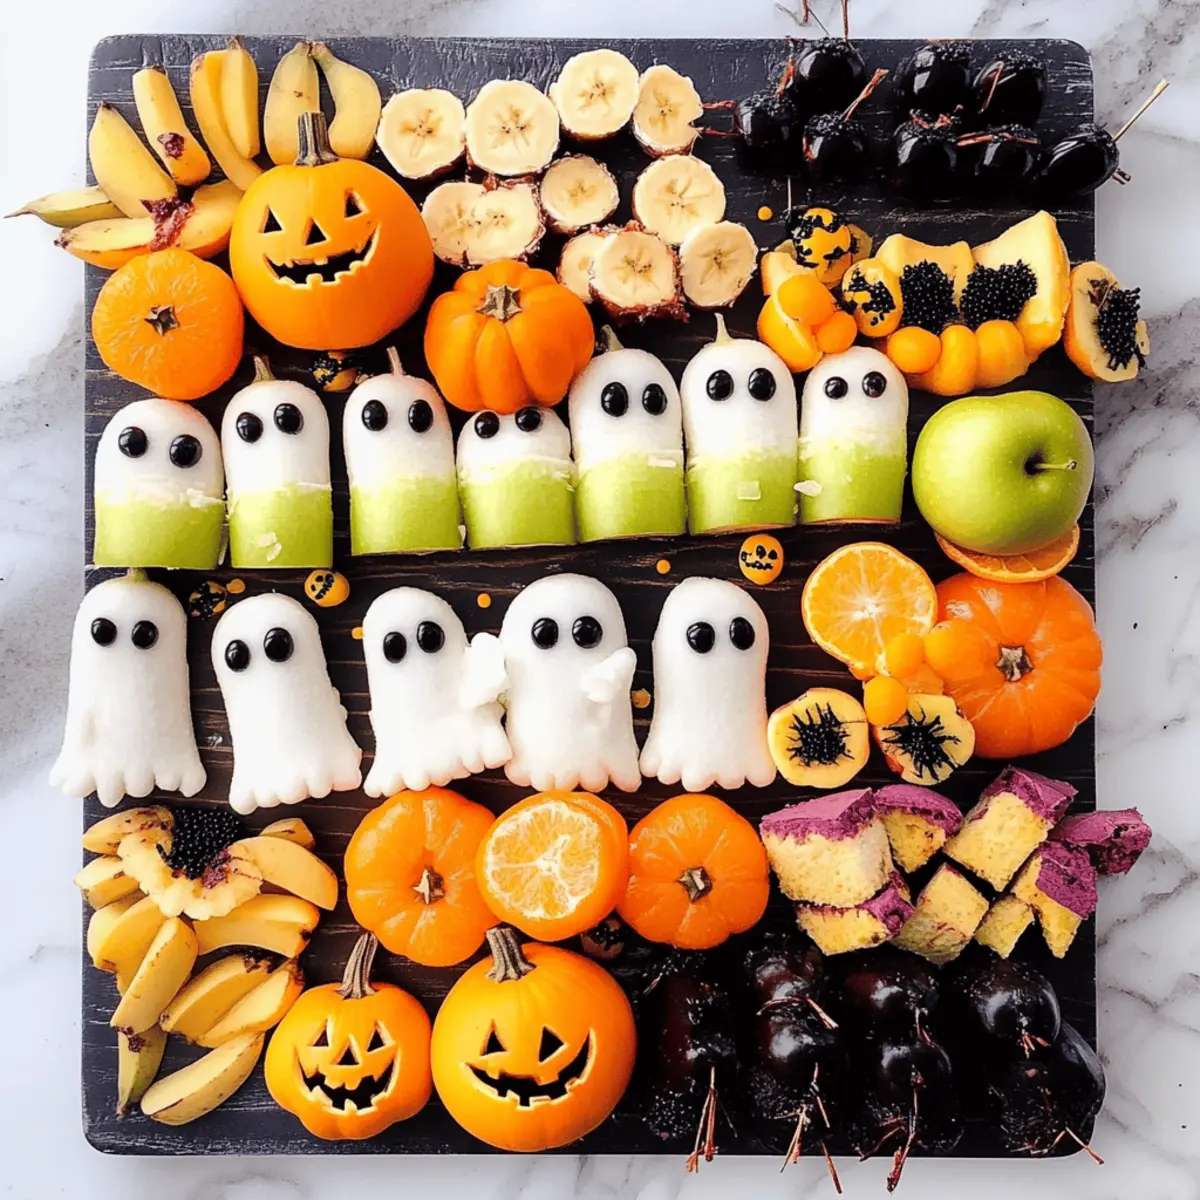
As the leaves turn amber and the crisp air whispers hints of Halloween, I can almost hear the excited giggles of kids preparing for a day of spooky fun. This Halloween, let’s take a break from the usual candy frenzy and dive into a delightful Halloween Snack Board for Kids—an adventure filled with cute ghost sandwiches, playful banana ghosts, and charming clementine pumpkins. With just a bit of assembly, you can create a feast that is not only a blast to eat but also packs in the nutrients. These easy, kid-friendly snacks won’t just keep the little ones happy; they’ll spark creativity and keep everyone feeling good. Ready to transform your Halloween table into a colorful, healthy treat that will enchant your little ghouls? Let’s get crafting!
Why Is This Snack Board a Spooky Hit?
Creativity Unleashed: The Halloween Snack Board inspires kids to engage with their food creatively, making healthy snacks exciting and fun.
Quick Assembly: With minimal prep, you can whip up this delightful spread in no time—ideal for busy parents!
Nutritious Options: Packed with fruits and wholesome ingredients, these snacks keep their energy up for all those pumpkin hunts!
Versatile Treats: Feel free to mix and match snacks; swap out clementines for Fun Bake Cookie or replace ghost sandwiches with Cranberry Pistachio!
Kid-Friendly Fun: Especially designed with little hands in mind, this board invites kids to help assemble their own healthy treats, ensuring they’ll love every bite!
Halloween Snack Board for Kids Ingredients
For the Clementine Pumpkins
- Clementines – Naturally sweet and healthy; perfect for little hands.
- Celery Stick – Adds crunch and acts as a stem; any sturdy vegetable can also work.
For the Ghost Mini Peppers
- Sweet Mini Peppers – Provides a fun base for spooky ghost decorations; regular bell peppers can suffice.
- Icing Sugar (½ cup) – Used to create a thick icing for attaching sugar eyes; store-bought icing can be a time-saver.
- Cold Water (2 ½ teaspoons) – Mix this with icing sugar to achieve the right consistency.
- Edible Sugar Eyeballs – Decorate the mini peppers with these for a fun spooky appearance; chocolate chips can be used as an alternative.
For the Fruit Skewers
- Cantaloupe Melon – Juicy base for delicious skewers; honeydew melon is a good alternative.
- Black Grapes – Sweet and provide a lovely contrast on skewers; any dark-colored grape can work fine.
- White Marshmallows – Used on skewers for playful shapes; mini marshmallows can substitute easily.
- Dark Chocolate Chips – Perfect for drawing funny faces on marshmallows; milk chocolate can be used if preferred.
For the Ghost Sandwiches
- White Bread – The base for creating adorable ghost sandwiches; opt for whole grain or gluten-free if needed.
- Simple Filling (ham/cheese) – Creates the ghostly sandwich; any spreadable filling can be delicious.
- Black Olives – These serve as the eyes for ghost sandwiches; any dark-colored olives will do.
For the Banana Ghosts
- Bananas – The star of the banana ghosts; plantains can work as another option.
For the Zombie Apple Mouths
- Green/Red Apples – Sliced to create the zombie mouths; any fresh apple variety is suitable.
- Smooth Thick Peanut Butter – Holds the apple slices together, creating “mouths”; almond butter can be an alternative but avoid oily kinds.
- White Mini Marshmallows – These serve as “teeth” for the zombie mouths; large marshmallows cut into pieces are good as well.
For Extra Fun
- Store-bought Halloween snacks (e.g., cheesy crisps, chocolates) – Adds variety to the board; any festive snacks can add to the fun.
This Halloween Snack Board for Kids is the perfect way to enjoy healthy, playful snacks that are both delicious and fun to make!
Step‑by‑Step Instructions for Halloween Snack Board for Kids
Step 1: Prepare the Clementine Pumpkins
Begin by slicing celery sticks lengthwise to create small stems for the clementines. Carefully insert the celery pieces into the top of each clementine, transforming them into adorable pumpkin pals. After assembly, wrap them in plastic wrap and chill in the fridge for about 30 minutes, allowing the flavors to meld.
Step 2: Make Ghost Mini Peppers
In a mixing bowl, combine icing sugar with cold water, stirring until you achieve a thick icing consistency, similar to toothpaste. Set it aside for a few minutes to thicken further if needed. Next, take your sweet mini peppers and dip the tops into the icing, then place them in the fridge to chill for around 15 minutes. Once firm, you can decorate them with edible sugar eyeballs.
Step 3: Assemble Fruit Skewers
Grab some wooden skewers and start threading alternating pieces of cantaloupe melon cubes, black grapes, and white marshmallows onto each skewer. Aim for a colorful mix, leaving space at the end for easy handling. After the skewers are filled, place them on a tray and melt dark chocolate chips in the microwave for about 30 seconds, then use it to draw funny faces on the marshmallows. Let the skewers set at room temperature.
Step 4: Create Ghost Sandwiches
Take two slices of white bread and layer your choice of filling (like ham or cheese) between them. Use a ghost-shaped cookie cutter to cut out your sandwiches, making them festive. Place the completed ghost sandwiches on a plate, and for the finishing touch, add sliced black olives as eyes. Chill for about 15 minutes in the fridge to firm up before serving.
Step 5: Prepare Banana Ghosts
Peel several bananas and place them on a plate. Next, melt some dark chocolate chips in the microwave to make it easier to draw faces. Use a toothpick or a piping bag to create spooky expressions on the bananas. This step is best done right before serving to keep the bananas looking fresh and appealing.
Step 6: Assemble Zombie Apple Mouths
Slice fresh apples horizontally to form two “lips” for each mouth. Spread a generous layer of smooth thick peanut butter on one slice and place mini marshmallows on top to act as “teeth.” Complete the mouth by topping with another apple slice. Assemble the zombie mouths just before serving to avoid browning and ensure vibrant color for your Halloween Snack Board for Kids.
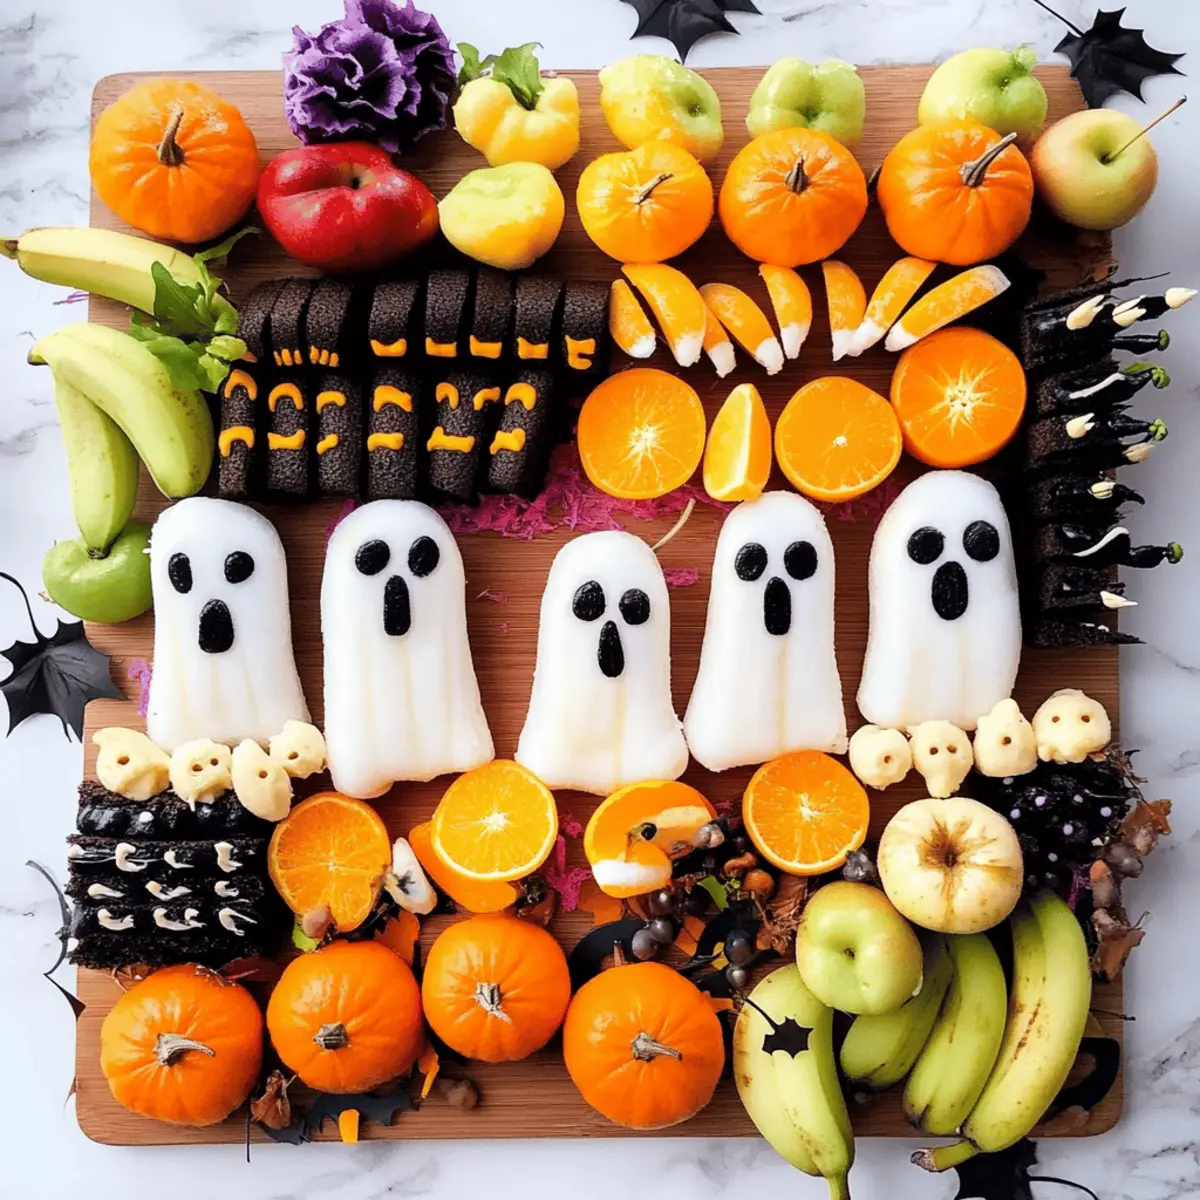
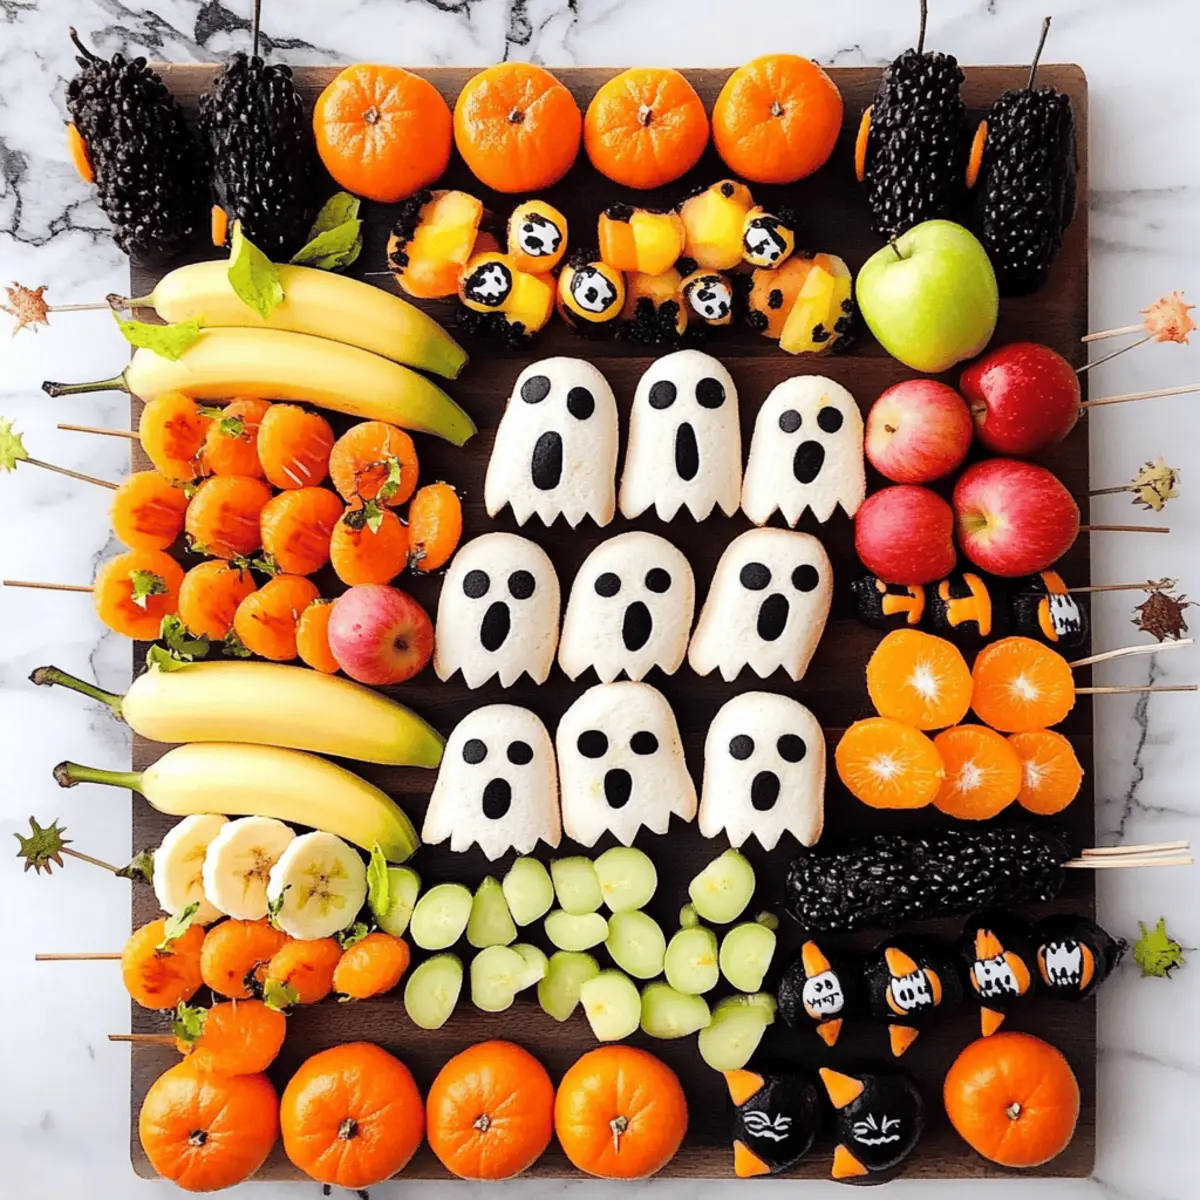
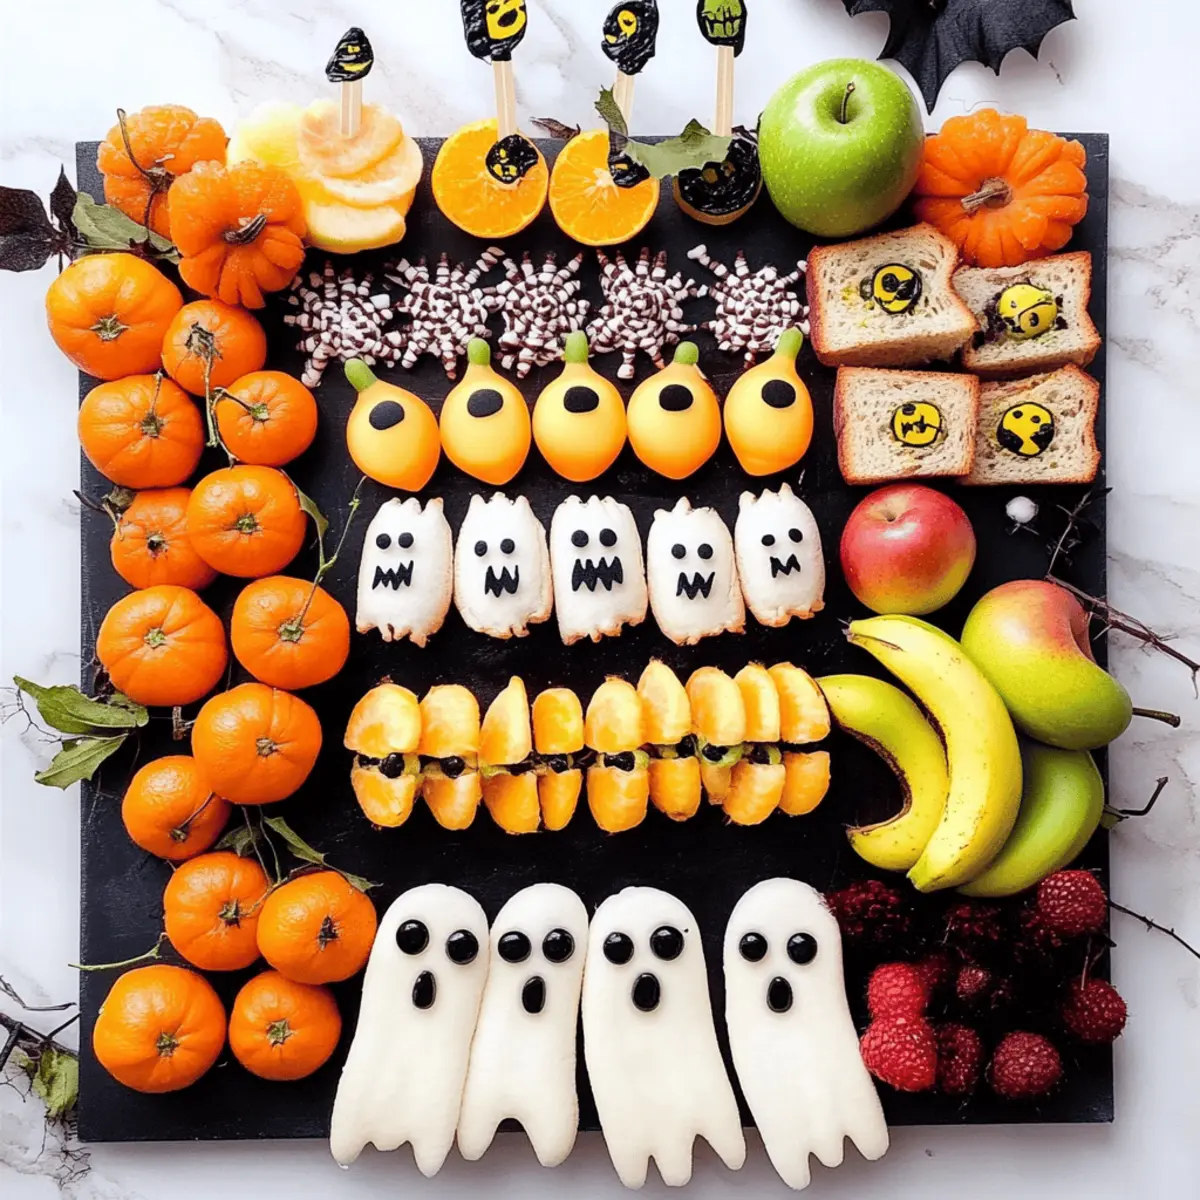
Step 7: Arrange the Snack Board
Once all your spooky snacks are prepared, it’s time for the fun part! Use a large serving board to artfully arrange your clementine pumpkins, ghost mini peppers, fruit skewers, ghost sandwiches, banana ghosts, and zombie apple mouths. To add an extra festive touch, incorporate store-bought Halloween snacks, like cheesy crisps or chocolates, and finish off with optional plastic spider decorations for that spook-tacular look!
Halloween Snack Board for Kids Variations
Feel free to turn up the fun with creative twists that will make your Halloween Snack Board even more delightful!
-
Fruit Alternatives: Swap out the cantaloupe for strawberries or kiwi for a burst of color and flavor.
-
Sandwich Shapes: Use different cookie cutters to create fun shapes like bats or spiders from your ghost sandwiches to jazz up the presentation.
-
Nut Butter Swap: For peanut allergies, try almond butter or sunflower butter as a creamy spread for the apple mouths.
-
Add Spicy Kick: If your kids enjoy a bit of heat, incorporate jalapeños into the ghost sandwiches for a surprising twist.
-
Themed Dips: Pair your skewers with festive dips like yogurt mixed with orange food coloring or a spooky green avocado dip to enhance the fun.
-
Halloween Sprinkles: Sprinkle spooky-themed edible decorations on your ghost sandwiches or skewers for a colorful and festive touch.
-
Mini Mummy Wraps: Use tortillas filled with cream cheese and veggies, then slice them to resemble mummies for a savory addition.
-
Frozen Treats: For a chilly twist, freeze your banana ghosts before serving for a refreshing Halloween treat!
By customizing your Halloween Snack Board, you not only cater to your little ones’ taste buds but also create an interactive and festive experience. Looking for other fun ideas? Why not add in some spooky Cranberry Pistachio truffles to your snack board or treat yourself to some Fun Bake Cookies?
What to Serve with Halloween Snack Board for Kids
Elevate your Halloween celebration with delightful treats that complement the spooky essence of this fun snack board.
-
Crispy Veggie Platter: A vibrant assortment of crunchy vegetables like carrots, cucumbers, and broccoli adds a refreshing crunch, inviting more healthy snacking.
-
Spooky Punch: Serve a green or orange fruit punch for a festive drink that will keep kids hydrated while joining the Halloween fun.
-
Mini Pumpkin Muffins: Soft and sweet, these muffins incorporate warm spices, mirroring the seasonal vibe while being a satisfying bite alongside the snack board.
-
Cheesy Ghost Crackers: Festively shaped crackers paired with a creamy dip; their fun shape encourages little ones to dive in and explore.
-
Chocolate-Covered Pretzels: The perfect balance of sweet and salty, these treats ignite joy and add a delicious crunch, creating another fun texture amidst the sweet options.
-
Fizzy Apple Cider: The effervescence of sparkling apple cider is inviting for kids, making for a festive and fun drink that pairs harmoniously with savory and sweet snacks alike.
Each of these ideas adds variety and enhances the overall Halloween experience, ensuring that your Halloween Snack Board for Kids is both a visual delight and a mouthwatering feast!
Expert Tips for Halloween Snack Board
- Keep It Fresh: Prepare apple slices just before serving to prevent browning; use lemon juice as an optional safeguard.
- Thick Icing: Ensure your icing is thick enough for sugar eyes to adhere; a watery mix will cause them to slide off.
- Creative Substitutes: Feel free to swap ingredients based on availability—try strawberries instead of grapes or hummus in place of peanut butter!
- Time Saving: Prep clementines and ghost sandwiches ahead of time. Chill them separately to save assembly time on the day.
- Kid Participation: Encourage kids to help assemble their snacks; it fosters excitement and makes healthy eating fun—perfect for your Halloween Snack Board for Kids!
How to Store and Freeze Halloween Snack Board for Kids
Fridge: Keep leftover components in separate airtight containers for up to 3 days to maintain freshness and prevent sogginess, especially for fruit and sandwiches.
Freezer: You can freeze uneaten banana ghosts and ghost sandwiches, though the texture may change—best consumed fresh. Wrap them tightly and use within one month.
Room Temperature: Assemble skewers and snacks right before serving; they are best enjoyed at room temperature for optimal flavor and texture of the Halloween Snack Board for Kids.
Reheating: If using components like ghost sandwiches from the fridge, consider lightly toasting them before serving to refresh the texture and flavor.
Make Ahead Options
These Halloween Snack Board for Kids components are perfect for meal prep, making your spooky celebrations less stressful! You can prepare the clementine pumpkins and ghost sandwiches up to 24 hours in advance, simply wrapping them in plastic wrap and refrigerating to keep them fresh. Additionally, the ghost mini peppers can be made a day ahead; just keep the icing separately in the fridge until you’re ready to decorate. For the fruit skewers, assemble them up to 3 days in advance (store in an airtight container) for easy grabbing later. When ready to serve, simply add the finishing touches, like chocolate faces on the marshmallows, and delight in the cheers from your little ghouls!
Halloween Snack Board for Kids Recipe FAQs
How do I know if the clementines are ripe?
Absolutely! Look for clementines that are firm to the touch, vibrant in color, and have a smooth skin without any dark spots. If they feel a bit heavy for their size, that’s a great sign of juiciness!
What’s the best way to store leftover snacks?
To keep your Halloween Snack Board for Kids fresh, store leftover components in separate airtight containers in the fridge. They will stay good for up to 3 days, ensuring your spooky snacks remain delicious!
Can I freeze the banana ghosts?
Yes! You can freeze banana ghosts, but keep in mind that their texture may change once thawed. Wrap them tightly in plastic wrap and place them in an airtight container or bag. Use them within one month for the best quality!
What are some common issues when making ghost sandwiches?
If your ghost sandwiches are falling apart, ensure your fillings are not too moist, as they can make the bread soggy. Additionally, chilling them before serving will help them hold their shape better, ensuring every ghost looks spooktacular!
Are there any allergy considerations for the snacks?
Definitely! If you’re concerned about peanut allergies, swap the peanut butter for almond butter or sunflower seed butter, ensuring a safe alternative. Always double-check the ingredient labels on store-bought snacks for potential allergens.
How can I make sure the apple slices don’t brown?
The best way to keep apple slices looking fresh is to prepare them just before serving. If you need to slice them in advance, lightly coat them with lemon juice. This creates a barrier to prevent browning and keeps your zombie mouths appealing!
Halloween Snack Board for Kids: Spooky & Healthy Fun
Ingredients
Equipment
Method
- Prepare the Clementine Pumpkins by inserting celery sticks into clementines.
- Make Ghost Mini Peppers by mixing icing sugar with cold water and dipping mini peppers.
- Assemble Fruit Skewers by threading cantaloupe, grapes, and marshmallows on skewers.
- Create Ghost Sandwiches using white bread and your choice of filling, cut out with a cookie cutter.
- Prepare Banana Ghosts by drawing faces with melted chocolate on peeled bananas.
- Assemble Zombie Apple Mouths by spreading peanut butter in between apple slices and adding marshmallows.
- Arrange the Snack Board artfully with all prepared snacks and optional festive decorations.