
As I reached into the garden, the delicate petals of the pumpkin blossoms practically called to me. These beautiful blooms not only add a pop of color to your plate, but they’re also the star of my Healthy Pumpkin Blossoms recipe. Coated in a flavorful chickpea flour batter, these golden bites offer a satisfying crunch that’s truly irresistible. Not only are they quick to prepare, but they’re also a nutritious option packed with vitamins A and C, making them an ideal vegan and gluten-free appetizer. Imagine serving these crisp delicacies at your next gathering, where they’ll surely wow your guests! Are you ready to create a dish that’s both delightful and healthy? Let’s dive in!

Why Are Healthy Pumpkin Blossoms So Special?
Crispy, Flavorful Delight: These pumpkin blossoms boast a delightful crunch, thanks to the chickpea flour batter that perfectly complements their delicate petals.
Nutrient-Rich Goodness: Packed with vitamins A and C, these blooms are a guilt-free appetizer that’s as healthy as it is tasty.
Vegan and Gluten-Free: A fantastic option for various dietary preferences, making them a crowd-pleaser for everyone at the table.
Quick and Easy: In just a few simple steps, you can whip up these golden bites — perfect for those busy weeknights or impromptu gatherings.
Versatile Pairing: Serve them warm with a squeeze of lemon or alongside flavorful dipping sauces, like spicy aioli or yogurt sauce, for an elevated snacking experience.
Elevate your appetizer game while enjoying a delightful dish that mingles beautifully with fresh salads or grilled veggies, like Air Fryer Flavorful options!
Healthy Pumpkin Blossoms Ingredients
• Gather your ingredients for a delicious dish!
For the Batter
• Fresh pumpkin blossoms – Look for fresh and unwilted flowers for the best flavor.
• Chickpea flour – Provides a nutty flavor and crunchy texture; it’s a gluten-free alternative to traditional flour.
• Water – Adjust the amount to achieve your desired batter consistency.
• Olive oil – Adds moisture and helps in frying, imparting a subtle fruity flavor.
For Seasoning
• Garlic powder – Enhances savory depth without overpowering the delicate blossoms.
• Onion powder – Provides a mellow sweetness that complements the garlic.
• Salt – Enhances the natural flavors of your ingredients.
• Black pepper – Adds mild heat and aromatic qualities.
• Chili flakes – Optional for an extra kick of spice and warmth.
For Cooking
• Olive oil spray – Prevents sticking and helps achieve a golden-brown exterior while frying.
To Serve
• Lemon wedges – A fresh squeeze brightens up the flavor just before serving.
Dive into the world of crispy healthy pumpkin blossoms and savor every delicious bite!
Step‑by‑Step Instructions for Healthy Pumpkin Blossoms
Step 1: Clean the Blossoms
Begin by gently rinsing your fresh pumpkin blossoms under cool running water to remove any dirt or debris. Carefully pat them dry with a clean kitchen towel, ensuring they’re free of moisture. As you clean, make sure to remove any inner stamens or pistils to prepare them for the flavorful chickpea flour batter that awaits.
Step 2: Prepare the Batter
In a medium-sized mixing bowl, combine chickpea flour, water, olive oil, garlic powder, onion powder, salt, black pepper, and optional chili flakes. Whisk until you achieve a smooth and slightly thick batter that can coat the pumpkin blossoms evenly. This vibrant mixture is key to crafting the perfect crust for your Healthy Pumpkin Blossoms, so ensure no lumps remain.
Step 3: Heat the Skillet
Place a non-stick skillet on the stovetop and preheat it over medium heat. Once hot, lightly grease the surface with olive oil or an olive oil spray to prevent sticking. You’ll know the skillet is ready when a drop of water dances on the surface before evaporating quickly. This ensures a crispy exterior for your delicious pumpkin blossoms during frying.
Step 4: Coat the Blossoms
One by one, dip each cleaned pumpkin blossom into the chickpea flour batter, ensuring it’s fully coated for maximum flavor and crunch. Allow any excess batter to drip off the blossoms before placing them gently into the preheated skillet. This step is crucial, as a good coating ensures that they fry up beautifully golden and crispy.
Step 5: Cook to Crispy Perfection
Fry the battered pumpkin blossoms in the skillet for about 3-4 minutes on each side. Keep an eye on them as they sizzle; they should turn a lovely golden brown and become crispy. Once perfectly fried, use tongs or a spatula to flip them carefully, ensuring they maintain their shape and integrity while cooking.
Step 6: Drain Excess Oil
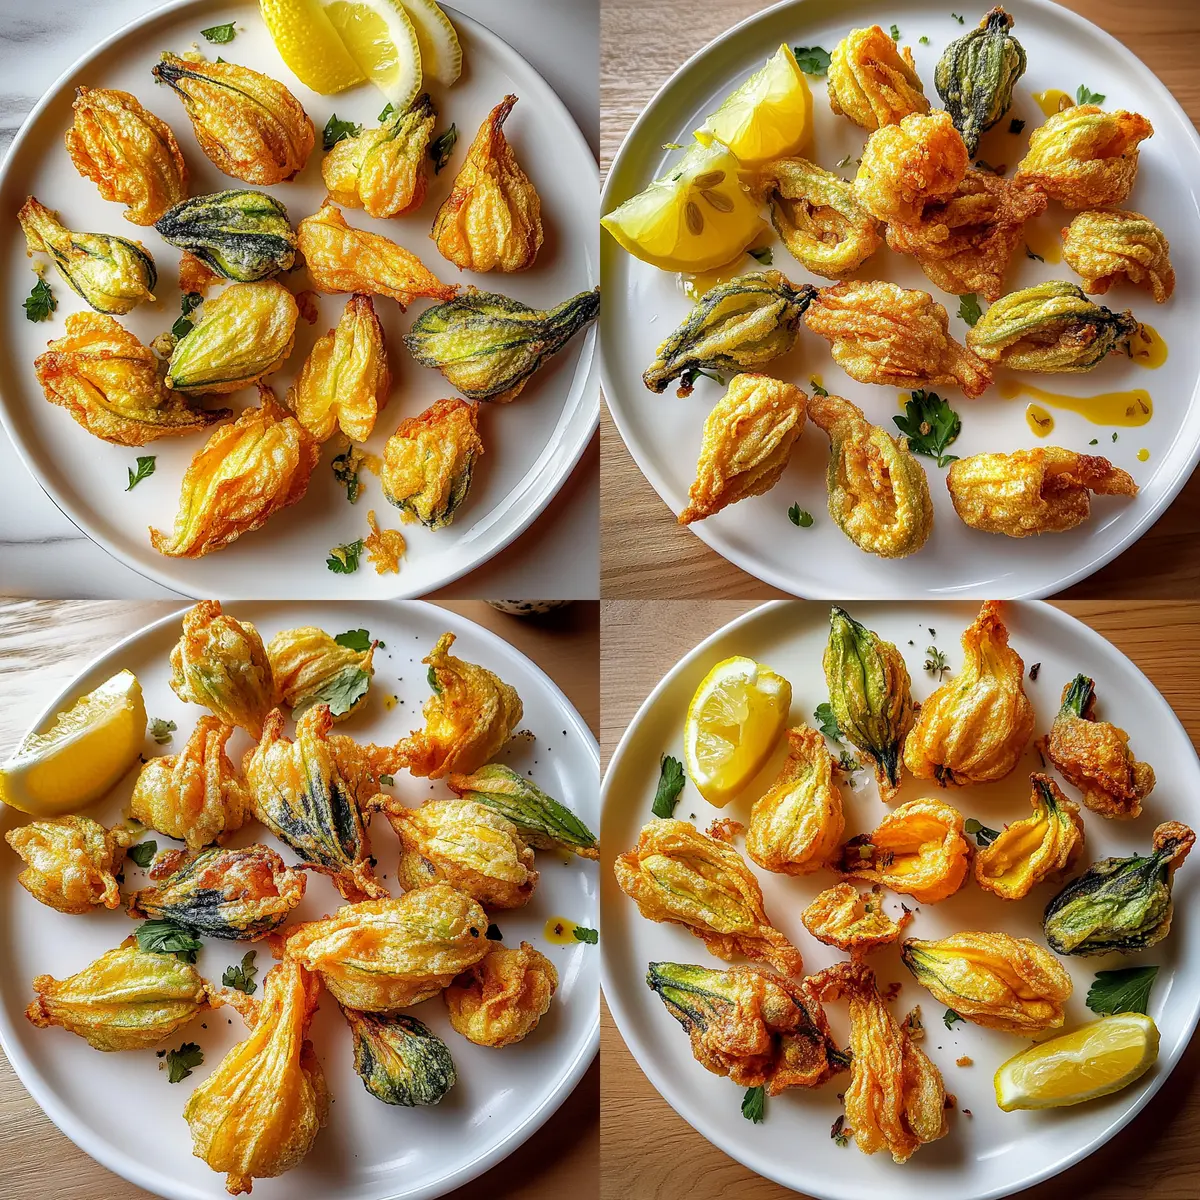
Once cooked, transfer the crispy pumpkin blossoms to a plate lined with paper towels. This will help absorb any excess oil, ensuring they remain light and crunchy. Take a moment to admire their golden hue as you prepare them for serving; the texture should be a beautiful contrast between the crispy exterior and tender interior.
Step 7: Serve and Enjoy
Plate the freshly fried Healthy Pumpkin Blossoms warm, garnished with lemon wedges for an extra burst of flavor. A squeeze of fresh lemon just before indulging brightens up this delightful appetizer, enhancing every bite. Consider pairing them with your favorite dipping sauces, like spicy aioli, to elevate the experience even further.

Healthy Pumpkin Blossoms Variations
Feel free to get creative with these flavorful twists that elevate your Healthy Pumpkin Blossoms to new heights!
-
Herb-Infused: Add finely chopped fresh herbs like basil or cilantro to the batter for a fragrant kick. Fresh herbs will add another layer of flavor, making each bite a delightful surprise.
-
Spicy Touch: Mix in some cayenne or jalapeño pepper to the batter for a zesty heat. This simple adjustment can transform the mild-flavor blossoms into a fiery treat, perfect for spice lovers.
-
Zucchini Swaps: If pumpkin blossoms aren’t in season, try substituting zucchini flowers instead. Their delicate texture and taste will provide a similar, yet unique experience!
-
Crispy Coating: For an extra crunch, toss the dipped blossoms in panko breadcrumbs before frying. The panko will create a delightful texture that makes these appetizers even more irresistible.
-
Nutty Flavor Boost: Mix in a tablespoon of nutritional yeast into the batter for a cheesy flavor without the dairy. This addition is not only delicious but also healthy and adds complexity to each bite.
-
Seasonal Veggies: Incorporate seasonal vegetables like asparagus or green beans into the batter to add color and nutrition. Picture a colorful platter that will brighten any gathering!
-
Gluten-Free Substitutes: If you want to switch it up, use rice flour instead of chickpea flour for a different texture while keeping things gluten-free. You may find that it lends a unique flavor of its own!
-
Serve With Style: Pair these delicious bites with different dipping sauces, such as an avocado-lime dressing or tangy tomato salsa for varied flavor profiles. The right dip can elevate your appetizer game to a whole new level.
For a burst of flavor, consider serving your Healthy Pumpkin Blossoms alongside a refreshing salad or a plate of grilled vegetables, like those found in my Air Fryer Flavorful recipes.
Expert Tips for Healthy Pumpkin Blossoms
-
Choose Fresh Blossoms: Look for vibrant, unwilted pumpkin blossoms to ensure the best flavor and texture in your dish. Freshness matters!
-
Perfect Batter Consistency: Aim for a smooth, slightly thick batter. If it’s too runny, the coating won’t stick well to the blossoms, leading to a less crispy outcome.
-
Avoid Sogginess: Thoroughly clean and dry the blossoms before battering. Excess moisture can lead to soggy pumpkin blossoms instead of the desired crispiness.
-
Monitor Frying Temperature: Maintain medium heat while frying to ensure even cooking. Too high heat can burn the batter while leaving the interior undercooked.
-
Explore Flavor Variations: Don’t hesitate to customize your chickpea flour batter with spices or herbs. This will enhance the flavor of your Healthy Pumpkin Blossoms beautifully!
What to Serve with Healthy Crispy Pumpkin Blossoms?
Make your meal memorable by complementing these golden bites with delightful sides that enhance their flavor and texture.
-
Garlicky Green Beans: Tender green beans sautéed with garlic provide a crunchy contrast and complement the savory notes of the pumpkin blossoms.
-
Quinoa Salad: A refreshing quinoa salad with cucumbers, cherry tomatoes, and a lemon vinaigrette brings a light, nutritious touch to your table.
-
Spicy Aioli: This creamy dip adds a kick to the crispy pumpkin blossoms, making each bite even more exciting and flavorful.
-
Mixed Greens Salad: A salad with fresh greens, avocados, and a tangy vinaigrette balances the richness of the blossoms while adding vibrant colors to the plate.
-
Grilled Corn on the Cob: Sweet, charred corn adds a delightful sweetness and textural contrast, perfect for those warm summer evenings spent outdoors.
-
Chilled Cucumber Soup: A cooling cucumber soup works wonderfully alongside these crispy bites, refreshing your palate with every bite.
-
Classic Lemonade: A glass of homemade lemonade adds a zesty sweetness that pairs beautifully with the nutty flavor of the pumpkin blossoms.
-
Fruit Sorbet: For a light finish, serve a scoop of fruit sorbet that cleanses the palate, leaving you with a sweet note to remember the meal by.
Indulging in these pairings not only elevates your dining experience but also showcases the delightful versatility of healthy pumpkin blossoms!
Make Ahead Options
These Healthy Pumpkin Blossoms are perfect for meal prep, making your busy weeknights a breeze! You can clean and prepare the pumpkin blossoms up to 24 hours in advance; just be sure to keep them stored in an airtight container in the refrigerator to maintain their freshness and prevent wilting. Additionally, the chickpea flour batter can be mixed ahead and stored in the fridge for up to 3 days; to ensure it stays smooth, simply give it a quick whisk before using. When you’re ready to cook, dip the blossoms in the batter and fry them as directed for a delicious appetizer that’s just as crispy and delightful!
How to Store and Freeze Healthy Pumpkin Blossoms
Fridge: Store leftover pumpkin blossoms in an airtight container for up to 2 days. This helps maintain their freshness and flavor, ensuring you can enjoy them again soon.
Freezer: If you’re looking to freeze them, ensure they are completely cooled first. Lay them flat on a baking sheet to freeze for 1-2 hours before transferring to airtight containers. They can be frozen for up to 3 months.
Reheating: To restore crispness, reheat frozen or refrigerated pumpkin blossoms in an oven at 375°F (190°C) for about 10-15 minutes, or until warmed through and crispy.
Enjoying Again: Remember, storing Healthy Pumpkin Blossoms properly allows you to savor this delightful appetizer long after the initial cooking!

Healthy Pumpkin Blossoms Recipe FAQs
What are the best ways to select fresh pumpkin blossoms?
Look for pumpkin blossoms that are vibrant and unwilted, as these will provide the best flavor and texture. When selecting, ensure that the flowers are firm and have a bright yellow or orange color, avoiding any with dark spots or signs of wilting.
How should I store leftover Healthy Pumpkin Blossoms?
Store any leftover pumpkin blossoms in an airtight container in the refrigerator. They will stay fresh for up to 2 days. To enjoy them again, reheat in an oven at 375°F (190°C) for 10-15 minutes to regain their crispiness—this method works like a charm!
Can I freeze Healthy Pumpkin Blossoms?
Absolutely! To freeze them, make sure the blossoms are completely cooled after frying. Lay them flat on a baking sheet in a single layer to freeze for 1-2 hours. After they’re frozen solid, transfer them to airtight containers or freezer bags. They can be stored in the freezer for up to 3 months. When you’re ready to enjoy them, reheat in the oven for the best texture.
What should I do if my batter is too runny?
If your batter turns out too runny, simply add a little more chickpea flour to thicken it up. Aim for a smooth but slightly thick consistency that can cling to the blossoms. This ensures they achieve that coveted crispy exterior when fried!
Are Healthy Pumpkin Blossoms safe for pets or those with allergies?
While pumpkin blossoms themselves are generally safe for pets, it’s best to avoid feeding them fried foods due to potential health risks. For allergies, ensure that no one in your household is allergic to chickpeas or any spices used in the batter. Always double-check ingredients for any specific dietary restrictions before serving!
Can I customize the seasoning in my batter?
The more the merrier! You can indeed customize the seasoning by adding your favorite spices or herbs to the batter, such as smoked paprika or cumin for a twist, or finely chopped herbs like parsley or cilantro for enhanced flavor. Feel free to experiment and make it your own!
Crispy Healthy Pumpkin Blossoms You’ll Crave Again and Again
Ingredients
Equipment
Method
- Begin by gently rinsing your fresh pumpkin blossoms under cool running water to remove any dirt or debris. Pat them dry with a clean kitchen towel and remove any inner stamens or pistils.
- In a bowl, combine chickpea flour, water, olive oil, garlic powder, onion powder, salt, black pepper, and optional chili flakes. Whisk until smooth and slightly thick.
- Preheat a non-stick skillet over medium heat and lightly grease with olive oil or spray.
- Dip each cleaned pumpkin blossom into the batter, ensuring it's fully coated for maximum flavor and crunch.
- Fry the blossoms for about 3-4 minutes on each side until golden brown and crispy. Flip carefully to maintain their shape.
- Transfer the cooked blossoms to a plate lined with paper towels to absorb excess oil.
- Plate the warm pumpkin blossoms and garnish with lemon wedges before serving.