
There’s something magical about the combination of cherries and peanut butter. The sweet and tangy notes of cherries paired with the creamy, nutty richness of peanut butter create a dessert that’s both comforting and luxurious. With this recipe for Cherry Peanut Butter Cheesecakes, you’ll create individual-sized indulgences that are perfect for any occasion—whether you’re hosting a party or treating yourself.
Ingredients: What You’ll Need
This recipe comes together with three main components: the crust, the filling, and the toppings. Here’s a breakdown of the ingredients:
| Component | Ingredients |
| Crust | 1 cup graham cracker crumbs |
| 3 tablespoons melted butter | |
| 1 tablespoon sugar | |
| Filling | 8 oz cream cheese, softened |
| 1/2 cup creamy peanut butter | |
| 1/3 cup sugar | |
| 1 teaspoon vanilla extract | |
| 1 egg | |
| Topping | 1 cup cherry preserves |
| 1/4 cup fresh cherries (optional) | |
| Whipped peanut butter frosting (optional) |
Step-by-Step Instructions
Step 1: Prepare the Crust
- Preheat Your Oven: Set your oven to 325°F (165°C) and line a muffin tin with paper liners.
- Mix Ingredients: In a bowl, combine the graham cracker crumbs, melted butter, and sugar. Stir until the mixture resembles wet sand.
- Form the Crusts: Spoon a heaping tablespoon of the crumb mixture into each muffin liner. Use the back of a spoon or your fingers to press it firmly into the bottom.
- Bake: Place the muffin tin in the oven and bake for 5 minutes. Remove and let the crusts cool while you prepare the filling.
Step 2: Make the Filling
- Beat the Base: In a mixing bowl, combine the softened cream cheese and peanut butter. Beat with a hand mixer or stand mixer until smooth and creamy.
- Add Sweetness and Flavor: Mix in the sugar and vanilla extract, ensuring everything is evenly incorporated.
- Incorporate the Egg: Add the egg and beat on low speed until just combined. Avoid overmixing, as this can affect the texture of your cheesecakes.
Step 3: Assemble and Bake
- Fill the Liners: Spoon the peanut butter filling over the cooled crusts, filling each liner about 3/4 full. Smooth the tops with a spoon or spatula if needed.
- Bake the Cheesecakes: Place the muffin tin back into the oven and bake for 18–20 minutes, or until the centers are just set.
- Cool Completely: Remove the cheesecakes from the oven and let them cool at room temperature before refrigerating for at least 2 hours.
Step 4: Add the Toppings
- Cherry Preserves: Spread a generous dollop of cherry preserves on top of each cheesecake.
- Optional Garnishes: Add fresh cherries for an elegant touch and pipe on whipped peanut butter frosting if desired.
- Serve Chilled: These cheesecakes are best enjoyed cold, so keep them refrigerated until ready to serve.
Why You’ll Love This Recipe
- Perfect Individual Portions: No slicing required! Each cheesecake is a ready-made dessert.
- Balanced Flavors: The tang of cherries perfectly complements the creamy peanut butter filling.
- Customizable: You can easily adapt the recipe for different dietary needs or flavor preferences.
Nutritional Information
| Nutrient | Per Serving (1 Cheesecake) |
| Calories | 280 |
| Total Fat | 18g |
| Saturated Fat | 9g |
| Cholesterol | 45mg |
| Sodium | 140mg |
| Total Carbohydrates | 26g |
| Protein | 6g |
Tips and Tricks for Success
- Room Temperature Ingredients: Ensure your cream cheese and peanut butter are at room temperature to avoid lumps in the filling.
- Graham Cracker Substitutes: If you don’t have graham crackers, crushed digestive biscuits or vanilla wafers work just as well.
- Check for Doneness: The cheesecakes should jiggle slightly in the center when baked. They’ll firm up as they cool.
- Topping Options: Not a fan of cherry? Swap out the preserves for raspberry, strawberry, or even caramel.
Creative Variations
- Chocolate Peanut Butter Cheesecakes: Add a layer of melted chocolate under the cherry preserves for a decadent twist.
- Gluten-Free Option: Use gluten-free graham crackers to make this recipe suitable for those with gluten sensitivities.
- Nut-Free Version: Replace peanut butter with sunflower seed butter for a nut-free alternative.
FAQs About Cherry Peanut Butter Cheesecakes
1. Can I make these cheesecakes ahead of time?
Yes! These cheesecakes can be made up to two days in advance. Store them in an airtight container in the refrigerator until ready to serve.
2. How do I store leftover cheesecakes?
Keep any leftovers in an airtight container in the refrigerator for up to 5 days.
3. Can I freeze these cheesecakes?
Absolutely! Wrap each cheesecake individually in plastic wrap and store in a freezer-safe bag for up to 2 months. Thaw in the refrigerator overnight before serving.
4. What’s the best way to prevent cracks in the filling?
Avoid overmixing the batter and ensure the cheesecakes cool gradually after baking. Rapid temperature changes can cause cracks.
5. Can I double this recipe for a larger batch?
Yes, you can double the ingredients and bake in two muffin tins. Adjust the baking time slightly if needed.
6. How do I make whipped peanut butter frosting?
Beat 1/2 cup of creamy peanut butter, 1/4 cup of softened butter, and 1 cup of powdered sugar until light and fluffy. Add 2 tablespoons of milk for a creamier consistency.
Conclusion: Your Next Favorite Dessert Awaits
With their perfect balance of creamy, nutty, and fruity flavors, Cherry Peanut Butter Cheesecakes are sure to become a favorite in your dessert repertoire. They’re easy to make, delightful to serve, and impossible to resist.
Ready to try this recipe? Gather your ingredients and start baking these mini masterpieces today!
Print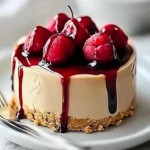
Cherry Peanut Butter Cheesecakes: A Decadent Dessert Worth Every Bite
- Total Time: 2 hours 40 minutes (including cooling and chilling)
- Yield: 12 mini cheesecakes
Description
Indulge in the perfect harmony of sweet and tangy cherries combined with the creamy, nutty richness of peanut butter. These individual-sized cheesecakes are not just delicious but also easy to make, making them perfect for any occasion—whether it’s a party or a quiet night in.
Ingredients
For the Crust:
- 1 cup graham cracker crumbs
- 3 tablespoons melted butter
- 1 tablespoon sugar
For the Filling:
- 8 oz cream cheese, softened
- 1/2 cup creamy peanut butter
- 1/3 cup sugar
- 1 teaspoon vanilla extract
- 1 egg
For the Topping:
- 1 cup cherry preserves
- 1/4 cup fresh cherries (optional)
- Whipped peanut butter frosting (optional)
Instructions
Step 1: Prepare the Crust
- Preheat your oven to 325°F (165°C) and line a muffin tin with paper liners.
- In a bowl, mix the graham cracker crumbs, melted butter, and sugar until the mixture resembles wet sand.
- Spoon a heaping tablespoon of the crumb mixture into each muffin liner and press it firmly into the bottom.
- Bake for 5 minutes, then let the crusts cool while preparing the filling.
Step 2: Make the Filling
- In a mixing bowl, beat the softened cream cheese and peanut butter until smooth and creamy.
- Add the sugar and vanilla extract, mixing well.
- Beat in the egg on low speed until just combined.
Step 3: Assemble and Bake
- Spoon the peanut butter filling over the cooled crusts, filling each liner about 3/4 full.
- Bake for 18–20 minutes, or until the centers are just set.
- Let the cheesecakes cool at room temperature, then refrigerate for at least 2 hours.
Step 4: Add the Toppings
- Spread a generous dollop of cherry preserves on top of each cheesecake.
- Garnish with fresh cherries and whipped peanut butter frosting if desired.
- Serve chilled for the best flavor.
Notes
- For a gluten-free option, substitute graham cracker crumbs with gluten-free alternatives.
- Avoid overmixing the filling to prevent cracks during baking.
- Cheesecakes can be stored in an airtight container in the refrigerator for up to 5 days or frozen for up to 2 months.
- Prep Time: 15 minutes
- Cook Time: 25 minutes
- Category: Dessert
- Method: Baking
- Cuisine: American