
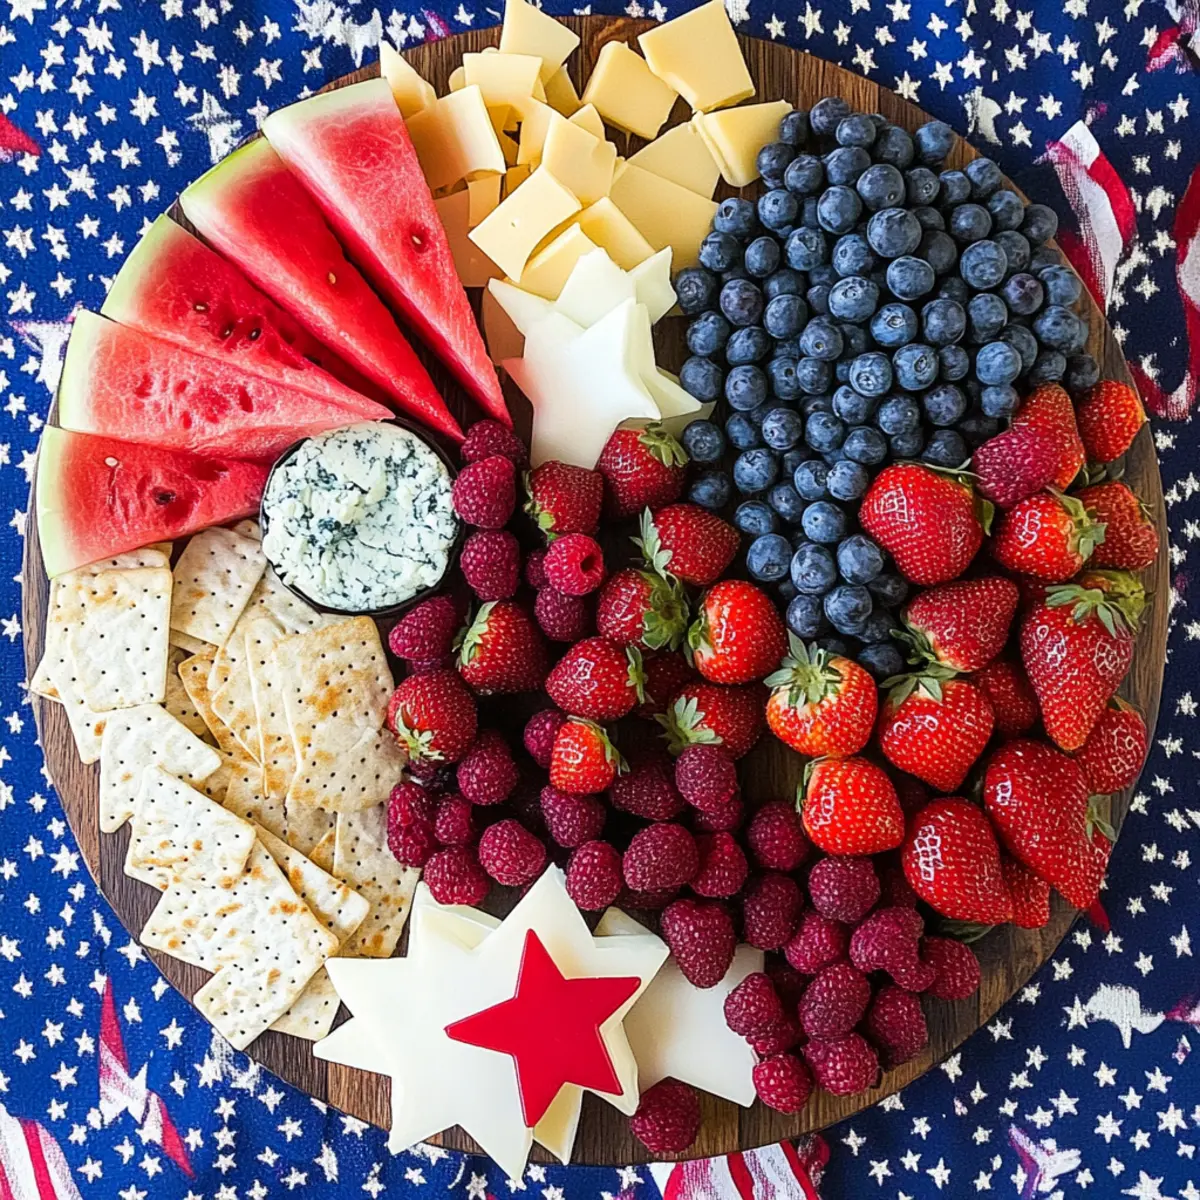
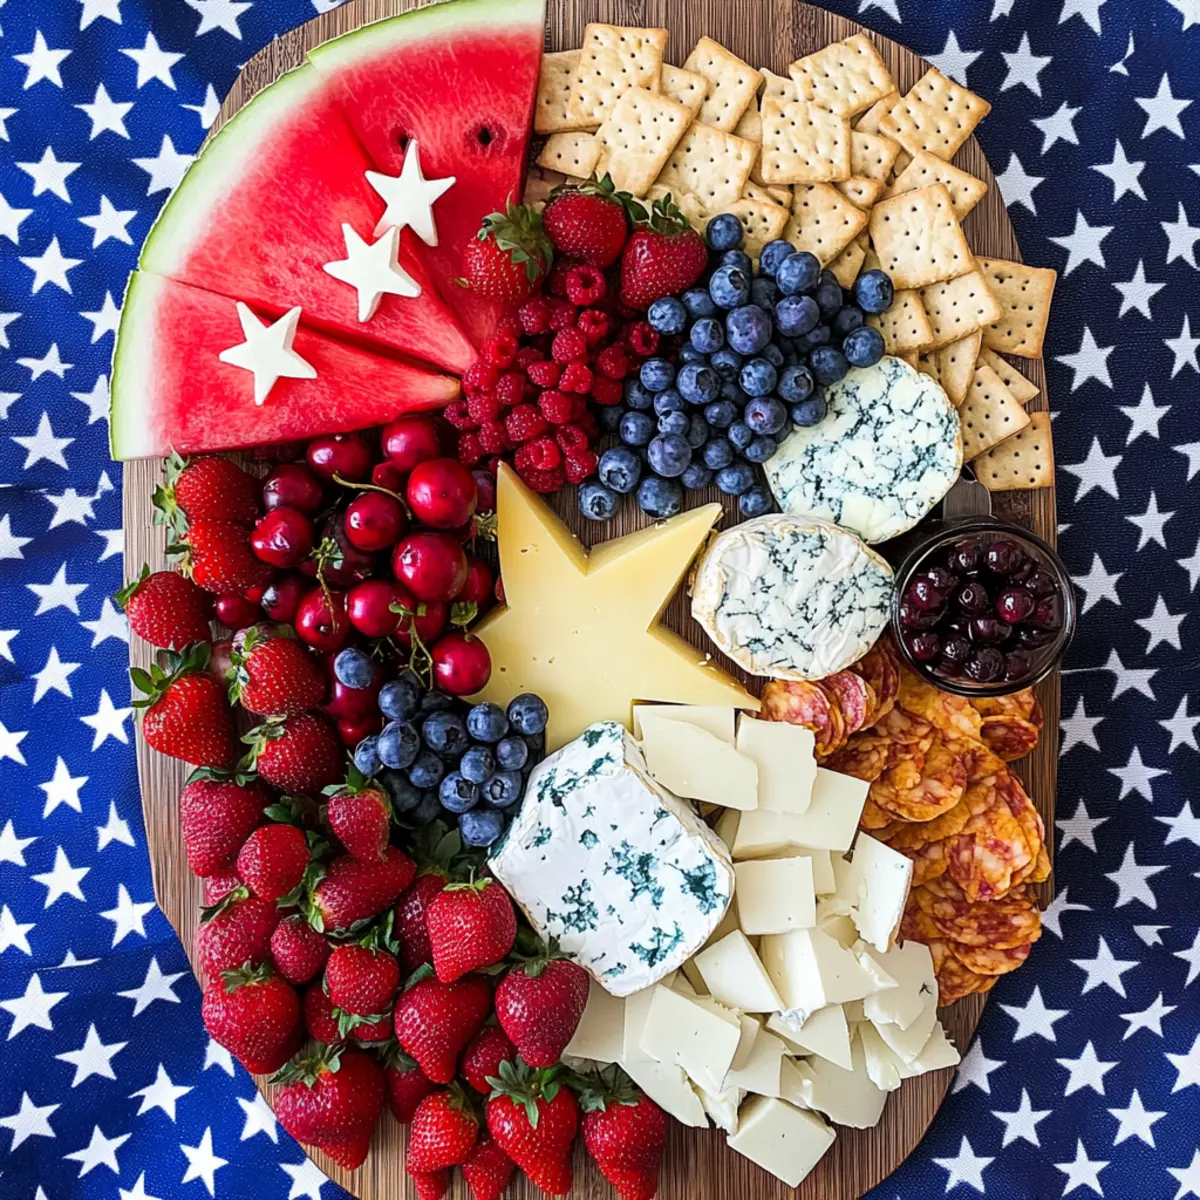
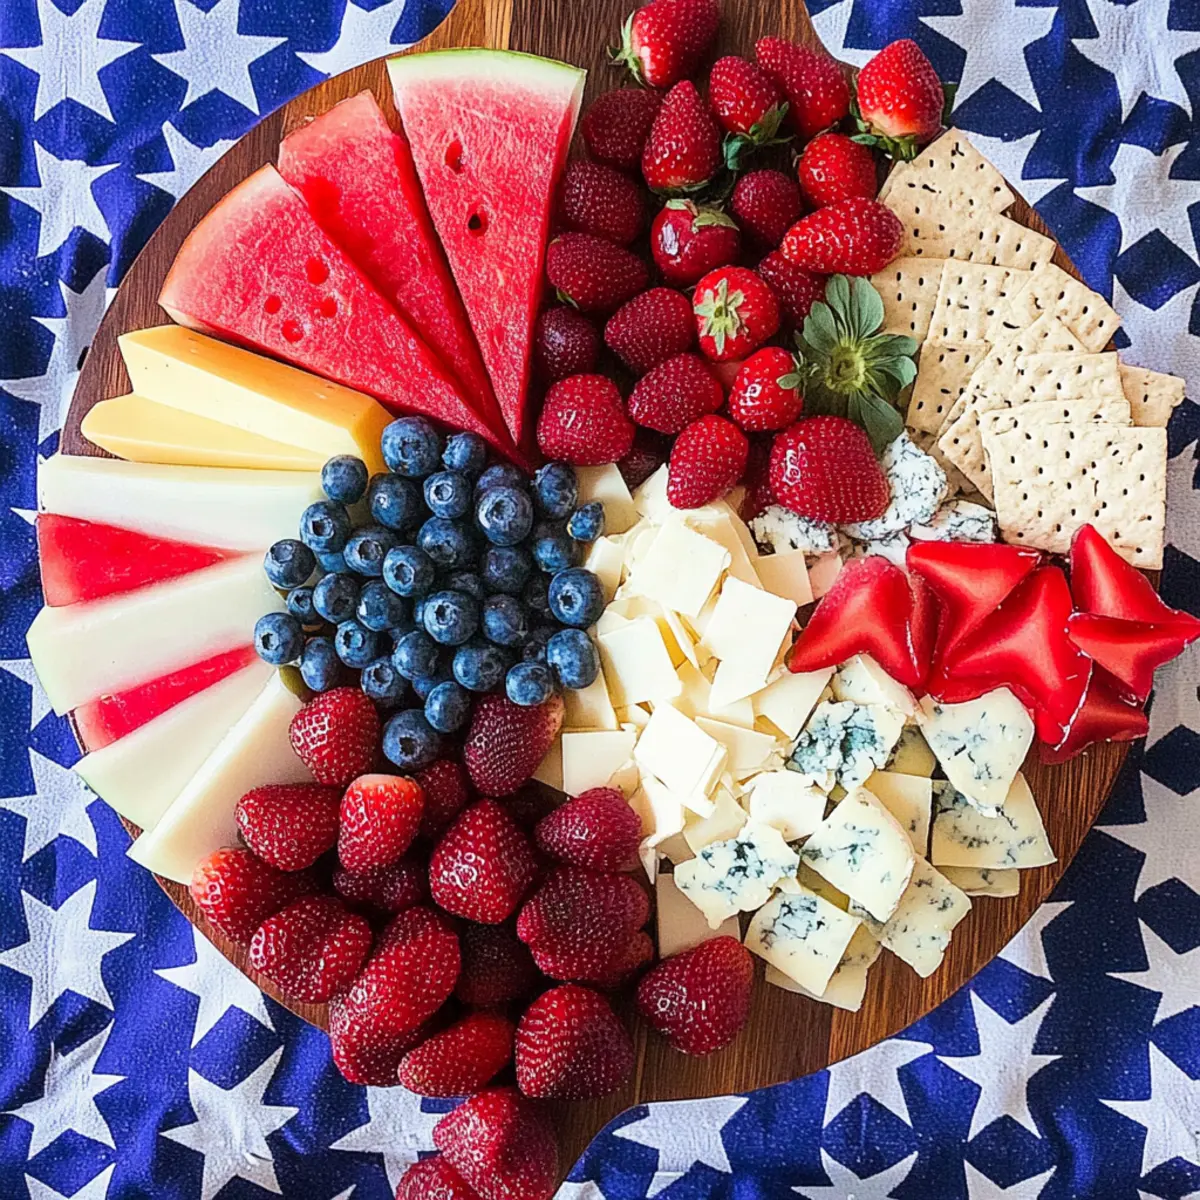
Every bright 4th of July, I find myself transported to sunny backyard barbecues and the laughter of friends mingling over delicious bites. This year, I’m excited to create a show-stopping centerpiece with my Ultimate Red, White, and Blue Cheese Board. Perfectly colorful and incredibly easy to assemble, this recipe showcases everything we love about summer gatherings: creamy cheeses, fresh fruits, and a dash of fun. Not only does this board save you time with minimal prep, but it also caters to everybody’s taste buds, making it a guaranteed hit among your guests. Are you ready to impress your friends and family with a festive flair that’s as delightful to look at as it is to savor? Let’s get started!
Why is this Cheese Board a Must?
Vibrant Colors: The red, white, and blue theme not only embodies the spirit of Independence Day but also creates an eye-catching centerpiece that your guests will love.
Easy Assembly: With just a few simple steps, you can create a stunning display that doesn’t require any culinary expertise—perfect for busy hosts!
Flavor Explosion: The combination of creamy cheeses, tangy fruit, and savory snacks means there’s something for everyone, making it a crowd favorite.
Versatile Options: Feel free to mix and match ingredients to suit your preferences. Try adding elements from my delicious Apples Blue Cheese or Raspberry White Chocolate recipes for a twist!
Time-Saving: Spend more time enjoying the festivities and less time in the kitchen, as this cheese board can be prepped in under 20 minutes.
Interactive Element: Encourage guests to build their own bites, fostering interaction and fun at your gathering!
Red White and Blue Cheese Board Ingredients
For the Red Section
• Red Cheese (e.g., Gouda) – Provides a creamy texture and a mild, smoky flavor. Substitute with any red wax-coated cheese.
• Mini Babybel Cheeses (red wax) – Adds fun shapes and a creamy taste. No direct substitute, but any soft cheese can work.
• Strawberries – Sweet and juicy; they add vibrant color. Substitute with raspberries or red cherries.
• Watermelon (cut into stars) – Refreshing and sweet, perfect for summery gatherings. No substitute needed for that vibrant red color.
• Pepperoni – Provides a savory touch with a hint of spice. Substitute any cured meat or omit for a vegetarian option.
For the Blue Section
• Blue Cheese – Offers a sharp flavor to contrast the sweetness of the fruits. Can replace with Feta for a milder taste.
• Blueberries – Sweet, plump fruit; essential for color. Substitute with blackberries for a similar look.
• Blue Corn Chips – Crunchy and slightly nutty; excellent for dipping. No substitute, but regular tortilla chips can also be used.
For the White Section
• Brie Cheese – Creamy and rich; essential part of the white component. Substitute with any soft, white cheese.
• Water Crackers – Light and crisp for a versatile base. Substitute with pita chips or breadsticks.
• Cheesy Popcorn – Adds a fun, crunchy element. Can be replaced with cheese puffs for a similar experience.
• Whole Roasted Peanuts (in shell) – Adds a salty crunch. No substitute needed, but remove shells for convenience.
For the Garnish
• Daisies (edible) – Garnish mimicking fireworks; optional but adds to the festive visual appeal.
Prepare this Red White and Blue Cheese Board for an unforgettable 4th of July gathering!
Step‑by‑Step Instructions for Red White and Blue Cheese Board
Step 1: Select Your Board
Begin by choosing a large, flat wooden or ceramic board that will serve as the canvas for your Ultimate Red White and Blue Cheese Board. Ensure it’s clean and dry to prevent any sogginess from fresh ingredients. Aim for a visually pleasing arrangement, so consider the board’s dimensions as you layout your ingredients.
Step 2: Arrange the Cheeses
Next, evenly space three types of cheese across the board. Place your red cheese, Mini Babybel cheeses, and Brie in distinct sections to create clean lines of color. Take a moment to consider the texture and shape of each cheese, ensuring they’re displayed to their best advantage and can be easily sliced or picked.
Step 3: Fill in the Red Section
Now, focus on the red section by adding your vibrant strawberries and star-shaped watermelon pieces. Arrange the fruits so their colors pop against the cheeses, creating a festive look. For added flavor, sprinkle some pepperoni slices throughout this area for a savory touch that complements the sweet fruits beautifully.
Step 4: Create the Blue Section
Transition to the blue section by placing blue cheese, fresh blueberries, and blue corn chips together. Disperse them artfully to showcase their appeal—from the crumbly blue cheese to the glossy blueberries. The chips should be strategically placed to invite guests to scoop up delightful bites, enhancing the overall visual feast of the Red White and Blue Cheese Board.
Step 5: Assemble the White Section
For the white section, layer your water crackers next to the Brie, giving guests a base for their cheese. Include cheesy popcorn and whole roasted peanuts for an added crunch and flavor diversity. Ensure everything is easily accessible, creating an inviting atmosphere for your guests to indulge in the rich flavors and textures of this festive spread.
Step 6: Add Decorative Touches
Once the main components are arranged, it’s time to add the final touches! Tuck edible daisies around the board, imitating fireworks while introducing a playful, festive element. This will brighten up your Ultimate Red White and Blue Cheese Board and make it an eye-catching centerpiece for Independence Day celebrations.
Step 7: Serve and Enjoy!
Finally, serve your beautifully arranged cheese board immediately, allowing guests to help themselves. Consider offering additional dipping options on the side, such as honey or dips that complement the cheeses. The Red White and Blue Cheese Board is now ready to impress, creating a delightful experience for everyone at your gathering!
Red White and Blue Cheese Board Variations
Feel free to customize this delightful board to suit your taste and dietary needs, creating a unique feast for your gathering!
-
Dairy-Free: Substitute all cheeses with plant-based alternatives, ensuring everyone can enjoy the board without missing out on flavors.
-
Spicy Kick: Add spicy salami or sprinkle some crushed red pepper flakes over the blue section for an irresistible heat that will tantalize your taste buds.
-
Herb-Infused: Mix some fresh herbs like basil or dill into your cheeses or sprinkle on the fruits for an aromatic twist that brightens the overall flavor profile.
-
Sweet Tooth: Incorporate honey-drizzled fruits or a handful of chocolate-covered blueberries to satisfy sweet cravings right alongside the savory elements.
-
Gluten-Free: Use gluten-free crackers instead of traditional water crackers and corn chips to ensure your guests with allergies can indulge without worry.
-
Texture Play: Add nuts like almonds or pistachios for an extra crunch that contrasts beautifully with the creamy cheeses and juicy fruits.
-
Fruity Fusion: Replace blueberries with slices of kiwi or tropical fruits like mango for a colorful, summer-inspired twist that adds a refreshing burst.
-
Regional Flair: Try introducing elements from my Blue Cheese Walnut or White Chocolate Raspberry recipes for extra flavor surprises that your guests will love!
Make Ahead Options
Preparing the Ultimate Red White and Blue Cheese Board in advance is a fantastic way to save time on the day of your gathering! You can prepare the fruits (strawberries, blueberries, and star-shaped watermelon) up to 24 hours in advance by washing and drying them thoroughly and storing them in airtight containers in the refrigerator to maintain freshness. Additionally, you can slice the cheeses and arrange them on the board without adding the fruits or crackers for up to 3 days prior; just cover it with plastic wrap to preserve their flavor and texture. When it’s time to serve, simply add the fruits and crackers, and your vibrant cheese board will be just as delightful and visually appealing as if it was freshly made!
Expert Tips for Red White and Blue Cheese Board
-
Cheese Variety: Choose cheeses with different textures (soft, hard) to create an engaging tasting experience. This diversity will keep your guests excited to explore.
-
Fruit Preparation: Always wash and dry your fruits thoroughly before arranging them. This prevents unwanted sogginess and helps maintain crispness in your Red White and Blue Cheese Board.
-
Avoid Clutter: Resist the temptation to overload the board. A clean and spacious layout not only looks more appealing but also makes it easy for guests to serve themselves.
-
Presentation Matters: Consider the colors as you arrange each section. Playing with shapes and heights will make your cheese board visually stunning, perfect for a festive atmosphere.
-
Timing is Key: Assemble the board as close to serving time as possible. This ensures everything remains fresh and vibrant, enhancing the overall taste and appeal.
Storage Tips for Red White and Blue Cheese Board
Fridge: Store any leftover components in airtight containers in the fridge for up to 1 day to preserve freshness and flavors.
Room Temperature: Cheese boards should be enjoyed at room temperature, so when serving leftovers, allow them to sit out for about 30 minutes before enjoying.
Freezer: It’s not recommended to freeze the cheese board, as fruits and cheeses may lose their texture while thawing.
Reheating: If you have cheese left, you can gently warm it in a microwave, but avoid reheating fruits. Enjoy your Red White and Blue Cheese Board as fresh as possible!
What to Serve with Ultimate Red White and Blue Cheese Board
Creating a memorable meal around your festive cheese board can elevate your gathering to unforgettable heights.
-
Grilled Veggie Skewers: Brightly colored vegetables add a smoky flavor that complements the creamy cheeses perfectly. Their charred edges add a delightful contrast to your vibrant board.
-
Classic Coleslaw: Creamy and tangy, coleslaw introduces a crunchy element that balances the richness of the cheese. The freshness pops in your mouth, making it a refreshing side choice.
-
Fresh Fruit Salad: A medley of seasonal fruits enhances the sweetness and brings even more vibrant colors to the table. It’s light, refreshing, and brings out the natural sweetness of all your cheese board ingredients.
-
Crispy Garlic Breadsticks: Perfect for dipping, their crunchy exterior and soft interior make them a versatile side. Pair them with oils or dips for an interactive experience alongside your cheese board.
-
Patriotic Punch: A refreshing drink made with berries, lemonade, and soda to continue the red, white, and blue theme. Its fizzy notes will tantalize your guests’ taste buds while keeping them cool!
-
Chocolate-Dipped Strawberries: For dessert, this treat adds a sweet finish to your meal. The decadence of chocolate contrasts beautifully with the bright flavors of your cheese board.
Embrace the spirit of the celebration and let your cheese board shine as the centerpiece, paired with these delightful sides!
Red White and Blue Cheese Board Recipe FAQs
What type of cheese should I use for a Red White and Blue Cheese Board?
Absolutely! For the best results, use a variety of textures and flavors. I recommend a creamy Gouda or a red wax-coated cheese for the red section, blue cheese for the blue section, and Brie for the white. Each brings contrasting flavors that will delight your guests’ taste buds!
How can I store leftovers from the cheese board?
You can store any leftover components in airtight containers in the fridge for up to 1 day to maintain freshness. Keep the cheeses and fruits separate to prevent moisture buildup, ensuring they stay delicious.
Can I freeze any part of the Red White and Blue Cheese Board?
Unfortunately, freezing the cheese board isn’t recommended. The fruits and cheeses may lose their texture and flavor once thawed, which diminishes the quality. Instead, enjoy it fresh for the best experience!
How can I ensure my fruits stay fresh on the board?
Very! To keep your fruits crisp and vibrant, wash and dry them thoroughly before arranging. This will help prevent them from becoming soggy. Arrange them just before serving to maintain their freshness and visual appeal.
Are there any dietary considerations to keep in mind for the cheese board?
When planning your Red White and Blue Cheese Board, keep guests’ dietary preferences in mind. You can easily make it vegetarian by omitting the pepperoni and adding more nuts or plant-based snacks. Always check for dairy allergies as well, and consider offering dairy-free cheese alternatives for those with lactose intolerance.

Red White and Blue Cheese Board That Steals the Show
Ingredients
Equipment
Method
- Step 1: Select Your Board - Choose a large, flat wooden or ceramic board and ensure it's clean and dry.
- Step 2: Arrange the Cheeses - Space three types of cheese evenly across the board.
- Step 3: Fill in the Red Section - Add strawberries and star-shaped watermelon, and sprinkle pepperoni.
- Step 4: Create the Blue Section - Place blue cheese, blueberries, and blue corn chips artfully together.
- Step 5: Assemble the White Section - Layer water crackers next to Brie, include cheesy popcorn and peanuts.
- Step 6: Add Decorative Touches - Tuck edible daisies around the board for a festive element.
- Step 7: Serve and Enjoy! - Serve immediately and allow guests to help themselves.