
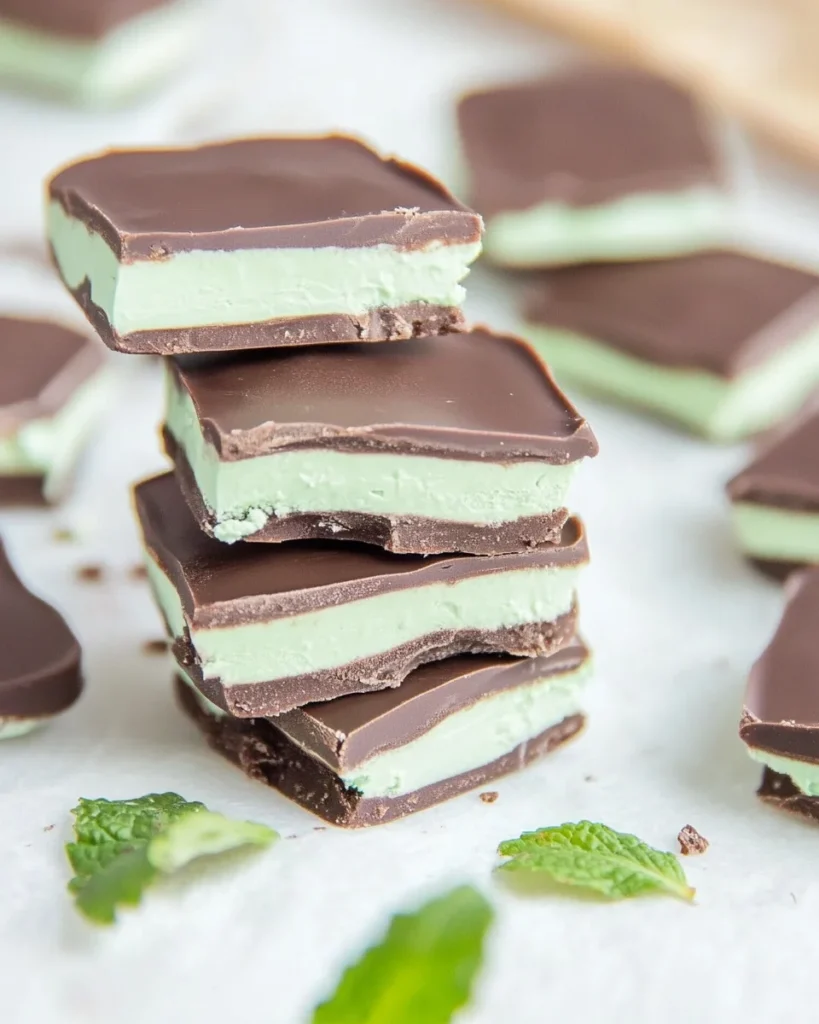
Andes Mints have long been a beloved after-dinner treat, known for their silky smooth chocolate layers and refreshing mint center. Their perfect balance of richness and coolness makes them an ideal indulgence for anyone who loves the classic combination of chocolate and mint.
Now, imagine making your own Andes Mints at home—a simple, fun, and rewarding process that delivers the same luxurious flavor with just a handful of ingredients. Whether you’re preparing them for holiday gifting, a sweet snack, or a homemade chocolate platter, these copycat Andes Mints are sure to impress.
Why Make Homemade Andes Mints?
1. A Simple Recipe with Big Flavor
This recipe requires only four ingredients and minimal effort, yet the result is an elegant, melt-in-your-mouth treat. By layering dark chocolate with a creamy peppermint-infused white chocolate center, you can recreate the signature Andes Mint experience without any complicated techniques.
2. A Versatile Treat for Any Occasion
Homemade Andes Mints are perfect for:
- Holiday gift boxes – Wrap them in decorative packaging for a thoughtful homemade present.
- Party favors – Serve them at weddings, baby showers, or special events.
- After-dinner mints – The refreshing peppermint flavor makes these a great palate cleanser.
- Baking add-ins – Chop them up and use them in cookies, brownies, or hot chocolate.
3. Customizable to Your Taste
Making these chocolates at home allows you to experiment with different flavors and textures. You can adjust the mint intensity, swap dark chocolate for milk or white chocolate, or even add a hint of sea salt for an extra layer of flavor.
4. No Candy Thermometer or Special Equipment Needed
Unlike some chocolate-making processes that require temperatures to be measured precisely, this recipe is straightforward and foolproof. By using a simple microwave melting technique, you can create these indulgent mints with ease.
Ingredients: The Perfect Layers of Chocolate and Mint
Silky Chocolate Layers
- Dark chocolate chips
- White chocolate chips
Cool and Refreshing Mint Filling
- Peppermint extract
- Green gel food coloring
Directions: Crafting the Perfect Copycat Andes Mints
Step 1: Melt the Chocolate
- Microwave half of the dark chocolate chips in intervals until smooth.
- Spread evenly in a parchment-lined baking dish and refrigerate.
Step 2: Create the Mint Layer
- Melt white chocolate chips and mix with peppermint extract and green food coloring until smooth.
- Pour over the first chocolate layer and return to the fridge.
Step 3: Finish with a Chocolate Top
- Melt the remaining dark chocolate chips and spread over the mint layer.
- Refrigerate for at least 4 hours or overnight to set.
Step 4: Slice and Serve
- Remove from the pan, cut into small squares, and enjoy!
Nutritional Breakdown: A Sweet and Refreshing Treat
- Calories: ~188 per serving
- Carbohydrates: 20g
- Fat: 11g
- Sugar: 16g
- Protein: 2g
Expert Tips for the Best Copycat Andes Mints
1. Use High-Quality Chocolate for a Silky Texture
Since this recipe has only a few ingredients, quality matters. Opt for premium dark and white chocolate chips or chopped chocolate bars for a smoother finish and richer taste. Cheap or waxy chocolate can result in a grainy or overly sweet texture.
2. Melt the Chocolate Slowly to Avoid Seizing
Chocolate is delicate and prone to burning, so always melt it in short intervals in the microwave or use a double boiler. Stirring between each interval ensures an even, glossy consistency.
3. Keep the Chocolate Layers Warm for Better Adhesion
To ensure that the layers stick together seamlessly, avoid letting each layer fully harden before adding the next. A slight softness between layers helps them bond better and prevents separation when slicing.
4. Add Vegetable Oil for a Smoother Chocolate Spread
If your chocolate seems too thick, add ½–1 tablespoon of vegetable oil while melting. This will create a smoother texture and make it easier to spread evenly in the pan.
5. Chill Properly for the Best Texture
While it’s tempting to rush the chilling process, allowing the mints to firm up in the refrigerator for at least 4 hours (or overnight) ensures that they slice cleanly and hold their layers perfectly.
Creative Variations on Andes Mints
Once you’ve mastered the classic version, you can have fun experimenting with different flavors and textures. Here are a few ideas to customize your homemade Andes Mints:
1. Dark Chocolate Lovers’ Edition
For an extra-rich chocolate experience, use semi-sweet or bittersweet chocolate for all three layers instead of a white chocolate mint center. This creates a deeper, more intense flavor.
2. White Chocolate Peppermint Mints
Switch out the dark chocolate completely and make a white chocolate version with a red or pink tinted mint layer for a festive holiday treat.
3. Milk Chocolate and Caramel Mint
For a sweeter variation, swap the dark chocolate for milk chocolate and add a thin layer of caramel beneath the mint filling. The sweetness of caramel, coolness of mint, and richness of chocolate make for a luxurious bite.
4. Spiked Mint Mints
For an adult-friendly treat, replace the peppermint extract with a splash of crème de menthe liqueur. This adds an extra layer of boozy richness, making them great for dinner parties.
5. Add a Crunchy Element
Sprinkle crushed peppermint candy, cocoa nibs, or finely chopped nuts on the top layer before chilling for an added crunch.
How to Store and Serve Homemade Andes Mints
1. Refrigeration for Freshness
To keep these mints firm and fresh, store them in an airtight container in the refrigerator. They will last for up to two weeks when stored properly.
2. Freezing for Long-Term Storage
These chocolates can be frozen for up to three months. Place them in a freezer-safe bag with parchment paper between layers to prevent sticking. Simply thaw them in the fridge before serving.
3. Serving Suggestions
- After-Dinner Treats – Serve with coffee or espresso for a classic combination.
- Gifting – Package them in decorative tins or small cellophane bags with a ribbon.
- Baking Add-In – Chop them up and fold them into brownie batter, cookie dough, or ice cream.
Frequently Asked Questions (FAQs)
1. Can I Make These Mints Without Peppermint Extract?
Yes! If you prefer a different flavor, you can use vanilla extract, orange extract, or almond extract instead. This will give your mints a unique taste without the cooling effect of peppermint.
2. Why Did My Chocolate Layers Separate When Cutting?
This usually happens if the layers fully hardened before adding the next one. To prevent this, keep the previous layer slightly soft before adding the next layer, allowing them to adhere properly.
3. Can I Use Natural Food Coloring Instead of Gel?
Yes, but gel food coloring is recommended because it provides a vibrant green hue without affecting the chocolate’s consistency. Liquid food coloring can cause the chocolate to seize or become grainy.
4. What’s the Best Way to Cut the Mints Without Cracking the Chocolate?
Use a sharp knife warmed under hot water and wipe it clean between cuts. This ensures clean, smooth slices without breaking the layers.
5. Can I Make These Mints Vegan or Sugar-Free?
Yes! Simply use dairy-free chocolate chips for a vegan version, and sugar-free chocolate chips for a keto-friendly alternative.
Conclusion: A Homemade Mint Chocolate Treat Worth Sharing
Making your own Copycat Andes Mints at home is a fun, simple, and rewarding experience. With just four ingredients and a little patience, you can create a decadent, silky, and refreshing chocolate treat that rivals the store-bought version.
Whether you’re making them for yourself, for gifting, or for adding a gourmet touch to your dessert tray, these homemade mints are guaranteed to impress. The combination of rich dark chocolate and cool peppermint is a timeless favorite, making these a go-to recipe for holidays, celebrations, or anytime you need a little sweet indulgence.
So why wait? Melt, layer, and enjoy every bite of this homemade chocolate-mint masterpiece!
Print
Homemade Andes Mints: A Decadent Chocolate and Mint Delight
- Total Time: 4 hours 10 minutes
- Yield: 24 pieces
Description
Recreate the silky, refreshing taste of Andes Mints at home with this easy recipe. These homemade mints feature layers of rich dark chocolate and a creamy peppermint-infused center, making them perfect for gifting, after-dinner treats, or baking add-ins.
Ingredients
Silky Chocolate Layers:
- Dark chocolate chips
Cool and Refreshing Mint Filling:
- White chocolate chips
- Peppermint extract
- Green gel food coloring
Instructions
- Melt the Chocolate: Microwave half of the dark chocolate chips in intervals until smooth. Spread evenly in a parchment-lined baking dish and refrigerate.
- Create the Mint Layer: Melt white chocolate chips and mix with peppermint extract and green food coloring until smooth. Pour over the first chocolate layer and return to the fridge.
- Finish with a Chocolate Top: Melt the remaining dark chocolate chips and spread over the mint layer. Refrigerate for at least 4 hours or overnight to set.
- Slice and Serve: Remove from the pan, cut into small squares, and enjoy!
Notes
- Use high-quality chocolate for the best texture.
- Melt chocolate slowly in short intervals to prevent seizing.
- Store in an airtight container in the fridge for up to 2 weeks or freeze for up to 3 months.
- Prep Time: 10 minutes
- Chill Time: 4 hours
- Category: Dessert
- Method: No-Bake
- Cuisine: American