
A Sweet Tradition with a Splash of Green
Baking has always been a part of my family’s celebrations. Whether it was birthdays, holidays, or just a cozy weekend, the kitchen was where the best memories were made. One of the first recipes I learned from my grandmother was red velvet cake—a timeless, rich, and perfectly moist dessert that always felt like a special occasion. But one year, as St. Patrick’s Day approached, I decided to experiment. If red velvet was a classic, why not give it a vibrant green makeover?
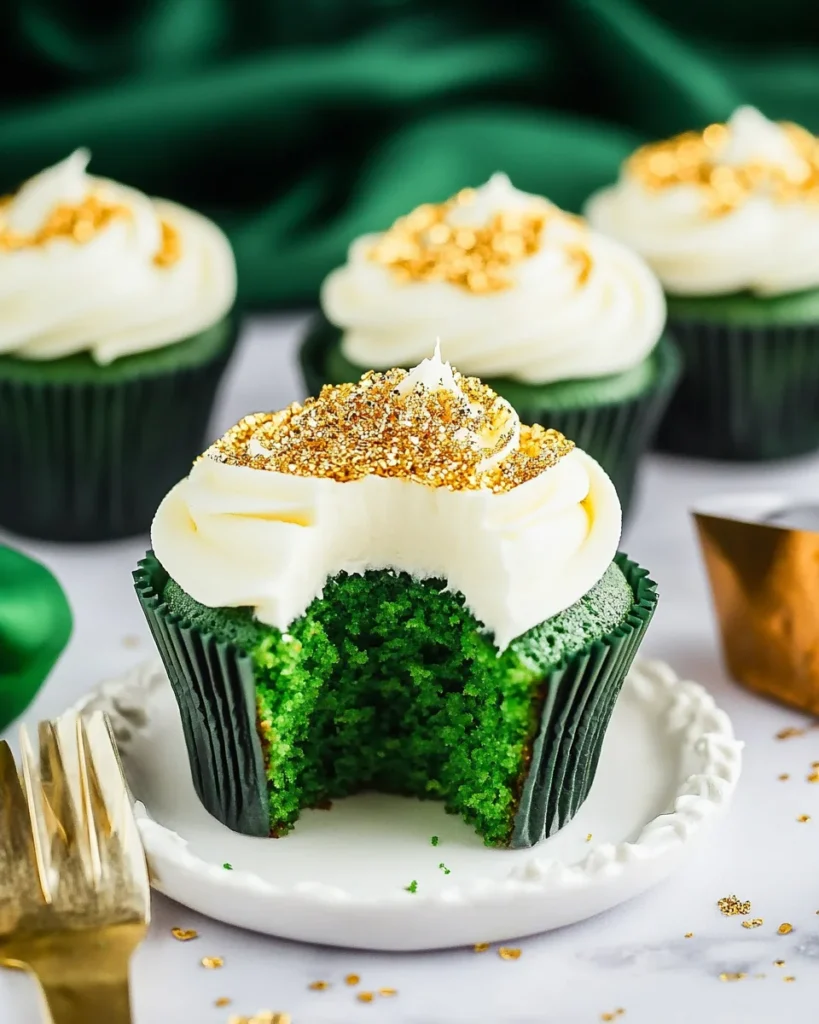
The result was Green Velvet Cupcakes, a festive and playful take on the traditional recipe. The rich buttermilk base, the hint of vanilla, and the smooth cream cheese frosting stayed the same, but the bright emerald color added a whole new level of fun. They became an instant hit—not just for St. Patrick’s Day but for Christmas, birthday parties, and even baby showers.
Now, these cupcakes have become a staple in my home, a treat that brings joy, nostalgia, and a little magic to any celebration. Whether you’re baking them for a holiday gathering or simply to brighten up an ordinary day, these Green Velvet Cupcakes are a recipe worth keeping in your collection.
Why You’ll Love These Cupcakes
These Green Velvet Cupcakes aren’t just about their stunning color—they’re a deliciously moist, lightly cocoa-flavored treat with a tangy, creamy frosting. Here’s what makes them a must-bake:
- A Unique Spin on a Classic – The same soft texture and subtle cocoa flavor of red velvet, but in a bold, festive green.
- Perfect for Any Celebration – Great for St. Patrick’s Day, Christmas, birthdays, and themed parties.
- Moist and Fluffy Texture – Thanks to buttermilk and butter, these cupcakes stay light yet rich.
- Simple Yet Elegant – No complicated techniques—just good ingredients, great color, and a foolproof method.
- A Fun Surprise Inside – Add gold sprinkles in the center for a St. Patrick’s Day “pot of gold” surprise!
Ingredients: A Colorful Twist on a Classic Treat
For the Cupcakes:
- 2 cups all-purpose flour
- 1 cup granulated sugar
- 2 teaspoons baking powder
- 1 teaspoon salt
- ½ cup unsalted butter, softened
- 1 cup buttermilk
- 2 large eggs, lightly beaten
- 1 teaspoon vanilla extract
- Green gel food coloring
- Gold sprinkles (optional, for surprise filling)
For the Cream Cheese Frosting:
- 8 ounces cream cheese, softened
- ½ cup unsalted butter, softened
- 4 cups powdered sugar
Directions: Baking the Perfect Green Velvet Cupcakes
- Mix the Batter: Whisk together the dry ingredients. In a separate bowl, cream butter and sugar, then mix in eggs, vanilla, and buttermilk. Gradually combine with the dry mixture and fold in green food coloring.
- Bake to Perfection: Fill cupcake liners halfway and bake at 350°F (175°C) for 15-17 minutes until a toothpick comes out clean.
- Add a Surprise Filling (Optional): Scoop out a small section from each cupcake’s center, fill with gold sprinkles, and replace the removed section.
- Prepare the Frosting: Beat butter until fluffy, then mix in cream cheese. Gradually add powdered sugar until smooth.
- Decorate and Serve: Pipe frosting onto cooled cupcakes and sprinkle with extra gold decorations for a festive touch.
Nutritional Information: A Sweet Indulgence
- Calories: 269 kcal
- Carbohydrates: 47g
- Protein: 3g
- Fat: 8g
- Saturated Fat: 5g
- Cholesterol: 37mg
- Sodium: 236mg
- Sugar: 37g
- Calcium: 27mg
Frequently Asked Questions (FAQs)
1. What Does Green Velvet Cake Taste Like?
Green velvet has the same mild chocolate and vanilla flavor as red velvet. It’s not as rich as a chocolate cake but has a smooth, buttery, slightly tangy taste, which pairs perfectly with cream cheese frosting.
2. What’s the Secret to Super Moist Cupcakes?
The key to achieving soft, moist cupcakes is:
- Using buttermilk – It adds richness and helps create a tender crumb.
- Mixing the batter just enough – Overmixing can make cupcakes dense.
- Baking at the right temperature – Too hot, and they’ll dry out; too low, and they’ll be dense.
3. Why Use Gel Food Coloring Instead of Liquid?
Gel food coloring is more concentrated, meaning you get a deep green color without affecting the texture of the batter. If you use liquid food coloring, you may need more, which can alter the consistency of the cupcakes.
4. Can I Make These Cupcakes Gluten-Free?
Yes! Simply substitute the all-purpose flour with a gluten-free 1:1 baking flour blend. Just ensure it contains xanthan gum, which helps mimic the texture of traditional flour.
5. Can I Make These Cupcakes Without Buttermilk?
If you don’t have buttermilk, you can make a substitute by mixing 1 tablespoon of white vinegar or lemon juice with 1 cup of milk and letting it sit for 5-10 minutes. This will give you the same tangy flavor and tenderness.
6. What’s the Best Frosting for Green Velvet Cupcakes?
Cream cheese frosting is the perfect match for velvet cakes. Its tangy, smooth, and slightly sweet flavor balances the rich, buttery cupcake beautifully. If you prefer something lighter, a vanilla buttercream frosting works well too.
7. How Can I Make These Cupcakes More Festive?
- Gold sprinkles or edible glitter – For a fun St. Patrick’s Day surprise.
- Rainbow decorations – To create a pot-of-gold-at-the-end-of-the-rainbow theme.
- Tint the frosting green – Add a bit of green food coloring to the cream cheese frosting for an extra pop of color.
8. Can I Make These Cupcakes Ahead of Time?
Yes! Here’s how to store them properly:
- Unfrosted cupcakes: Store in an airtight container at room temperature for up to 3 days or freeze for up to 3 months.
- Frosted cupcakes: Keep in the refrigerator for up to 3 days, but bring them to room temperature before serving for the best texture.
9. Can I Make This Recipe as a Full Cake Instead of Cupcakes?
Yes! Simply pour the batter into two 8-inch cake pans and bake at 350°F for about 30-35 minutes, or until a toothpick inserted in the center comes out clean.
10. Can I Make a Dairy-Free Version?
Absolutely! Swap out the dairy ingredients for:
- Almond or oat milk + lemon juice as a buttermilk substitute.
- Vegan butter for the cupcakes and frosting.
- Dairy-free cream cheese for a plant-based frosting option.
Creative Ways to Serve Green Velvet Cupcakes
These cupcakes are already stunning on their own, but here are some ideas to take them to the next level:
- Create a St. Patrick’s Day Dessert Board – Arrange these cupcakes alongside gold-wrapped chocolates, rainbow candy, and green macarons for a festive spread.
- Make Mini Cupcakes – Use a mini muffin tin and reduce the baking time for bite-sized treats.
- Serve with a Whipped Cream Topping – For a lighter alternative to cream cheese frosting.
- Pair with Irish Coffee or Mint Hot Chocolate – A delicious match for a cozy celebration.
A Festive Treat for Every Occasion
There’s something magical about taking a classic recipe and giving it a fun, colorful twist. Green Velvet Cupcakes are more than just a festive treat—they’re a celebration of creativity, flavor, and the joy of baking.
Whether you’re making them for St. Patrick’s Day, Christmas, a themed party, or just because you love a good cupcake, these are sure to be a hit. Their vibrant color, moist texture, and creamy frosting make every bite a delight.
So next time you want to add a little color and fun to your dessert table, whip up a batch of these cupcakes, share them with loved ones, and enjoy the magic that comes with every bite.
Print
Green Velvet Cupcakes: A Festive Twist on a Classic Treat
- Total Time: 32 minutes
- Yield: 12 cupcakes
Description
These Green Velvet Cupcakes are a festive twist on the classic red velvet, offering the same moist texture and subtle cocoa flavor but with a vibrant emerald hue. Topped with rich cream cheese frosting, they’re perfect for St. Patrick’s Day, Christmas, or any fun celebration!
Ingredients
For the Cupcakes:
- 2 cups all-purpose flour
- 1 cup granulated sugar
- 2 teaspoons baking powder
- 1 teaspoon salt
- ½ cup unsalted butter, softened
- 1 cup buttermilk
- 2 large eggs, lightly beaten
- 1 teaspoon vanilla extract
- 2 tablespoons cocoa powder
- Green gel food coloring
- Gold sprinkles (optional, for surprise filling)
For the Cream Cheese Frosting:
- 8 ounces cream cheese, softened
- ½ cup unsalted butter, softened
- 4 cups powdered sugar
- 1 teaspoon vanilla extract
Instructions
- Mix the Batter: In a bowl, whisk together flour, baking powder, salt, and cocoa powder. In another bowl, cream butter and sugar until light and fluffy. Mix in eggs, vanilla, and buttermilk. Gradually combine with the dry mixture and add green food coloring.
- Bake to Perfection: Preheat oven to 350°F (175°C). Line a cupcake tray and fill liners halfway. Bake for 15-17 minutes or until a toothpick inserted in the center comes out clean.
- Add a Surprise Filling (Optional): Once cooled, scoop out a small section from the center of each cupcake, fill with gold sprinkles, and replace the removed section.
- Prepare the Frosting: Beat butter until fluffy, then mix in cream cheese and vanilla. Gradually add powdered sugar and continue beating until smooth.
- Decorate and Serve: Pipe frosting onto cooled cupcakes and sprinkle with extra gold decorations for a festive touch.
Notes
- Using gel food coloring ensures a vibrant color without affecting batter consistency.
- To make them gluten-free, substitute all-purpose flour with a gluten-free 1:1 baking blend.
- Store unfrosted cupcakes in an airtight container at room temperature for up to 3 days, or freeze for up to 3 months.
- Frosted cupcakes should be refrigerated but brought to room temperature before serving for the best texture.
- Prep Time: 15 minutes
- Cook Time: 17 minutes
- Category: Dessert
- Method: Baking
- Cuisine: American