
A Bite of Nostalgia: The Story Behind This Recipe
Easter has always been one of my favorite times of the year. It’s a season of renewal, warmth, and togetherness, marked by family traditions that revolve around delicious food and sweet indulgences. As a child, nothing excited me more than waking up on Easter morning to find my basket filled with colorful chocolates, marshmallow treats, and, of course, the iconic Mini Eggs.
But there was one tradition that stood above the rest—homemade Easter fudge. My grandmother was the queen of holiday baking, and her kitchen became a sugary wonderland every Easter weekend. She would spend hours melting chocolate, stirring sugar mixtures, and carefully selecting the best Easter candies to fold into her signature fudge. The smell of caramelized sugar and vanilla would fill the house, making it nearly impossible to wait until the fudge had set.
As I grew older, I found myself drawn to this tradition, recreating her recipe with my own twist. I kept the creamy white chocolate base but experimented with different Easter chocolates, mixing in everything from Mini Eggs to Creme Eggs and even the occasional chocolate bunny. What I love most about this recipe is its simplicity—there’s no need for complicated techniques, yet the result is a fudge so rich, creamy, and packed with Easter flavors that it feels like a celebration in every bite.
Now, this Easter fudge has become a staple in my home, a treat that brings back childhood memories while creating new ones. Whether you’re making it as a gift, serving it at an Easter gathering, or just indulging in a personal sweet moment, this fudge is guaranteed to spread joy.
Why This Easter Fudge is the Ultimate Holiday Treat
1. A Celebration of Chocolate
This fudge isn’t just a dessert—it’s a chocolate lover’s dream. The creamy white chocolate base provides the perfect contrast to the colorful, crunchy Easter candies folded inside. Every bite delivers a mix of textures and flavors, from the smooth melt-in-your-mouth fudge to the delightful crunch of Mini Eggs and the gooey decadence of Creme Eggs.
2. Perfect for Gifting and Sharing
Easter is a time of giving, and this fudge makes for a thoughtful homemade gift. Cut into bite-sized pieces and packaged in decorative tins or small gift bags, it’s an ideal treat to share with friends, family, and coworkers. Unlike store-bought chocolates, this homemade fudge adds a personal touch, showing just how much love and effort went into creating it.
3. Simple, Yet Impressive
One of the best things about this recipe is its simplicity. While some traditional fudges require a candy thermometer and careful temperature monitoring, this Easter fudge is straightforward and beginner-friendly. The key is patience—allowing the fudge to set properly ensures the perfect texture.
4. A Versatile Base for Creativity
The beauty of this recipe is that it serves as a blank canvas for creativity. While the white chocolate base pairs beautifully with Easter candies, you can easily swap it for milk or dark chocolate if you prefer. You can also mix in nuts, dried fruit, or even a drizzle of caramel for an extra layer of indulgence.
Ingredients: A Sweet Symphony of Flavors
For the Fudge Base:
- 450g double cream
- 550g caster sugar
- 200g golden syrup
- 2 tsp vanilla extract
- 200g white chocolate
For the Decorations:
- 600g mixed Easter chocolates (Mini Eggs, Creme Eggs, Galaxy Eggs, etc.)
Directions: Crafting the Perfect Easter Treat
Step 1: Prepare the Base
- Grease and line a 9-inch square tin with parchment paper.
- In a large pan, combine the cream, sugar, syrup, and vanilla extract.
- Heat gently, stirring continuously until the sugar fully dissolves.
Step 2: Heat to Perfection
- Bring the mixture to a boil and continue heating until it reaches 116°C (use a sugar thermometer for accuracy).
- Remove from heat and beat the mixture for 5-10 minutes until it thickens and lightens slightly in color.
Step 3: Add the White Chocolate
- Stir in the white chocolate, letting it melt into the mixture while beating.
Step 4: Incorporate the Easter Treats
- Quickly fold in the Easter chocolates, allowing them to slightly melt into the fudge.
Step 5: Set and Serve
- Pour the mixture into the prepared tin, spreading it evenly.
- Allow the fudge to set in a cool place for at least 4 hours, preferably overnight.
- Once set, cut into bite-sized pieces and enjoy!
Nutritional Breakdown: Indulge Responsibly
- Calories: Approximately 150 kcal per piece
- Fat: 8g
- Carbohydrates: 18g
- Sugar: 16g
- Protein: 1g
- Sodium: 10mg
The Secret to Perfect Fudge: Expert Tips and Tricks
1. Use a Sugar Thermometer for Precision
While it’s possible to make this fudge without a thermometer, using one ensures accuracy. The fudge mixture needs to reach 116°C (soft-ball stage) for it to set properly. If the temperature is too low, the fudge may remain soft and sticky; if it’s too high, it can become grainy.
2. Stir, But Not Too Much
Stirring is essential in the early stages to dissolve the sugar and prevent burning. However, once the mixture starts boiling, resist the urge to stir too frequently. Over-stirring can cause sugar crystallization, leading to a grainy texture instead of the smooth, creamy consistency you want.
3. Choose High-Quality Chocolate
Since white chocolate is the star ingredient, quality matters. Opt for a high-quality white chocolate bar rather than white chocolate chips, which often contain stabilizers that can affect texture.
4. Let It Set Properly
Patience is key! Allow the fudge to set for at least 4 hours, preferably overnight. While it may be tempting to speed up the process by placing it in the fridge, doing so can sometimes cause condensation, altering the texture. A cool room-temperature setting is ideal.
Ways to Customize Your Easter Fudge
1. Swap the Chocolate Base
- Milk Chocolate Fudge: Replace the white chocolate with milk chocolate for a classic, rich flavor.
- Dark Chocolate Fudge: If you love a deeper, slightly bitter taste, dark chocolate is a great alternative.
- Marbled Fudge: Swirl white and milk chocolate together for a stunning visual effect.
2. Get Creative with Easter Candies
While Mini Eggs and Creme Eggs are traditional favorites, you can experiment with:
- Galaxy Caramel Eggs for an extra gooey texture
- Lindt Lindor Truffles for a touch of luxury
- Chocolate-covered marshmallows for a softer, fluffier element
3. Add a Crunchy Element
If you love a bit of crunch in your fudge, consider adding:
- Chopped hazelnuts or almonds
- Crushed pretzels for a salty-sweet contrast
- Crispy rice cereal for a light, airy texture
4. Drizzle on Some Extra Indulgence
For a gourmet touch, try:
- A drizzle of melted caramel
- A swirl of peanut butter
- A dusting of crushed freeze-dried raspberries for a pop of color and tartness
Frequently Asked Questions (FAQs)
1. Can I Make This Fudge Without a Thermometer?
Yes, but it’s riskier. If you don’t have a sugar thermometer, you can use the soft-ball test: Drop a small amount of the hot fudge mixture into a bowl of cold water. If it forms a soft, pliable ball that holds its shape but flattens slightly when pressed, it’s ready.
2. How Long Does Easter Fudge Last?
Stored in an airtight container at room temperature, this fudge will stay fresh for up to two weeks. If you prefer a firmer texture, you can store it in the fridge.
3. Can I Freeze This Fudge?
Yes! Wrap the fudge tightly in parchment paper and place it in an airtight container before freezing. It can last up to three months. When ready to enjoy, let it thaw at room temperature for about an hour.
4. My Fudge Didn’t Set. What Went Wrong?
The most common reasons for fudge not setting include:
- Not cooking the mixture to 116°C
- Not beating the fudge long enough before pouring it into the tin
- Too much moisture in the ingredients (using low-quality chocolate or adding mix-ins that contain water)
5. Can I Make This Recipe Dairy-Free?
Absolutely! Swap the double cream for full-fat coconut cream and use a dairy-free white chocolate alternative. Some Easter chocolates may contain milk, so check labels or use dairy-free options.
Conclusion: The Ultimate Easter Treat
Easter is a time for celebration, and what better way to indulge than with homemade Easter fudge? This recipe is a beautiful blend of nostalgia, creativity, and indulgence, making it perfect for sharing with loved ones or treating yourself.
With its creamy texture, playful mix-ins, and endless customization options, this fudge is more than just a dessert—it’s an experience. Whether you stick to the classic recipe or put your own twist on it, one thing is certain: this fudge will become an Easter tradition in your home, just like it has in mine.
So, grab your favorite chocolates, get melting, and enjoy the magic of homemade fudge this Easter!
Print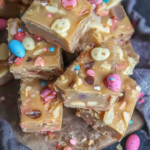
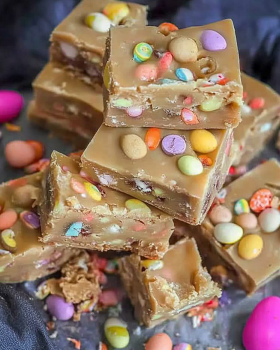
Easter Fudge: A Sweet Treat for the Holiday Season
- Total Time: 4 hours 30 minutes (including setting time)
- Yield: 20-25 pieces
Description
Celebrate Easter with this rich, creamy, and indulgent homemade fudge! A smooth white chocolate base loaded with colorful Easter chocolates like Mini Eggs and Creme Eggs makes this the perfect holiday treat. Easy to make and even easier to enjoy, this fudge is great for gifting, sharing, or savoring all to yourself!
Ingredients
For the Fudge Base:
- 450g double cream
- 550g caster sugar
- 200g golden syrup
- 2 tsp vanilla extract
- 200g white chocolate
For the Decorations:
- 600g mixed Easter chocolates (Mini Eggs, Creme Eggs, Galaxy Eggs, etc.)
Instructions
- Prepare the Base:
- Grease and line a 9-inch square tin with parchment paper.
- In a large pan, combine the cream, sugar, syrup, and vanilla extract.
- Heat gently, stirring continuously until the sugar fully dissolves.
- Heat to Perfection:
- Bring the mixture to a boil and continue heating until it reaches 116°C (use a sugar thermometer for accuracy).
- Remove from heat and beat the mixture for 5-10 minutes until it thickens and lightens slightly in color.
- Add the White Chocolate:
- Stir in the white chocolate, letting it melt into the mixture while beating.
- Incorporate the Easter Treats:
- Quickly fold in the Easter chocolates, allowing them to slightly melt into the fudge.
- Set and Serve:
- Pour the mixture into the prepared tin, spreading it evenly.
- Allow the fudge to set in a cool place for at least 4 hours, preferably overnight.
- Once set, cut into bite-sized pieces and enjoy!
Notes
- Use a Sugar Thermometer: Ensures the fudge reaches the right consistency.
- Choose High-Quality Chocolate: The better the chocolate, the smoother the fudge.
- Let it Set Properly: Avoid refrigeration as it can alter the texture.
- Storage: Store in an airtight container at room temperature for up to two weeks.
- Prep Time: 10 minutes
- Cook Time: 20 minutes
- Category: Dessert
- Method: Stovetop
- Cuisine: Holiday Treat