
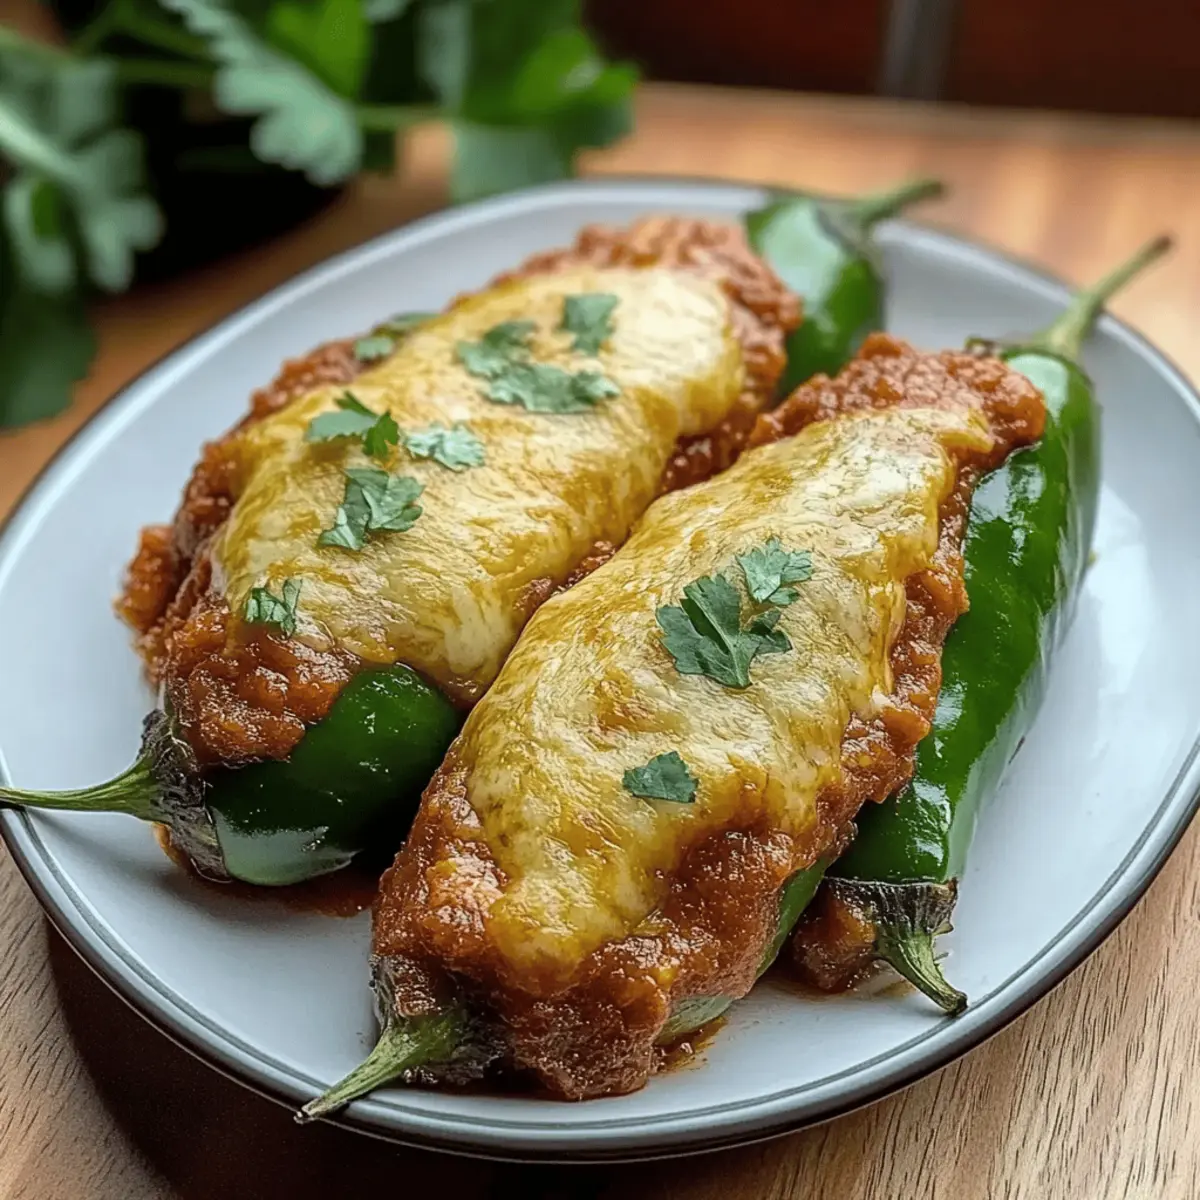
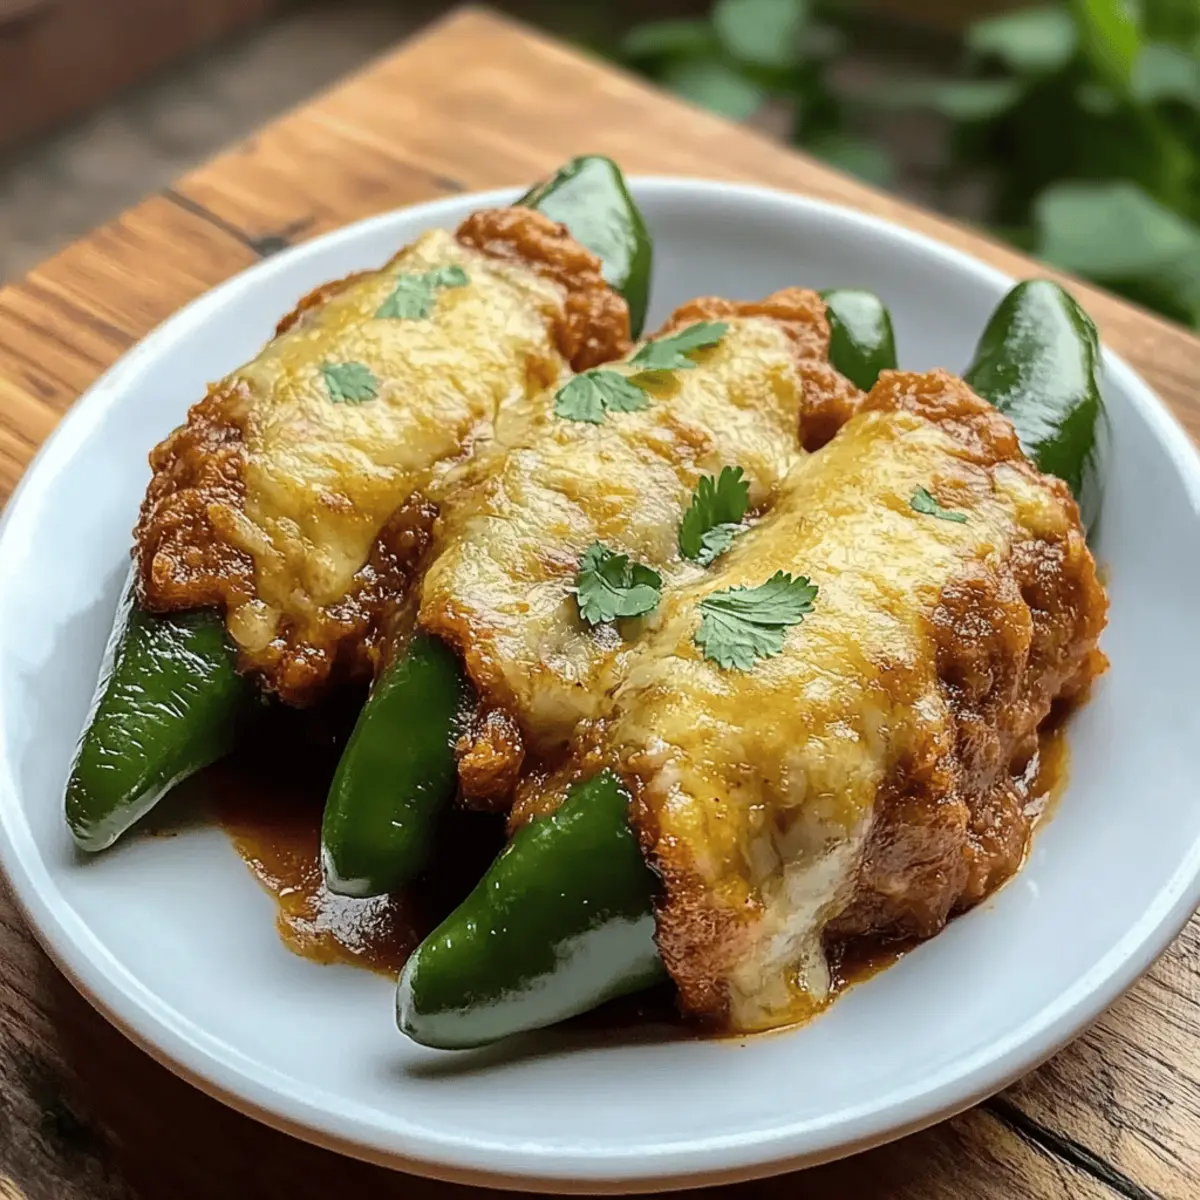
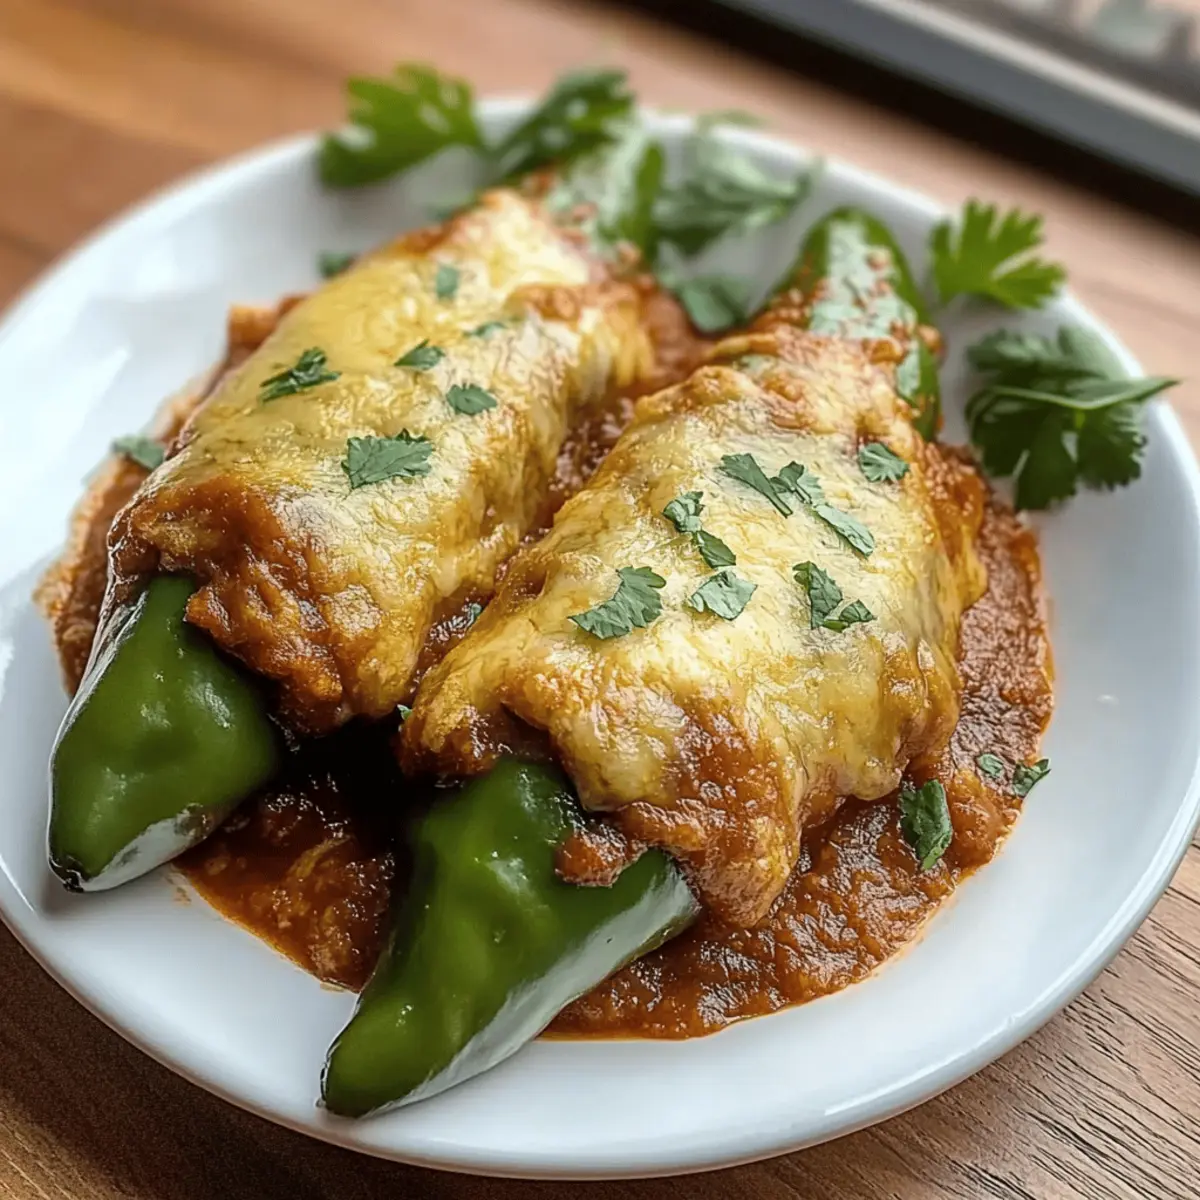
The aroma of roasting chiles wafts through the kitchen, tinged with memories of joyful gatherings and shared meals. When I first tackled the art of making Cheesy Hatch Chile Rellenos, I discovered a dish that not only satisfies my cravings for comfort food but also sparks delight for anyone sitting at the table. These smoky, golden-brown poblano peppers are stuffed with creamy Oaxaca cheese and embraced in a fluffy batter, creating a crispy exterior that envelops a tender, cheesy core. What makes this recipe even better? It’s a gluten-friendly option that keeps all the indulgent flavors while being perfect for vegetarians. Whether you’re preparing for a cozy family dinner or impressing friends at a gathering, these Cheesy Hatch Chile Rellenos are bound to win hearts. Are you ready to spice up your next meal with this delicious comfort food?
Why are Cheesy Hatch Chile Rellenos irresistible?
Comforting, Creamy Goodness: These Cheesy Hatch Chile Rellenos offer a delightful balance of smoky flavors and melty cheese that create a cozy meal.
Crispy Perfection: With a light, airy batter enveloping tender peppers, each bite delivers a satisfying crunch that’s hard to resist.
Flavorful Versatility: Swap in different cheeses or adjust the spice level to match your cravings—there’s no wrong way to enjoy them!
Easy to Make: Get ready to impress without fuss; this simple recipe will have you whipping up restaurant-quality comfort food at home.
Perfect for Any Occasion: Whether it’s a family dinner or a festive gathering, these stuffed chiles are sure to steal the show and leave everyone wanting more!
Cheesy Hatch Chile Rellenos Ingredients
• Get ready to create this comforting dish!
For the Rellenos
- Hatch Green Chiles – Offering a unique smoky flavor and heat, you can substitute poblano peppers if necessary.
- Oaxaca Cheese – The star filling that provides a creamy melt; you can replace it with mozzarella or Monterey Jack for a similar effect.
- Eggs – They help create a light, fluffy batter; don’t forget to separate the whites for beating.
- All-Purpose Flour – Used for coating and ensuring the batter sticks; while no direct substitutions are advised, gluten-free flour can be a fun experiment.
- Salt – Enhances the overall flavor—it’s essential in both the batter and sauce.
- Garlic Powder – Adds depth to the batter; feel free to swap in fresh garlic if you prefer a more intense taste.
- Vegetable Oil – A must for frying; stick to high smoke point oils like canola or peanut oil.
For the Red Sauce
- Tomatoes – The base for your homemade sauce; any fresh variety like Roma works beautifully.
- White Onion – Sweetness and depth added to the sauce; yellow onion can serve in its place if needed.
- Garlic Cloves – Essential for flavor in the sauce; garlic powder can substitute in a pinch.
- Cilantro – A fresh herb that brightens the sauce, though feel free to omit it if it’s not your thing.
- Jalapenos – Optional for those who want to kick up the heat; adjust based on your spice preference.
These ingredients come together to create the comforting, flavorful experience that is Cheesy Hatch Chile Rellenos—perfect for anyone looking to bring joy back to the dinner table!
Step‑by‑Step Instructions for Cheesy Hatch Chile Rellenos
Step 1: Prep Chiles
Begin by broiling the Hatch green chiles. Preheat your oven and line a baking sheet with foil to catch drippings. Place the chiles on the pan and broil for 10–20 minutes, turning occasionally, until the skins are blackened and blistered. This step releases their smoky flavors, creating the perfect base for your Cheesy Hatch Chile Rellenos.
Step 2: Steam
Once the chiles are charred, carefully transfer them into a plastic bag. Seal the bag and let them steam for 10–15 minutes. This steaming process allows the skins to loosen, making them easier to peel. You’ll know they’re ready when you can easily touch the chiles without burning your fingers!
Step 3: Peel & Prep
After steaming, remove the chiles from the bag. Gently peel off the charred skins, being careful not to tear the chiles. Next, cut a slit down the side of each chile without cutting all the way through. Remove the seeds, and secure the openings with toothpicks. Your chiles are now ready to be transformed into Cheesy Hatch Chile Rellenos!
Step 4: Make Batter
In a mixing bowl, beat the egg whites until stiff peaks form, using an electric mixer for the best results. Gently fold in the egg yolks to create a light and airy batter. This fluffy batter is what gives your chiles a wonderful texture when fried. Avoid overmixing to keep the volume.
Step 5: Flour Mix
Combine the all-purpose flour, salt, and garlic powder in a shallow dish. This will create a coating for your chiles, helping the batter stick during frying. Spread the flour mixture evenly to ensure easy dredging later on. Setting this up in advance makes the frying process smoother for your Cheesy Hatch Chile Rellenos.
Step 6: Fry
Heat vegetable oil in a deep skillet or fryer until it reaches 350°F (175°C). Dredge each stuffed chile lightly in the flour, ensuring it’s coated completely. Next, dip the floured chilies into the batter, letting the excess drip off. Carefully place them in the hot oil, frying for 2–3 minutes per side or until they’re golden brown and crispy.
Step 7: Prepare Sauce
While the chiles are frying, make the red sauce. In a blender, combine ripe tomatoes, chopped white onion, garlic cloves, cilantro, and salt. Blend until smooth, then pour the mixture into a saucepan. Heat over medium until the sauce simmers, stirring occasionally. This sauce will add a delicious touch to your Cheesy Hatch Chile Rellenos when served.
What to Serve with Cheesy Hatch Chile Rellenos?
Elevate your delicious meal with complementary sides that enhance the comforting flavors and textures of these delightful stuffed chiles.
- Warm Tortillas: Flour or corn tortillas are perfect for scooping up bites of the chiles and soaking up the rich sauce.
- Refried Beans: Creamy, savory refried beans add a hearty element that balances the dish while providing additional protein.
- Fresh Avocado Salad: A crisp salad with ripe avocados, lime, and cilantro offers a refreshing contrast to the smoky, cheesy richness.
- Mexican Rice: Fluffy Mexican rice adds a lovely texture; its mild flavors provide an excellent backdrop to the bold rellenos.
- Pickled Jalapeños: For spice lovers, tangy pickled jalapeños bring a zesty kick to complement the richness of the chiles.
- Sour Cream or Crema: A dollop of sour cream or creamy Mexican crema adds coolness and a subtle tang, balancing the heat.
- Margaritas: Pair with a fresh margarita for the ultimate experience; the citrus notes hit the right refreshing spot.
- Churros for Dessert: End your meal on a sweet note with crispy churros dipped in chocolate, a delightful contrast to the savory appetizers.
- Spicy Slaw: A crunchy slaw made with cabbage and a touch of heat introduces a bold brightness that contrasts beautifully with the chiles.
Cheesy Hatch Chile Rellenos Variations
Feel free to get creative with these delicious Cheesy Hatch Chile Rellenos and discover new flavor profiles that delight the senses!
-
Dairy-Free: Use a plant-based cheese alternative to keep the creamy filling while maintaining a dairy-free option. This swap can satisfy guests with dietary restrictions without compromising on flavor.
-
Spicy Kick: Add diced jalapeños or a dash of hot sauce to the filling for an extra layer of heat. This way, you can adjust each batch to suit your spice tolerance—perfect for those who crave a little more adventure!
-
Smoky Flavor Boost: Mix in some smoked paprika or chipotle powder to the batter for an added smoky dimension. This subtle tweak can elevate your Cheesy Hatch Chile Rellenos to a whole new level of flavor.
-
Veggie Lovers: Incorporate black beans or corn into the cheese filling for added texture and flavor. Not only will this enhance the dish’s heartiness, but it also creates a more colorful presentation that’s sure to impress.
-
Savory Herb Infusion: Add fresh herbs like parsley or oregano into the batter or sauce for an aromatic twist. This enriches every bite, bringing a garden-fresh brightness that complements the smokiness of the chiles.
-
Egg-Free Option: Replace eggs in the batter with aquafaba (the liquid from canned chickpeas) for a vegan variant. This option still delivers the airy texture needed for the perfect crispy coating.
-
Serving Twist: Serve these Cheesy Hatch Chile Rellenos over a bed of quinoa or rice instead of sauce for a satisfying, meal-like dish. This hearty base can absorb all those delicious flavors, making every bite truly fulfilling.
-
Mild Version: If you want a gentler spice level, opt for mild Hatch chiles or remove all seeds. This makes them suitable for those who enjoy a comforting experience without the heat.
Feel free to explore these variations to tailor this family-loved recipe to your tastes! And if you’re looking for delightful sides, consider pairing your Rellenos with a fresh salad or warm tortillas for a complete feast.
Make Ahead Options
These Cheesy Hatch Chile Rellenos are perfect for meal prep, allowing you to save time on busy weeknights! You can roast and peel the Hatch chiles up to 24 hours ahead of time; simply store them in an airtight container in the refrigerator to maintain their quality. Additionally, you can prepare the batter and the red sauce up to 3 days in advance; just be sure to keep them sealed and refrigerated. When you’re ready to serve, simply stuff the chiles, dredge them in flour and batter, and fry for that crispy perfection you crave. With these make-ahead options, you’ll enjoy delicious, homemade comfort food with minimal effort!
Expert Tips for Cheesy Hatch Chile Rellenos
-
Roasting Chiles: Properly roast and peel the hatch chiles to avoid bitterness; this brings out their delightful smoky flavor essential for Cheesy Hatch Chile Rellenos.
-
Stuffing Wisely: Avoid overstuffing the chiles; aim for about 1 ounce of cheese per chile to prevent bursting during frying.
-
Frying Temperature: Maintain the oil temperature at 350°F (175°C) for a perfectly crispy texture; frying in small batches helps achieve this without cooling the oil.
-
Batter Freshness: Don’t let the batter sit for long; use it immediately after mixing to ensure the airy fluffiness that makes these Rellenos so delightful.
-
Sauce Variations: Feel free to customize the red sauce with herbs or spices that match your taste; fresh ingredients elevate the overall flavor of your dish!
Storage Tips for Cheesy Hatch Chile Rellenos
Fridge: Store leftovers in an airtight container in the fridge for up to 3 days to maintain freshness while enjoying your Cheesy Hatch Chile Rellenos.
Freezer: For best results, freeze uncooked rellenos by placing them on a baking sheet until firm, then transfer to a freezer-safe bag for up to 2 months.
Reheating: When ready to enjoy, cook frozen rellenos directly from the freezer. Bake in a preheated oven at 375°F (190°C) for about 20-25 minutes until heated through and crispy.
Preventing Sogginess: Always let cooked chiles cool completely before storing to prevent moisture buildup in the container.

Cheesy Hatch Chile Rellenos Recipe FAQs
How do I select the right Hatch chiles?
Absolutely! Look for Hatch chiles that are firm, shiny, and free from any dark spots or blemishes. If you can’t find Hatch chiles, poblano peppers are a great substitute, though they have a milder flavor.
What’s the best way to store leftover Cheesy Hatch Chile Rellenos?
Store your leftovers in an airtight container in the fridge for up to 3 days. This preserves their delicious flavor and texture, making them a joyful thing to heat up the next day!
Can I freeze Cheesy Hatch Chile Rellenos?
Yes, indeed! To freeze uncooked rellenos, place them on a baking sheet to firm up for about an hour. Then transfer them into a freezer-safe bag or container, and they’ll keep for up to 2 months. When you’re ready to enjoy, bake them from frozen at 375°F (190°C) for about 20-25 minutes until crispy!
What if my batter isn’t whipping up properly?
If your egg whites aren’t reaching stiff peaks, ensure your mixing bowl is completely clean and dry, as any grease can affect whipping. Also, avoid any yolk in the whites; even a tiny bit can prevent the right texture. Patience is key—whip until they’re super fluffy!
Are these Cheesy Hatch Chile Rellenos suitable for vegans or gluten-free diets?
While this recipe is vegetarian, those following a vegan diet can substitute the cheese with a vegan alternative and the eggs with aquafaba (chickpea water) or a vegan egg substitute. For a gluten-free option, swap all-purpose flour with gluten-free flour for breading and ensure your ingredients are certified gluten-free.
Can I make the red sauce ahead of time?
Absolutely! You can make the red sauce in advance and refrigerate it for 3-4 days. It can also be frozen for up to 3 months; just reheat it gently over low heat before serving with your Cheesy Hatch Chile Rellenos to really bring out the flavors!
Cheesy Hatch Chile Rellenos: A Crispy Comfort Food Dream
Ingredients
Equipment
Method
- Begin by broiling the Hatch green chiles. Preheat your oven and line a baking sheet with foil to catch drippings. Place the chiles on the pan and broil for 10–20 minutes, turning occasionally, until the skins are blackened and blistered.
- Once the chiles are charred, carefully transfer them into a plastic bag. Seal the bag and let them steam for 10–15 minutes.
- After steaming, remove the chiles from the bag. Gently peel off the charred skins, cut a slit down the side of each chile, remove the seeds, and secure the openings with toothpicks.
- In a mixing bowl, beat the egg whites until stiff peaks form, then gently fold in the egg yolks.
- Combine the all-purpose flour, salt, and garlic powder in a shallow dish.
- Heat vegetable oil in a deep skillet or fryer until it reaches 350°F (175°C). Dredge each stuffed chile in the flour mixture and then dip into the batter.
- Carefully place the chiles in the hot oil, frying for 2–3 minutes per side until golden brown and crispy.
- While the chiles are frying, blend tomatoes, onion, garlic, cilantro, and salt in a blender until smooth. Heat in a saucepan over medium until the sauce simmers.