
There’s something undeniably comforting about chicken pot pie—the creamy filling, tender chicken, and perfectly seasoned vegetables all wrapped in a flaky crust. But what if you could enjoy all the rich flavors of this beloved dish without the extra carbs, calories, or the hassle of making a crust? That’s where the Crustless Chicken Pot Pie comes in.
This dish delivers the same warmth and satisfaction of a traditional pot pie but skips the pastry, making it a one-pot meal that’s quicker, healthier, and easier to prepare. Whether you’re short on time, following a gluten-free diet, or just looking for a lighter version of a classic comfort food, this recipe is a game-changer.
In this article, we’ll dive deep into why this dish is a must-try, explore different ways to customize it, discuss storage and meal prep options, and answer some frequently asked questions. By the end, you’ll be ready to whip up this delicious and nutritious meal with confidence.
Why Skip the Crust? The Benefits of a Crustless Chicken Pot Pie
Many people think that the crust is what makes a chicken pot pie complete, but the truth is, the magic is in the filling. By removing the crust, you get a dish that’s:
1. Faster and Easier to Make
Making and rolling out a pie crust takes time, and pre-made store-bought crusts often contain preservatives, unhealthy fats, and refined carbohydrates. By skipping the crust, you cut down on prep time and eliminate an unnecessary step while still preserving all the delicious flavors.
2. A Healthier Comfort Food
While the crust adds texture, it also adds extra calories and carbs. A crustless version keeps the dish light and wholesome while still being filling. This makes it perfect for those following a low-carb, gluten-free, or balanced diet without sacrificing the cozy, creamy goodness.
3. A One-Pot Meal with Minimal Cleanup
Fewer dishes = happier cooks. Since everything is cooked in a single pot or skillet, you save time on cleanup, making this a practical meal for busy weeknights.
4. Customizable for Any Diet
One of the best things about this dish is its versatility. Whether you need a dairy-free, keto-friendly, paleo, or plant-based version, it’s easy to adjust the ingredients to suit your needs.
Ingredients: Simple and Wholesome
Main Ingredients:
- Olive oil – For browning the chicken and adding a rich depth of flavor.
- Chicken breasts – Lean protein that keeps the dish hearty and satisfying.
- Onion & garlic – The base of any good comfort dish, adding sweetness and aroma.
- Carrots & celery – Classic pot pie vegetables that bring crunch, color, and nutrition.
- Spices (parsley, rosemary, thyme, basil) – Dried or fresh, these herbs infuse the dish with warmth.
- Whole wheat flour – Used as a thickener; can be substituted with gluten-free 1:1 flour or tapioca flour.
- Chicken broth – Provides a rich and flavorful base for the sauce.
- Milk – Adds creaminess without the need for heavy cream (regular or dairy-free).
- Frozen peas & corn – A touch of sweetness and color, rounding out the dish.
Directions: From Stovetop to Table in No Time
- Sauté the Chicken – Heat olive oil in a large pot over medium heat. Add cubed chicken and cook until lightly browned.
- Add the Vegetables – Stir in the onion, garlic, carrots, and celery, cooking until they start to soften.
- Build the Sauce – Sprinkle in the spices and flour, then slowly pour in the chicken broth, stirring continuously.
- Thicken the Filling – Let the mixture come to a simmer, then stir in the milk to create a creamy consistency.
- Finish with Vegetables – Add the defrosted peas and corn, stirring until well combined.
- Serve & Enjoy – Dish up the pot pie filling as is, or serve over rice, mashed potatoes, or roasted vegetables.
Nutritional Breakdown: A Balanced, Wholesome Meal
- Calories: ~506 kcal per serving
- Protein: 59g
- Carbohydrates: 43g
- Fat: 11g
- Fiber: 8g
- Sodium: 555mg
How to Customize Your Crustless Chicken Pot Pie

One of the biggest advantages of this recipe is how easily adaptable it is. Here are a few ways you can make it your own:
1. Make It Dairy-Free
If you’re lactose intolerant or avoiding dairy, swap out regular milk for unsweetened almond, coconut, or oat milk. For an extra creamy texture, try a splash of coconut cream or cashew cream.
2. Make It Gluten-Free
The recipe already uses a gluten-free thickening option, such as tapioca flour or gluten-free 1:1 flour. Avoid all-purpose flour if you’re sensitive to gluten.
3. Boost the Veggies
This dish is already packed with nutrient-dense vegetables like carrots, celery, peas, and corn, but you can add even more variety:
- Spinach or kale for extra iron and fiber
- Green beans for a crunchy bite
- Mushrooms for a hearty, umami flavor
- Butternut squash or sweet potatoes for a natural sweetness
4. Adjust the Protein
Chicken is a staple in pot pies, but you can switch things up with:
- Turkey – A great way to use up Thanksgiving leftovers
- Rotisserie chicken – For an even quicker meal
- Tofu or chickpeas – A plant-based alternative that still provides protein
- Ground turkey or chicken – A leaner option with great texture
5. Give It a Crunchy Topping
While this dish doesn’t need a crust, you can still add some texture by sprinkling:
- Panko breadcrumbs
- Crushed crackers
- Toasted almond slivers
- Shredded cheese (if not dairy-free)
Pop it under the broiler for a few minutes to crisp it up.
Storage and Meal Prep Tips
How to Store Leftovers
One of the best things about this dish is that it stores beautifully. Simply transfer leftovers to an airtight container and refrigerate for up to 4 days.
Can You Freeze It?
Yes! This dish freezes well for up to 3 months. Here’s how to do it:
- Let the mixture cool completely before transferring it to a freezer-safe container.
- Store in individual portions for easy reheating.
- Label with the date to keep track of freshness.
Reheating Instructions
- Stovetop: Heat in a saucepan over medium heat, stirring occasionally, until warmed through.
- Microwave: Heat in a microwave-safe dish in 30-second intervals, stirring in between, until hot.
- Oven: Transfer to an oven-safe dish, cover with foil, and bake at 350°F (175°C) for 15-20 minutes.
Frequently Asked Questions (FAQs)
1. Why is my filling watery?
If your filling is too thin, it may be because:
- You didn’t cook it long enough for the liquid to reduce.
- You forgot to add the thickener (flour or a gluten-free alternative).
- Your frozen vegetables weren’t fully drained, adding extra moisture to the dish.
2. Can I make this in a slow cooker?
Yes! To make it in a slow cooker:
- Add all ingredients except the milk and thickener to the crockpot.
- Cook on low for 6-8 hours or high for 3-4 hours.
- Mix the milk and thickener separately, then stir it in during the last 30 minutes to thicken the filling.
3. Can I add a crust on top?
Absolutely! If you still want some crunch, try:
- Baking a sheet of puff pastry separately and serving it on the side.
- Adding a biscuit topping and baking until golden brown.
4. What side dishes go well with this?
While this dish is a complete meal on its own, here are a few sides that complement it well:
- Mashed potatoes or cauliflower mash
- A fresh green salad
- Garlic bread or dinner rolls
- Roasted vegetables like Brussels sprouts or asparagus
5. Is this meal good for weight loss?
Yes! This dish is packed with lean protein, fiber, and nutrient-rich vegetables, making it a filling yet low-calorie option. If you’re watching your calories, reduce the milk or use a lighter alternative and opt for extra vegetables instead of flour-based thickeners.
Conclusion: The Perfect Comfort Food Without the Guilt
The Crustless Chicken Pot Pie is proof that comfort food can be both delicious and nutritious. By skipping the crust, you’re left with a hearty, creamy, and protein-packed dish that’s easy to make, meal-prep friendly, and adaptable for any dietary need.
Whether you’re looking for a quick family dinner, a meal-prep favorite, or a cozy dish for colder months, this recipe is sure to satisfy. Give it a try, and you may never go back to traditional chicken pot pie again!
Would you like more variations on this recipe? Let us know in the comments!
Print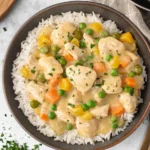
Crustless Chicken Pot Pie: A Comforting Classic with a Healthy Twist
- Total Time: 30 minutes
- Yield: 4 servings
Description
Love the comforting flavors of chicken pot pie but want a lighter, quicker, and healthier version? This Crustless Chicken Pot Pie brings all the creamy, hearty goodness of the classic dish—without the hassle of making a crust! Packed with tender chicken, a velvety sauce, and flavorful veggies, this one-pot meal is a game-changer for busy nights. Plus, it’s naturally gluten-free, lower in carbs, and easy to customize. Cozy up with this nutritious and satisfying dish today!
Ingredients
- 2 tablespoons olive oil
- 1 pound boneless, skinless chicken breasts, cubed
- 1 small onion, diced
- 2 cloves garlic, minced
- 2 medium carrots, diced
- 2 celery stalks, chopped
- 1 teaspoon dried parsley
- ½ teaspoon dried rosemary
- ½ teaspoon dried thyme
- ½ teaspoon dried basil
- 2 tablespoons whole wheat flour (or gluten-free 1:1 flour)
- 2 cups low-sodium chicken broth
- 1 cup milk (regular or dairy-free alternative)
- ½ cup frozen peas
- ½ cup frozen corn
- Salt and pepper to taste
Instructions
1. Sauté the Chicken
- Heat olive oil in a large pot over medium heat.
- Add cubed chicken and cook until lightly browned on all sides. Remove from the pan and set aside.
2. Cook the Vegetables
- In the same pot, add diced onion, garlic, carrots, and celery.
- Sauté for 3-5 minutes until the vegetables begin to soften.
3. Build the Sauce
- Sprinkle in the parsley, rosemary, thyme, basil, and flour. Stir to coat the vegetables.
- Slowly pour in the chicken broth, stirring continuously to prevent lumps.
4. Thicken the Filling
- Bring the mixture to a simmer and let it cook for 5 minutes until slightly thickened.
- Stir in the milk and continue simmering for another 3 minutes.
5. Finish with Peas & Corn
- Add the cooked chicken back into the pot.
- Stir in frozen peas and corn, cooking for another 2-3 minutes until heated through.
- Season with salt and pepper to taste.
6. Serve & Enjoy
- Enjoy as is or serve over mashed potatoes, rice, or roasted vegetables for a complete meal.
Notes
- Make It Dairy-Free: Use unsweetened almond, coconut, or oat milk instead of regular milk.
- Make It Gluten-Free: Substitute whole wheat flour with gluten-free 1:1 flour or tapioca flour.
- Storage: Refrigerate leftovers in an airtight container for up to 4 days.
- Freezing: Let the dish cool completely before freezing in portion-sized containers for up to 3 months.
- Reheating: Warm on the stovetop over medium heat or microwave in 30-second intervals, stirring in between.
- Add a Crunchy Topping: Sprinkle with toasted breadcrumbs, crushed crackers, or shredded cheese before serving.
- Prep Time: 10 minutes
- Cook Time: 20 minutes
- Category: Main Course
- Method: Stovetop
- Cuisine: American Comfort Food