
A Tradition Built on Sticky Hands and Happy Hearts
Spring always had a certain magic in my childhood—longer days, the scent of blooming flowers, and the anticipation of Easter morning. But beyond the egg hunts and pastel decorations, one of my favorite Easter traditions was baking with my grandmother. While she was known for her beautiful cakes and homemade breads, it was the Easter Rice Krispie Nests that truly brought the family together in the kitchen.
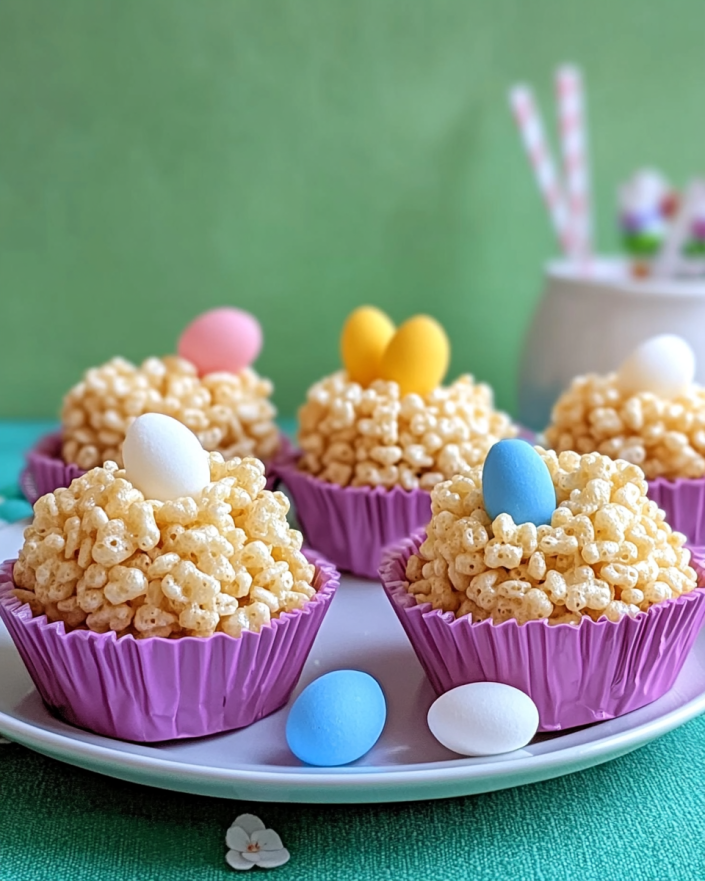
I still remember standing on a stool beside her, watching as she melted marshmallows into a gooey, golden mixture. My siblings and I eagerly stirred in the cereal, laughing as it stuck to our hands before we pressed it into nest-like shapes. The best part, of course, was decorating—placing tiny candy eggs into our marshmallow nests and imagining little chicks hatching from them.
Now, as an adult, I make these Easter Rice Krispie Nests with my own children. The recipe is simple, yet it carries so much joy. It’s a treat that bridges generations, bringing back childhood memories while creating new ones. Whether you’re making these for a festive gathering, an Easter dessert table, or simply as a fun activity with kids, these adorable no-bake nests are guaranteed to bring a smile to everyone’s face.
Why Easter Rice Krispie Nests Are the Perfect Springtime Treat
1. No Oven Required
Spring is the perfect time to enjoy no-bake desserts, and these rice cereal nests make baking easy. With no need to preheat an oven or worry about baking times, you can focus on the fun of mixing, shaping, and decorating.
2. Kid-Friendly and Interactive
One of the best things about this recipe is how hands-on it is. Kids will love stirring the gooey marshmallow mixture, pressing the nests into shape, and decorating with colorful candy eggs. It’s a great way to get little ones involved in the kitchen while creating something they’ll be excited to eat.
3. A Lighter Alternative to Traditional Easter Desserts
While Easter is filled with indulgent cakes and chocolates, Rice Krispie Nests offer a sweet treat that feels light and crispy. The marshmallow binding gives them a chewy texture, while the airy cereal makes them less rich than heavier baked goods.
4. Customizable for Any Occasion
While the classic version features mini chocolate eggs and pastel sprinkles, there are endless ways to make these nests unique. Whether you switch up the decorations for other holidays or add a fun twist to the flavor, this recipe can be adapted to suit any celebration.
Ingredients: A Fun and Festive No-Bake Delight
For the Nests:
- 2 tablespoons butter
- 8 oz (220g) marshmallows (mini or chopped large ones)
- 4 cups (110g) Rice Krispies cereal
For Decorating:
- 6 tablespoons powdered icing sugar
- 4 teaspoons water
- Green food coloring (optional)
- Mini egg candies
- Sprinkles
Directions: Creating the Perfect Easter Nests
- Prepare the Nest Base – Lightly grease a muffin tin. Melt butter and marshmallows over medium heat, then mix in Rice Krispies until fully coated.
- Shape the Nests – Spoon the mixture into the muffin tin, pressing down slightly to form nest shapes. Create a small indentation in the center. Let cool completely.
- Make the “Grass” Icing – Mix powdered sugar with water, adding green food coloring for a grassy effect.
- Decorate and Serve – Spoon icing into each nest, place mini eggs inside, and finish with festive sprinkles.
Nutritional Breakdown: A Light and Crunchy Treat
- Calories: 128 per nest
- Carbohydrates: 27g
- Protein: 1g
- Fat: 2g
- Saturated Fat: 1g
- Sugar: 16g
- Sodium: 81mg
- Fiber: 1g
Common Mistakes to Avoid
Even though this is a simple, foolproof recipe, a few small mistakes can make a big difference in texture and flavor. Here’s how to get it right every time.
1. Melting the Marshmallows Too Quickly
One of the key steps in making perfect Rice Krispie Nests is melting the marshmallows over low heat. If the heat is too high, the marshmallow mixture can become too hard when it cools, making the nests overly chewy instead of soft and gooey.
2. Not Greasing Your Hands
The marshmallow mixture is extremely sticky, so lightly greasing your hands with butter or cooking spray before shaping the nests will make the process much smoother. You can also use a buttered spoon to press them into the muffin tin.
3. Not Pressing the Center Deep Enough
Since these nests will hold candy eggs or sprinkles, it’s important to make a deep enough indentation in the center while the mixture is still warm. If the center is too shallow, the candy may roll off instead of sitting neatly inside the nest.
4. Using Too Much or Too Little Cereal
Adding too much cereal can make the nests dry and difficult to shape, while too little can make them overly sticky and dense. Sticking to the correct ratio ensures the perfect balance of crunch and chewiness.
5. Decorating Too Soon
If you’re adding icing or melted chocolate as decoration, let the nests cool completely first. Adding toppings while they’re still warm can cause them to melt and lose their shape.
FAQs: Everything You Need to Know
1. Can I Make These in Advance?
Yes! These nests can be made 1-2 days ahead of time and stored in an airtight container at room temperature. However, if you’re using icing or other decorations, it’s best to add them just before serving to keep them looking fresh.
2. Can I Use a Different Cereal?
Absolutely! While Rice Krispies are traditional, you can try:
- Cocoa Krispies for a chocolate version
- Fruity Pebbles for a colorful twist
- Cornflakes for a slightly different texture
3. How Do I Store Leftovers?
Store the nests in an airtight container at room temperature for up to three days. Avoid refrigerating them, as this can make them too hard.
4. Can I Make a Healthier Version?
Yes! You can:
- Use brown rice cereal instead of traditional Rice Krispies
- Substitute honey and almond butter for the marshmallow and butter mixture
- Use dark chocolate eggs or dried fruit instead of candy
5. What Can I Use Instead of a Muffin Tin?
If you don’t have a muffin tin, you can shape the nests by hand on a parchment-lined tray. Just lightly grease your hands before shaping to prevent sticking.
6. What Other Toppings Can I Use?
Beyond mini chocolate eggs, you can fill these nests with:
- Jelly beans for a colorful, fruity touch
- Mini marshmallows for extra fluffiness
- Shredded coconut dyed green to resemble grass
- Edible flowers for a beautiful spring look
7. Can I Make These Vegan or Allergy-Friendly?
Yes! To make them vegan, use:
- Dairy-free butter
- Vegan marshmallows (available in most health food stores)
- Dairy-free chocolate eggs or jelly beans for decoration
For a gluten-free version, make sure your cereal and decorations are certified gluten-free.
Why Everyone Will Love These Rice Krispie Nests
- They’re easy to make with minimal ingredients.
- They bring a fun, hands-on element to Easter celebrations.
- They’re light and crispy, making them a great alternative to heavier desserts.
- They’re completely customizable—you can switch up flavors, colors, and decorations.
- They’re a nostalgic treat that both kids and adults will enjoy.
Conclusion: A Sweet and Simple Easter Delight
There’s something special about a recipe that reminds us of childhood, brings families together, and adds a little extra magic to the holidays. These Easter Rice Krispie Nests are more than just a fun dessert—they’re a tradition, a memory, and a symbol of joyful moments in the kitchen.
Whether you’re making them with kids, sharing them at an Easter gathering, or simply indulging in a bite of nostalgia, these adorable no-bake nests are guaranteed to spread smiles. So gather your ingredients, get a little sticky, and start shaping your own sweet little Easter nests—it’s a tradition worth keeping.
Print
Easter Rice Krispie Nests: A Sweet Taste of Springtime Nostalgia
- Total Time: 20 minutes
- Yield: 12 nests
Description
These adorable Easter Rice Krispie Nests are a fun and festive no-bake treat, perfect for springtime celebrations. Made with gooey marshmallows and crispy rice cereal, they’re shaped into nests and filled with candy eggs for a delightful, kid-friendly dessert.
Ingredients
For the Nests:
- 2 tablespoons butter
- 8 oz (220g) marshmallows (mini or chopped large ones)
- 4 cups (110g) Rice Krispies cereal
For Decorating:
- 6 tablespoons powdered icing sugar
- 4 teaspoons water
- Green food coloring (optional)
- Mini egg candies
- Sprinkles
Instructions
- Prepare the Nest Base – Lightly grease a muffin tin with butter or non-stick spray.
- Melt the Marshmallows – In a large pot over medium heat, melt the butter. Add the marshmallows and stir until fully melted and smooth.
- Mix in Cereal – Remove from heat and quickly stir in the Rice Krispies cereal, ensuring even coating.
- Shape the Nests – Spoon the mixture into the greased muffin tin, pressing down slightly to form nest shapes. Create a small indentation in the center for the eggs. Let cool completely.
- Prepare the Icing – Mix powdered sugar with water, adding green food coloring for a grass-like effect.
- Decorate – Spoon a small amount of icing into each nest, place mini egg candies inside, and top with festive sprinkles.
- Serve and Enjoy! – Allow the decorations to set before serving.
Notes
- Grease your hands with butter or cooking spray to prevent sticking while shaping the nests.
- Let nests cool completely before decorating to maintain their shape.
- Store in an airtight container at room temperature for up to 3 days.
- Customize with different cereals, candy, or shredded coconut for variation.
- Prep Time: 15 minutes
- Cook Time: 5 minutes
- Category: Dessert
- Method: No-Bake
- Cuisine: American