
Introduction to Fruity Pebbles Cheesecake Tacos
There’s something magical about dessert that brings out the kid in all of us.
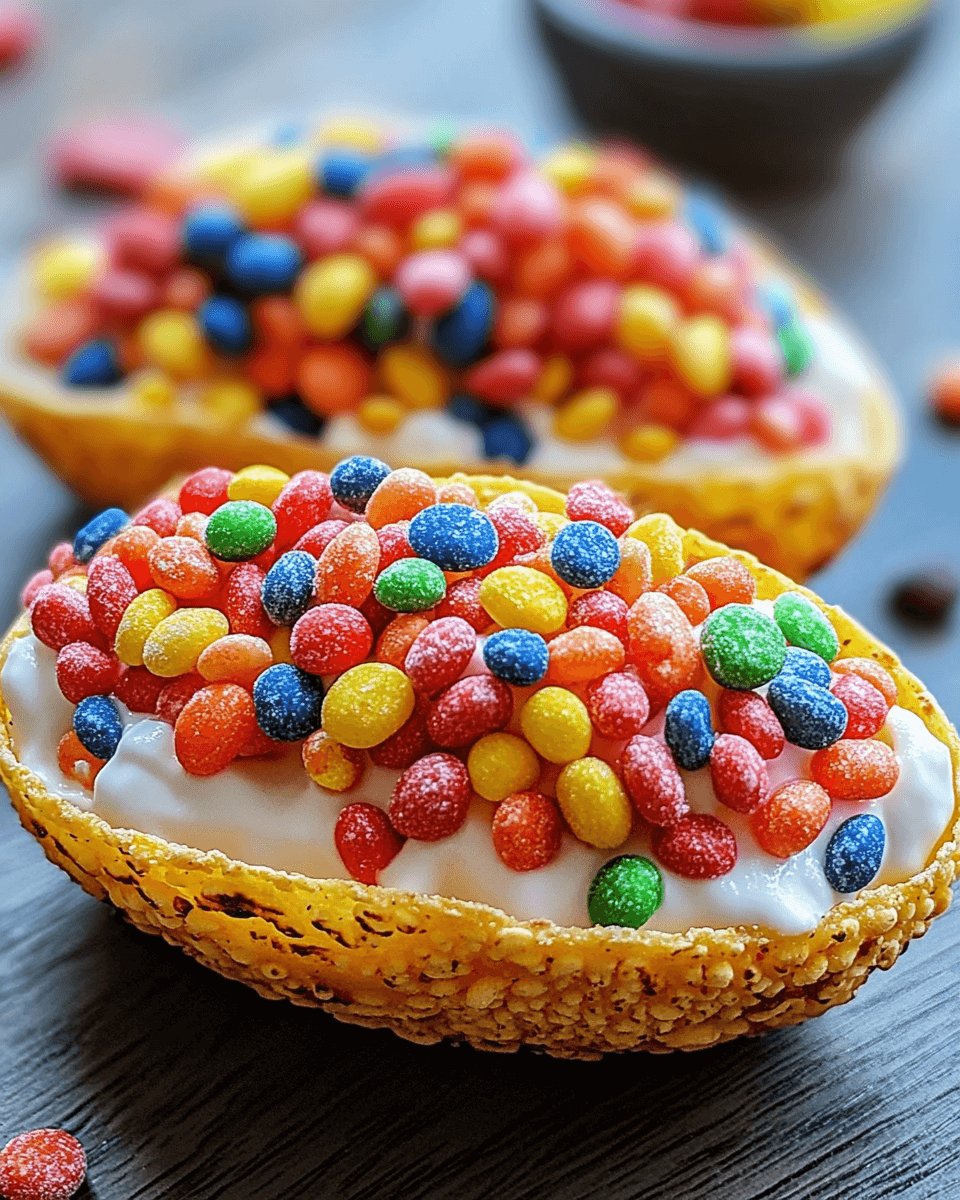
Fruity Pebbles Cheesecake Tacos are a delightful twist on traditional sweets, combining creamy cheesecake with the playful crunch of Fruity Pebbles cereal.
Whether you’re looking to impress your friends at a gathering or simply want a fun treat for a busy weeknight, these colorful tacos are the answer.
They’re quick to whip up and even quicker to disappear!
Let’s dive into this vibrant recipe that’s sure to bring smiles and a touch of nostalgia to your table.
Why You’ll Love This Fruity Pebbles Cheesecake Tacos
These Fruity Pebbles Cheesecake Tacos are not just a feast for the eyes; they’re a breeze to make!
In just about an hour, you can create a dessert that’s both fun and delicious.
The combination of creamy cheesecake and crunchy cereal is a flavor explosion that will have everyone coming back for seconds.
Plus, they’re perfect for any occasion, from casual family dinners to festive celebrations.
Ingredients for Fruity Pebbles Cheesecake Tacos
Creating these Fruity Pebbles Cheesecake Tacos is as fun as eating them!
Here’s what you’ll need to gather for this colorful dessert:
- Fruity Pebbles cereal: The star of the show! This cereal adds a vibrant crunch and fruity flavor.
- Crushed graham crackers: These provide a sweet, crumbly base for the taco shells, reminiscent of classic cheesecake crust.
- White sugar: A touch of sweetness to balance the flavors in the cone mixture.
- Melted unsalted butter: This helps bind the cone ingredients together, giving them a rich flavor.
- Softened cream cheese: The creamy heart of the cheesecake filling, providing that luscious texture we all love.
- Confectioners’ sugar: For a smooth sweetness that blends perfectly into the cream cheese.
- Vanilla essence: A splash of vanilla enhances the overall flavor, making it even more delightful.
- Heavy cream: Whipped to perfection, it adds lightness and fluffiness to the cheesecake filling.
- Additional Fruity Pebbles: These are for garnishing, adding an extra crunch and a pop of color on top.
- Small ice cream cones: The perfect vessel for your cheesecake filling, creating a fun taco shape.
Feel free to get creative!
You can fold in some crushed strawberries or blueberries for a fruity twist.
If you prefer a different texture, swap the ice cream cones for waffle cones.
For exact measurements, check the bottom of the article where you can find everything you need for printing.
How to Make Fruity Pebbles Cheesecake Tacos
Creating these Fruity Pebbles Cheesecake Tacos is a delightful journey.
Let’s break it down step by step, ensuring you have all the tips you need for success.
Step 1: Preheat the Oven
Start by preheating your oven to 350°F (175°C).
This step is crucial because it ensures your cones bake evenly and achieve that perfect golden color.
A hot oven means crispy, delicious taco shells!
Step 2: Prepare the Cone Mixture
In a large bowl, combine the Fruity Pebbles, crushed graham crackers, white sugar, and melted butter.
Mix everything together until the cereal is well-coated.
This mixture will form the base of your taco shells, so make sure it’s evenly blended for the best texture.
Step 3: Shape and Bake the Cones
Now comes the fun part!
Take your mixture and press it firmly into the insides of the ice cream cones.
Make sure to pack it tightly to create sturdy shells.
Place the cones on a baking sheet and bake for 10-12 minutes until they’re lightly golden.
Let them cool completely before moving on.
Step 4: Make the Cheesecake Filling
In another bowl, blend the softened cream cheese, confectioners’ sugar, and vanilla essence.
Mix until the mixture is smooth and creamy.
This is the heart of your dessert, so take your time to get it just right!
Step 5: Whip the Cream
In a separate bowl, whip the heavy cream until it forms stiff peaks.
This step adds lightness to your cheesecake filling.
Once whipped, gently fold the cream into the cream cheese mixture.
Be careful not to deflate the whipped cream; you want that fluffy texture!
Step 6: Fill the Cones
Once your cones have cooled, it’s time to fill them!
Using a piping bag or a spoon, generously fill each cone with the cheesecake mixture.
Don’t be shy—pack it in there!
Top each filled cone with extra Fruity Pebbles for that delightful crunch.
Step 7: Chill Before Serving
Finally, place the filled cones in the refrigerator for at least 30 minutes.
Chilling allows the cheesecake filling to firm up, making it easier to enjoy.
Trust me, this step is worth the wait!
Tips for Success
- Make sure your cream cheese is softened for easy blending.
- Don’t skip the chilling step; it helps the filling set perfectly.
- Use a piping bag for a neat and easy filling process.
- Experiment with different toppings like sprinkles or chocolate drizzle.
- Keep an eye on the cones while baking to avoid over-browning.
Equipment Needed
- Baking sheet: A standard one works great; you can use a pizza stone if you have it.
- Mixing bowls: Grab a couple of different sizes for mixing ingredients.
- Whisk or electric mixer: Either will do for blending the cream cheese and whipping the cream.
- Piping bag or spoon: Use a piping bag for precision, but a spoon works just fine!
- Measuring cups: Essential for accurate ingredient portions.
Variations
- Berry Bliss: Fold in crushed strawberries or blueberries into the cheesecake filling for a fruity twist.
- Chocolate Lovers: Add mini chocolate chips to the filling for a rich, chocolatey flavor.
- Nutty Crunch: Sprinkle chopped nuts like almonds or pecans on top for added texture and flavor.
- Gluten-Free Option: Substitute crushed gluten-free cookies for graham crackers to make it gluten-free.
- Vegan Version: Use vegan cream cheese and coconut whipped cream for a plant-based alternative.
Serving Suggestions
- Pair these Fruity Pebbles Cheesecake Tacos with a scoop of vanilla ice cream for an extra indulgent treat.
- Serve with fresh fruit like strawberries or raspberries for a refreshing contrast.
- For a fun presentation, arrange the cones in a colorful dessert stand.
- Drizzle with chocolate or caramel sauce for added sweetness.
- Enjoy with a chilled glass of milk or a fruity smoothie to complement the flavors.
FAQs about Fruity Pebbles Cheesecake Tacos
Can I make Fruity Pebbles Cheesecake Tacos ahead of time?
Absolutely! You can prepare the cones and cheesecake filling a day in advance. Just fill the cones right before serving to keep them crispy.
What can I use instead of ice cream cones?
If you want a different texture, waffle cones are a great alternative. You could also use mini tart shells for a unique twist!
How do I store leftover Fruity Pebbles Cheesecake Tacos?
Store any leftovers in an airtight container in the fridge. They’re best enjoyed within a couple of days for optimal freshness.
Can I customize the filling?
Definitely! Feel free to add your favorite mix-ins like crushed cookies, chocolate chips, or even a splash of fruit puree for a unique flavor.
Are these Fruity Pebbles Cheesecake Tacos suitable for kids?
Yes! These colorful tacos are a hit with kids and adults alike. They’re fun to eat and perfect for birthday parties or family gatherings.
Final Thoughts
Creating Fruity Pebbles Cheesecake Tacos is more than just making a dessert; it’s about bringing joy and nostalgia to the table.
Each colorful cone is a bite of happiness, blending creamy cheesecake with the playful crunch of Fruity Pebbles.
Whether you’re sharing them with family or enjoying them solo, these tacos are sure to spark smiles and laughter.
They’re perfect for any occasion, transforming ordinary moments into sweet memories.
So, roll up your sleeves, gather your ingredients, and let the fun begin!
You’ll find that these delightful treats are as enjoyable to make as they are to eat.
PrintFruity Pebbles Cheesecake Tacos: A Fun Twist on Dessert!
- Total Time: 1 hour
- Yield: 6 servings
- Diet: Vegetarian
Description
Fruity Pebbles Cheesecake Tacos are a fun and colorful dessert that combines the flavors of cheesecake with the crunch of Fruity Pebbles cereal, all served in a crispy cone.
Ingredients
- 1 cup Fruity Pebbles cereal
- 1 cup crushed graham crackers
- 1/4 cup white sugar
- 1/2 cup melted unsalted butter
- 8 ounces softened cream cheese
- 1/2 cup confectioners’ sugar
- 1 teaspoon vanilla essence
- 1 cup heavy cream
- 1/2 cup additional Fruity Pebbles (for garnish)
- 6 small ice cream cones
Instructions
- Start by preheating your oven to 350°F (175°C).
- In a large bowl, mix together the Fruity Pebbles, crushed graham crackers, white sugar, and melted butter until everything is evenly coated.
- Shape the mixture into the insides of ice cream cones, pressing firmly to create a sturdy shell. Bake for 10-12 minutes until they are lightly golden. Let them cool completely.
- In another bowl, blend the softened cream cheese, confectioners’ sugar, and vanilla essence until the mixture is smooth and creamy.
- In a separate bowl, whip the heavy cream until it forms stiff peaks. Carefully fold this whipped cream into the cream cheese mixture until it is well combined and fluffy.
- Once the cones have cooled, use a piping bag or a spoon to generously fill each cone with the cheesecake mixture.
- Sprinkle the tops of each filled cone with extra Fruity Pebbles for a delightful crunch.
- Place the cones in the refrigerator for at least 30 minutes to allow the filling to firm up before serving.
Notes
- For a berry twist, fold in some crushed strawberries or blueberries into the cheesecake mixture.
- Swap the ice cream cones for waffle cones for an extra crunchy texture.
- Prep Time: 20 minutes
- Cook Time: 12 minutes
- Category: Dessert
- Method: Baking and Mixing
- Cuisine: American
Nutrition
- Serving Size: 1 cone
- Calories: 290
- Sugar: 15g
- Sodium: 150mg
- Fat: 18g
- Saturated Fat: 10g
- Unsaturated Fat: 8g
- Trans Fat: 0g
- Carbohydrates: 30g
- Fiber: 1g
- Protein: 4g
- Cholesterol: 60mg