
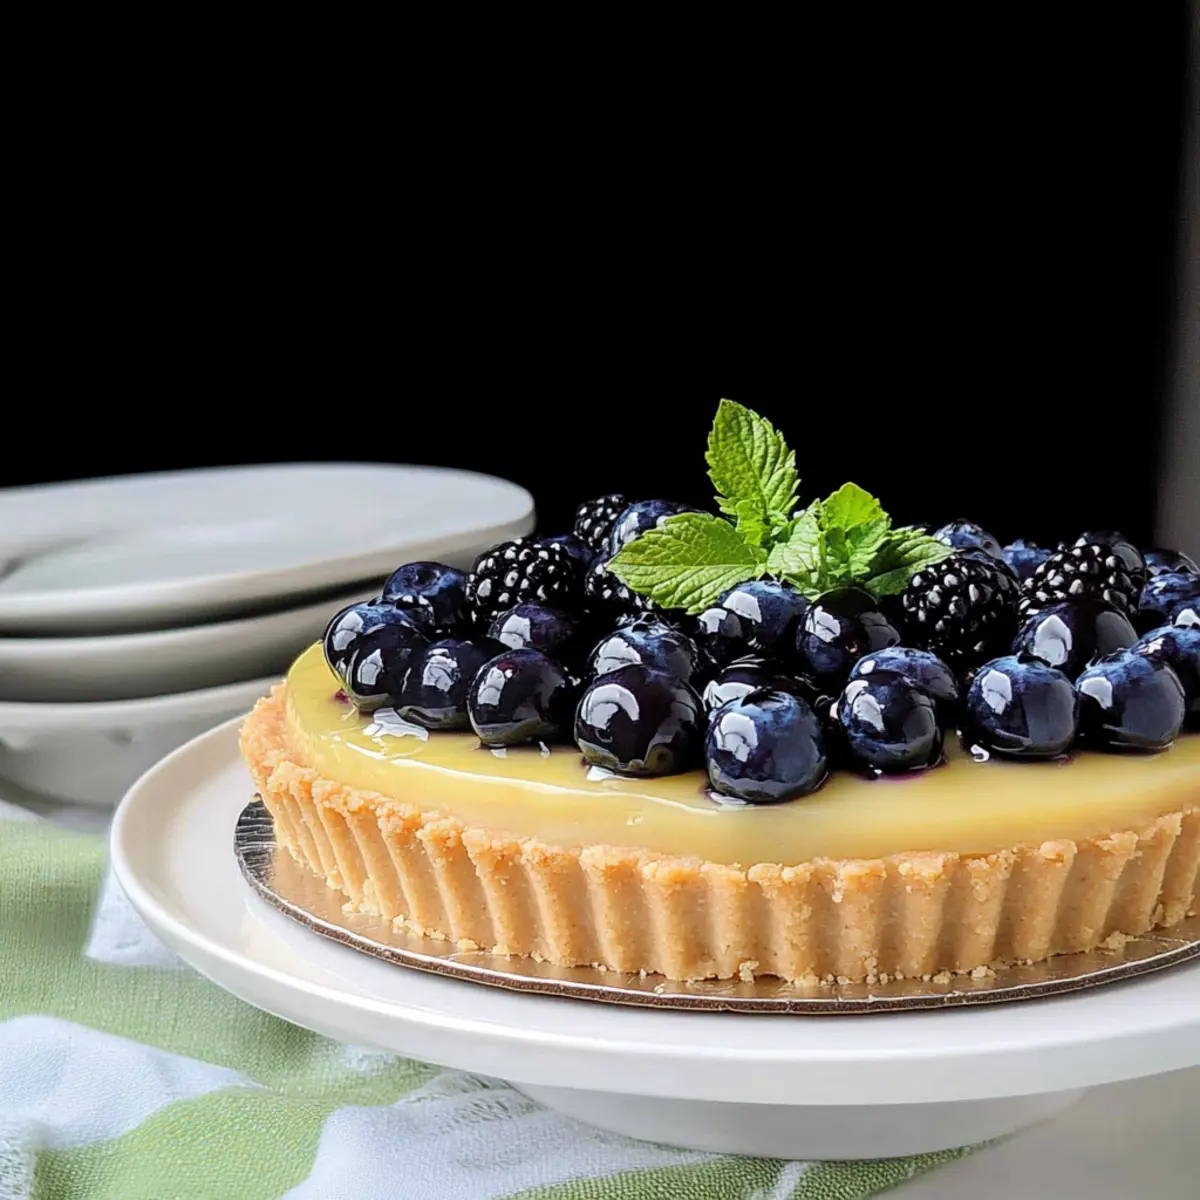
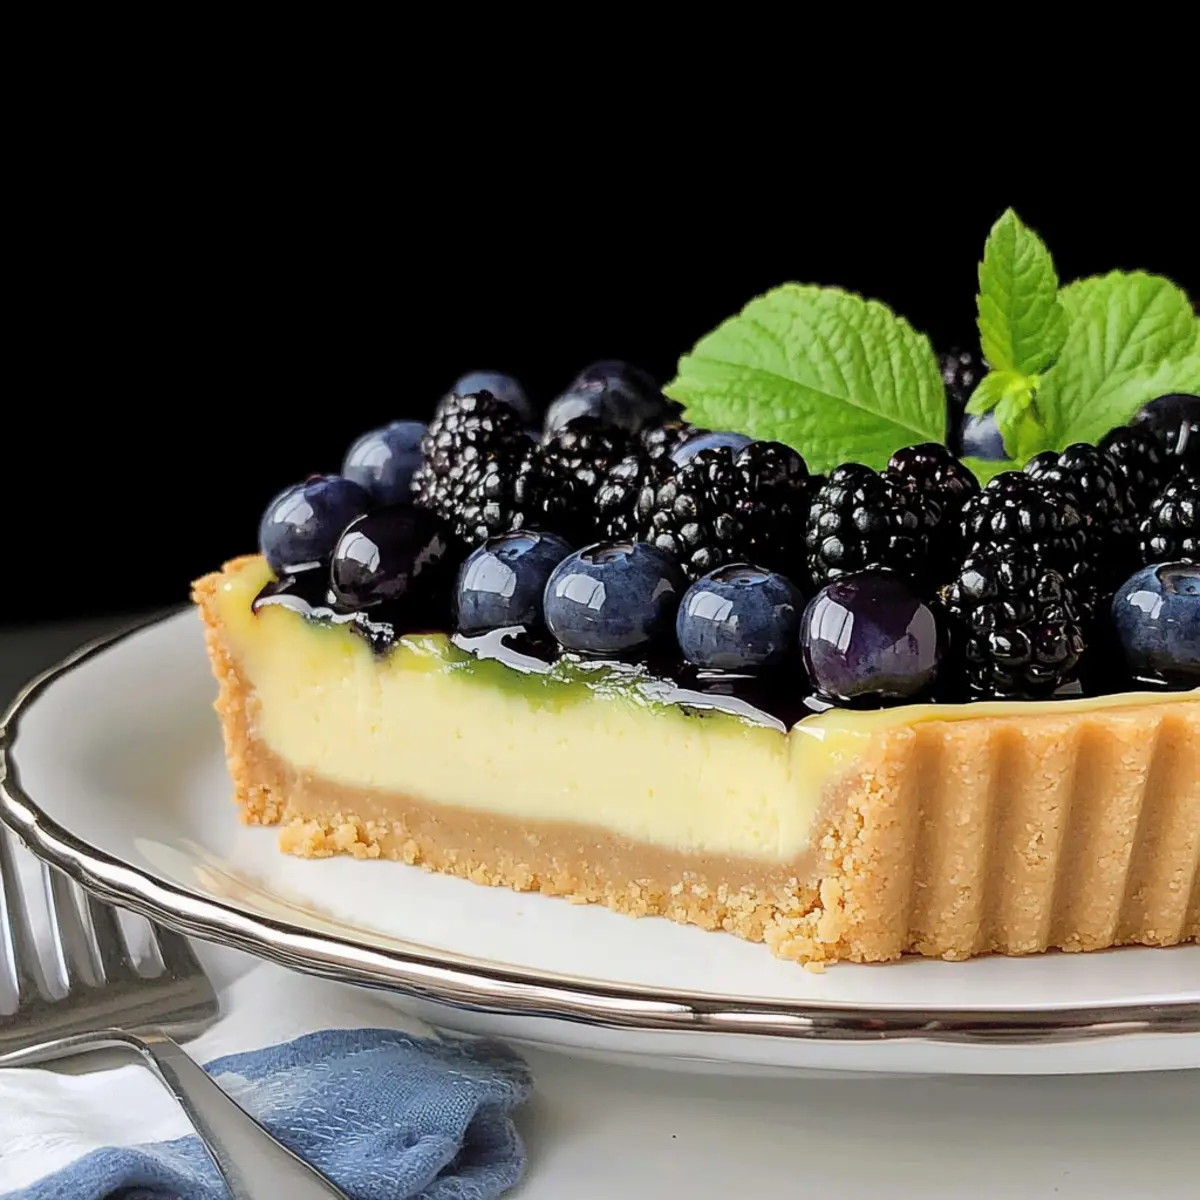
As I stood in my kitchen on a sun-drenched afternoon, the vibrant scent of fresh lemons mingling with the sweet aroma of berries brought a wave of nostalgia. I couldn’t resist whipping up a No-Bake Lemon Cheesecake with Glazed Berries, a delightfully refreshing dessert that promises to be the star of any summer gathering. With its light and airy filling resting on a buttery shortbread crust, this recipe offers two irresistible perks: it’s a stress-free, quick-to-make beauty that requires no baking! Plus, the glossy berries add a stunning touch to this enchanting treat. Are you ready to create a dessert that will impress your loved ones while you sip iced tea on the patio? Let’s dive in!
Why is this cheesecake a must-try?
No-Bake Ease: This Lemon Cheesecake requires no baking, making it a hassle-free dessert option perfect for summer.
Refreshing Flavors: The vibrant citrus notes combined with the sweetness of glazed berries create a delightful flavor profile that dances on your palate.
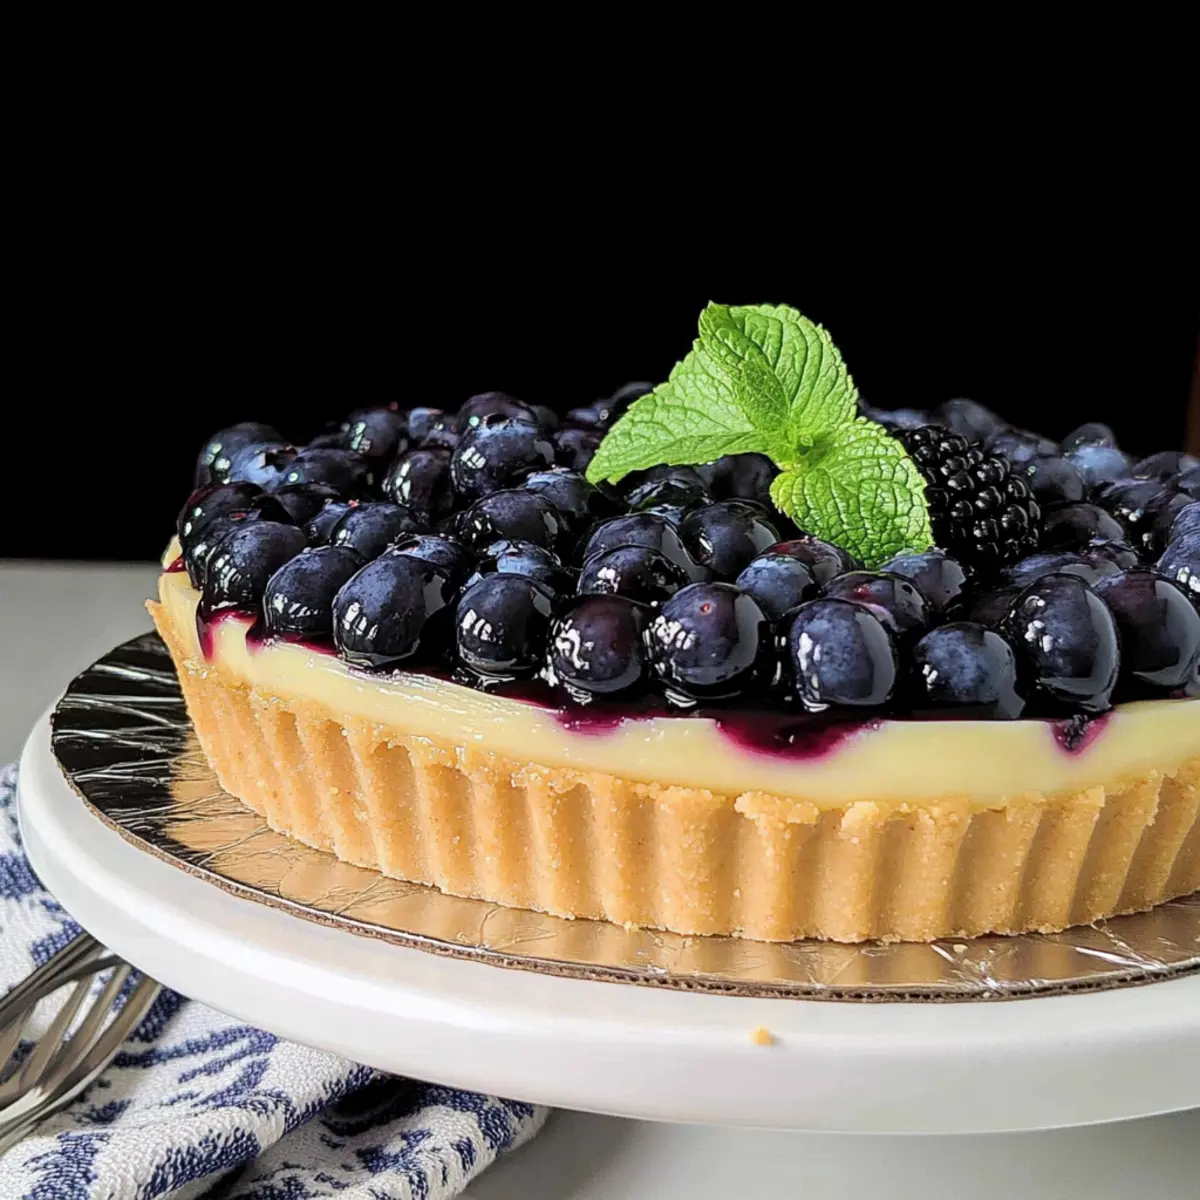
Impressive Presentation: With its shiny berry topping, this cheesecake looks stunning, ensuring you’ll wow your guests at any gathering.
Versatile & Customizable: Feel free to switch up the berries or even the citrus for a unique twist each time you make it!
Quick to Assemble: You can gather friends or family together and whip this up in no time, so you can spend more time enjoying your company.
Pair it with a refreshing drink like herbal teas for a perfect summer treat!
-
Ingredients
• • ## Lemon Cheesecake with Glazed Berries Ingredients -
For the Crust
- Powdered Sugar – Provides sweetness and lightness to the crust. Use granulated sugar if unavailable, but texture may differ.
- All-Purpose Flour – Forms the structure of the shortbread crust. Gluten-free flour may be a substitute.
- Kosher Salt – Enhances flavor balance in crust. Can replace with table salt, but use less due to higher salinity.
- Egg Yolk – Adds richness and moisture to the crust. For a vegan option, use a flaxseed or chia seed egg substitute.
- Butter (melted) – Serves as fat for the crust, creating a rich flavor. Plant-based butter can be used for dairy-free version.
- Vanilla – Adds depth of flavor to the crust. Leave out for a more minimalist flavor profile if desired.
- For the Filling
- Cream Cheese – Creates a creamy filling; low-fat variety is suggested for a lighter texture. Non-dairy cream cheese can be used as a substitute.
- Sweetened Condensed Milk – Sweetens and ensures creaminess in the filling. Evaporated milk with sugar is an alternative.
- Lemon Zest – Provides vibrant lemon flavor. Use bottled lemon juice in a pinch, but freshly zested is preferred for aroma.
- Fresh Lemon Juice – Key for tartness in filling. If fresh lemons are unavailable, bottled juice can work, but flavor-wise it might not be as vibrant.
- Unflavored Gelatin – Stabilizes the filling, keeping it firm. Agar-agar can be used for a vegetarian alternative.
- For the Topping
- Orange Marmalade – Glazes the berries, adding sweetness and a shiny appearance. Use apricot jam as a substitute.
- Blueberries – Fresh fruit for topping; adds sweetness and color. Can swap with strawberries or raspberries.
- Blackberries – Complements the blueberries for a mixed berry topping. Use any seasonal berries based on availability or preference.
- Fresh Mint Leaves – Garnish for an elegant finish. Skip if unavailable or substitute with basil for a unique twist.
Step‑by‑Step Instructions for Lemon Cheesecake with Glazed Berries
Step 1: Preheat the Oven
Begin by preheating your oven to 375°F (190°C). This initial step ensures your crust can achieve that perfect golden-brown hue as you bake it. Preheating takes about 10–15 minutes, so use this time to gather your ingredients and utensils to create your No-Bake Lemon Cheesecake with Glazed Berries.
Step 2: Prepare the Crust Mixture
In a large mixing bowl, combine the powdered sugar, egg yolk, and melted butter, stirring until fully incorporated. Add the vanilla extract and all-purpose flour, then mix until a crumbly dough forms. This delicious mixture will serve as the base for your cheesecake, offering a rich flavor that pairs beautifully with the zesty filling.
Step 3: Form the Crust
Press the crust mixture firmly into a 9 or 10-inch tart pan, ensuring an even layer across the bottom and up the sides. Use a fork to prick the surface, which helps prevent bubbling while baking. Once formed, transfer the tart pan to the freezer for about one hour, allowing the crust to firm up before baking.
Step 4: Bake the Crust
Once chilled, bake the crust for 15 minutes covered with foil. After this time, carefully remove the foil, prick the crust again with a fork, and bake for an additional 13–15 minutes until golden brown. Keep a close eye on it to avoid over-browning. Once done, remove from the oven and let the crust cool completely.
Step 5: Prepare the Gelatin
In a small bowl, combine the fresh lemon juice and unflavored gelatin. Allow the mixture to sit for about 5 minutes to bloom, then microwave it for approximately 15-20 seconds until melted and well blended. This gelatin will help stabilize the creamy filling of your Lemon Cheesecake once mixed.
Step 6: Make the Creamy Filling
In a large mixing bowl or a stand mixer, beat the cream cheese until smooth. Gradually incorporate the sweetened condensed milk, mixing until fully combined and fluffy in texture. Then, add in the melted gelatin mixture along with lemon zest, mixing until everything is airy and well-blended. This luscious filling is what makes your No-Bake Lemon Cheesecake with Glazed Berries so irresistible.
Step 7: Assemble the Cheesecake
Pour the creamy filling into the cooled crust, spreading it evenly with a spatula. Ensure the filling reaches the edges for a beautiful presentation. Once assembled, cover the cheesecake with plastic wrap and refrigerate for at least 2 hours, allowing it to set and turn into a delightful treat.
Step 8: Prepare the Glazed Berries
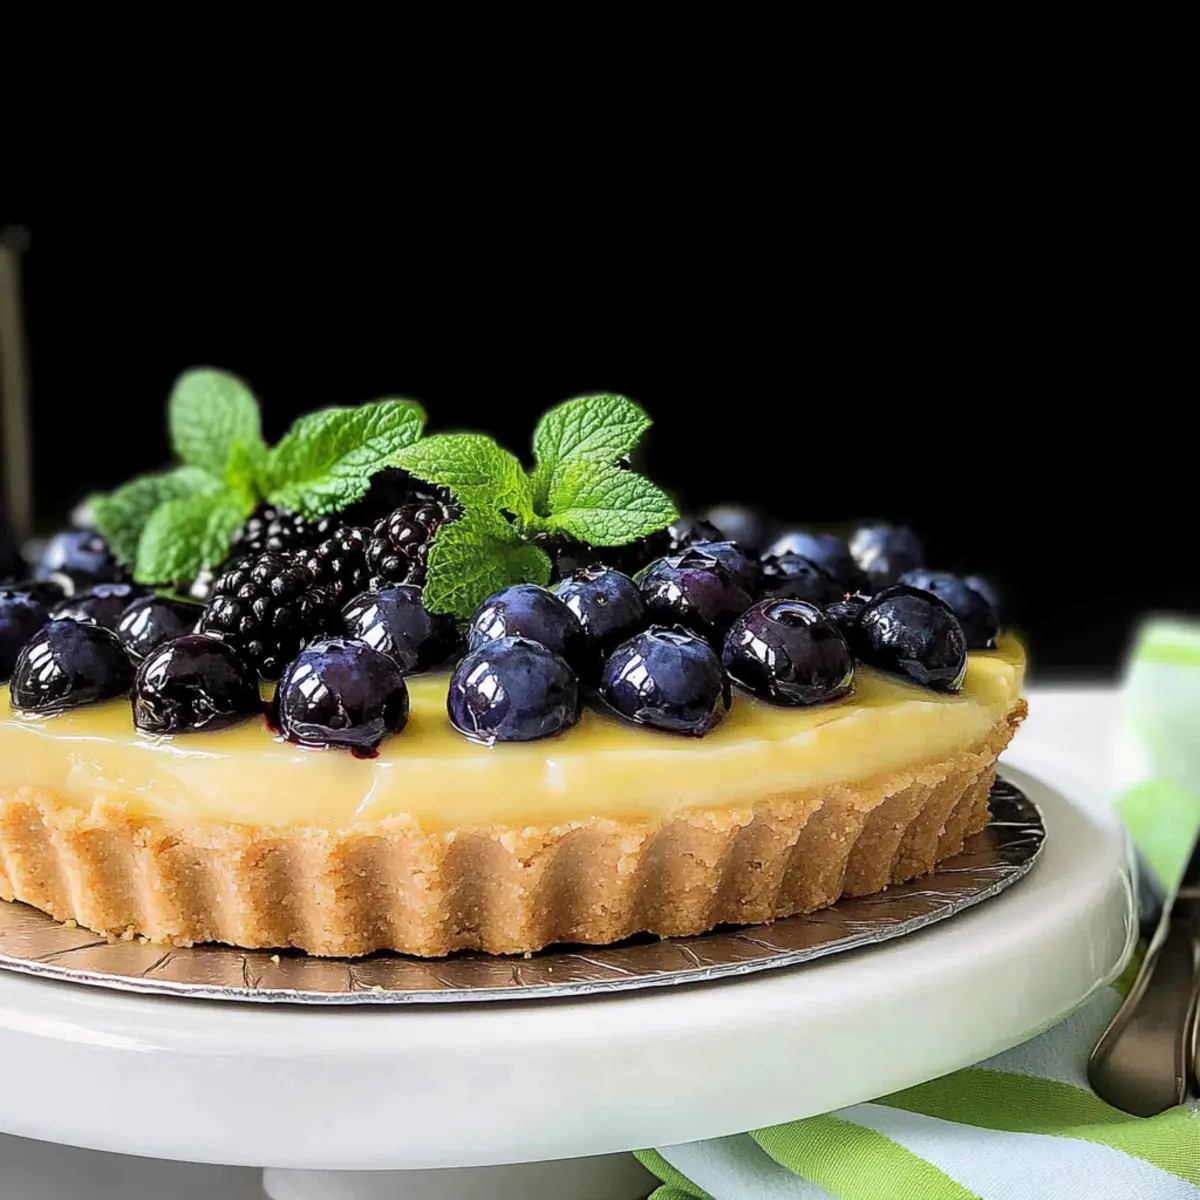
While the cheesecake is chilling, gently warm the orange marmalade in a small saucepan over low heat until it becomes liquid. Add the fresh blueberries and blackberries, stirring to coat them evenly in the glaze. Let this mixture cool before spooning it over the cheesecake for a stunning finishing touch.
Step 9: Final Chill and Serve
After the cheesecake has set and the berries are glazed, carefully spoon the berry mixture over the top of the cheesecake. Return it to the refrigerator for an additional 2 hours to allow the flavors to meld beautifully. When you’re ready to serve, garnish with fresh mint leaves for an elegant touch and enjoy this refreshing No-Bake Lemon Cheesecake with Glazed Berries at room temperature.
What to Serve with No-Bake Lemon Cheesecake with Glazed Berries
Elevate your summer dessert experience by pairing this zesty cheesecake with delightful accompaniments that enhance its refreshing flavors.
-
Creamy Vanilla Ice Cream: The silky smoothness of vanilla ice cream complements the tartness of the cheesecake, creating a delightful balance of flavors. A scoop on the side adds a classic touch that’s hard to resist.
-
Minted Fruit Salad: A medley of seasonal fruits dressed with fresh mint enhances the vibrant flavors of the cheesecake, adding a refreshing crunch. The bright colors of the fruit salad will also create an eye-catching presentation on your table.
-
Sparkling Lemonade: The effervescent citrus notes in sparkling lemonade mirror the cheesecake’s flavors perfectly, making for a refreshing sip that cleanses the palate. Serve it chilled for a delightful beverage option during your summer gathering!
-
Buttery Shortbread Cookies: For a little extra crunch, buttery shortbread cookies echo the crisp texture of the cheesecake crust. These delightful treats can be enjoyed on their own or crumbled on top for an added texture.
-
Herbal Iced Tea: A glass of herbal iced tea with hints of lemon or mint provides a refreshing contrast to the rich cheesecake. This light beverage perfectly complements the dessert without overpowering its flavors.
-
Lemon Sorbet: Continue the citrus theme with a scoop of lemon sorbet. Its icy tartness revives your taste buds and leaves you feeling refreshed after each bite of cheesecake.
Indulging in these thoughtfully chosen pairings can transform your no-bake lemon cheesecake into a multi-sensory culinary experience that your guests will adore!
Lemon Cheesecake with Glazed Berries Variations
Feel free to get creative and customize your Lemon Cheesecake to match your taste buds!
-
Fruit Swap: Replace the blueberries and blackberries with strawberries or seasonal fruits for a fresh flair. The sweetness and vibrant color will transform your cheesecake’s look and taste!
-
Vegan Delight: Use a flaxseed egg for the crust and non-dairy cream cheese in the filling for a delightful vegan twist. This will still yield a luscious and creamy finish that everyone will enjoy.
-
Citrus Burst: Add a splash of lime or orange juice to the filling for an extra citrusy zing. This variation creates a bright flavor that elevates this dessert’s refreshing qualities.
-
Flavorful Extracts: Incorporate flavored extracts like almond or coconut to introduce a unique element into the filling. Just a teaspoon can bring a whole new dimension to your cheesecake!
-
Sugar Alternatives: Substitute sweetened condensed milk with a sugar alternative or a homemade version using coconut milk for a lower-calorie option. It’s a wonderful way to cater to different dietary needs without sacrificing taste.
-
Nutty Crust: Mix some crushed nuts like almonds or pecans into the crust for a delightful crunch. The added texture complements the creaminess of the cheesecake beautifully!
-
Spiced Up: Add a hint of cinnamon or nutmeg to the filling for a warm, spiced flavor. This can make your dessert feel cozy and inviting, perfect for a holiday gathering.
-
Chocolate Drizzle: Top your cheesecake with a drizzle of melted chocolate for an indulgent treat. The combination of lemon and chocolate may sound unusual, but it creates a delightful pairing that surprises the palate!
Don’t forget, every twist you make can enhance your dessert experience, much like how the glossy berry topping in this cheesecake brings it all together beautifully. Pair your stunning creation with a refreshing beverage, just like the lovely suggestions of herbal teas or sparkling water to impress your guests!
Tips for the Best Lemon Cheesecake
-
Crust Pre-Cooling: Ensure the crust is fully cooled before adding the filling to avoid a soggy bottom. A well-chilled crust maintains its structure beautifully.
-
Setting Time: Allow the cheesecake to set in the fridge for the full recommended time; this helps create that ideal creamy texture. Patience is key!
-
Room Temperature: Take the cheesecake out of the refrigerator 20-30 minutes before serving for a softer texture. This enhances the lusciousness of your Lemon Cheesecake with Glazed Berries.
-
Berry Glaze Technique: When warming the marmalade, do so gently to avoid burning it and to ensure it coats the berries evenly for a glossy finish.
-
Taste Testing: Always taste the filling before pouring it into the crust. Adjust the sweetness or lemon zest according to your preference for a personalized flavor experience.
How to Store and Freeze Lemon Cheesecake with Glazed Berries
-
Fridge: Store your cheesecake in the refrigerator, covered with plastic wrap or an airtight container, for up to 3-4 days to keep it fresh and creamy.
-
Freezer: For longer preservation, freeze the cheesecake wrapped tightly in plastic wrap and then foil for up to 2 months. Thaw it at room temperature before serving.
-
Reheating: Since this is a no-bake dessert, there’s no need to reheat it. Simply let it warm slightly at room temperature for about 20-30 minutes for the best flavor and texture.
-
Berry Topping: If you’ve added the glazed berries, it’s best to store the cheesecake separately from the berries to maintain their freshness and prevent sogginess. Add the berries just before serving.
Make Ahead Options
These No-Bake Lemon Cheesecake with Glazed Berries are perfect for meal prep enthusiasts! You can prepare the crust up to 24 hours in advance by making it and allowing it to cool completely before refrigerating. The filling can also be made ahead—just be sure to cover it tightly and store it in the refrigerator for up to 3 days. To maintain the quality and flavor, wait to add the glazed berries until just before serving. When you’re ready to enjoy your cheesecake, simply assemble the layers by pouring the filling into the crust, allow it to set for a minimum of 2 hours in the fridge, and then top with berries for a delightful finishing touch. This way, you’ll have a stunning dessert ready with minimal last-minute effort!
Lemon Cheesecake with Glazed Berries Recipe FAQs
How do I select ripe lemons for this recipe?
Absolutely! Look for lemons that are heavy for their size, with smooth, bright yellow skin and a slight sheen. Avoid any with dark spots or wrinkles, as these can indicate over-ripeness. Fresh lemons should yield slightly when pressed, showing they are juicy and ready to deliver that vibrant citrus flavor to your cheesecake.
What’s the best way to store leftover cheesecake?
To keep your No-Bake Lemon Cheesecake with Glazed Berries fresh, store it in the refrigerator covered with plastic wrap or in an airtight container for up to 3-4 days. If you’ve added the berry topping, consider storing the cheesecake and berries separately to prevent sogginess. This way, you can enjoy the delightful crunch of glazed berries with each slice!
Can I freeze this cheesecake?
Yes! For longer preservation, you can freeze your cheesecake. Wrap it tightly in plastic wrap followed by aluminum foil to protect against freezer burn and maintain freshness. It can be frozen for up to 2 months. When you’re ready to enjoy it, simply thaw it at room temperature for about 1-2 hours before serving.
My cheesecake didn’t set well; what could I have done wrong?
Very! If your cheesecake didn’t set properly, it could be due to not allowing enough chilling time; ensure it sets for at least 2 hours in the fridge. Incorporating the gelatin fully into the filling is essential as well—make sure it’s completely dissolved and mixed in. If you’re returning your cheesecake to the refrigerator, consider giving it an additional hour or two for a firmer consistency.
Are there any dietary considerations I should be aware of?
Definitely! If you’re making this for someone with allergies, ensure you check for any dairy or gluten concerns. For a gluten-free version, substitute the all-purpose flour with a gluten-free flour blend. Additionally, non-dairy cream cheese can be used for vegans, while a flaxseed egg substitute is great for those avoiding eggs. Always ask your guests about their dietary restrictions beforehand!
Lemon Cheesecake with Glazed Berries: A No-Bake Delight
Ingredients
Equipment
Method
- Preheat your oven to 375°F (190°C).
- In a large mixing bowl, combine the powdered sugar, egg yolk, and melted butter, stirring until fully incorporated. Add the vanilla extract and all-purpose flour, then mix until a crumbly dough forms.
- Press the crust mixture firmly into a 9 or 10-inch tart pan, ensuring an even layer across the bottom and up the sides. Use a fork to prick the surface.
- Chill the tart pan in the freezer for about one hour.
- Bake the crust for 15 minutes covered with foil. Remove the foil and bake for an additional 13–15 minutes until golden brown.
- In a small bowl, combine the fresh lemon juice and unflavored gelatin. Allow the mixture to bloom, then microwave until melted.
- In a large mixing bowl, beat the cream cheese until smooth. Gradually mix in the sweetened condensed milk, then add the melted gelatin mixture along with lemon zest.
- Pour the creamy filling into the cooled crust, spreading it evenly. Cover with plastic wrap and refrigerate for at least 2 hours.
- Warm the orange marmalade over low heat and add the fresh blueberries and blackberries, stirring to coat.
- Carefully spoon the berry mixture over the chilled cheesecake and return it to the refrigerator for an additional 2 hours before serving.