
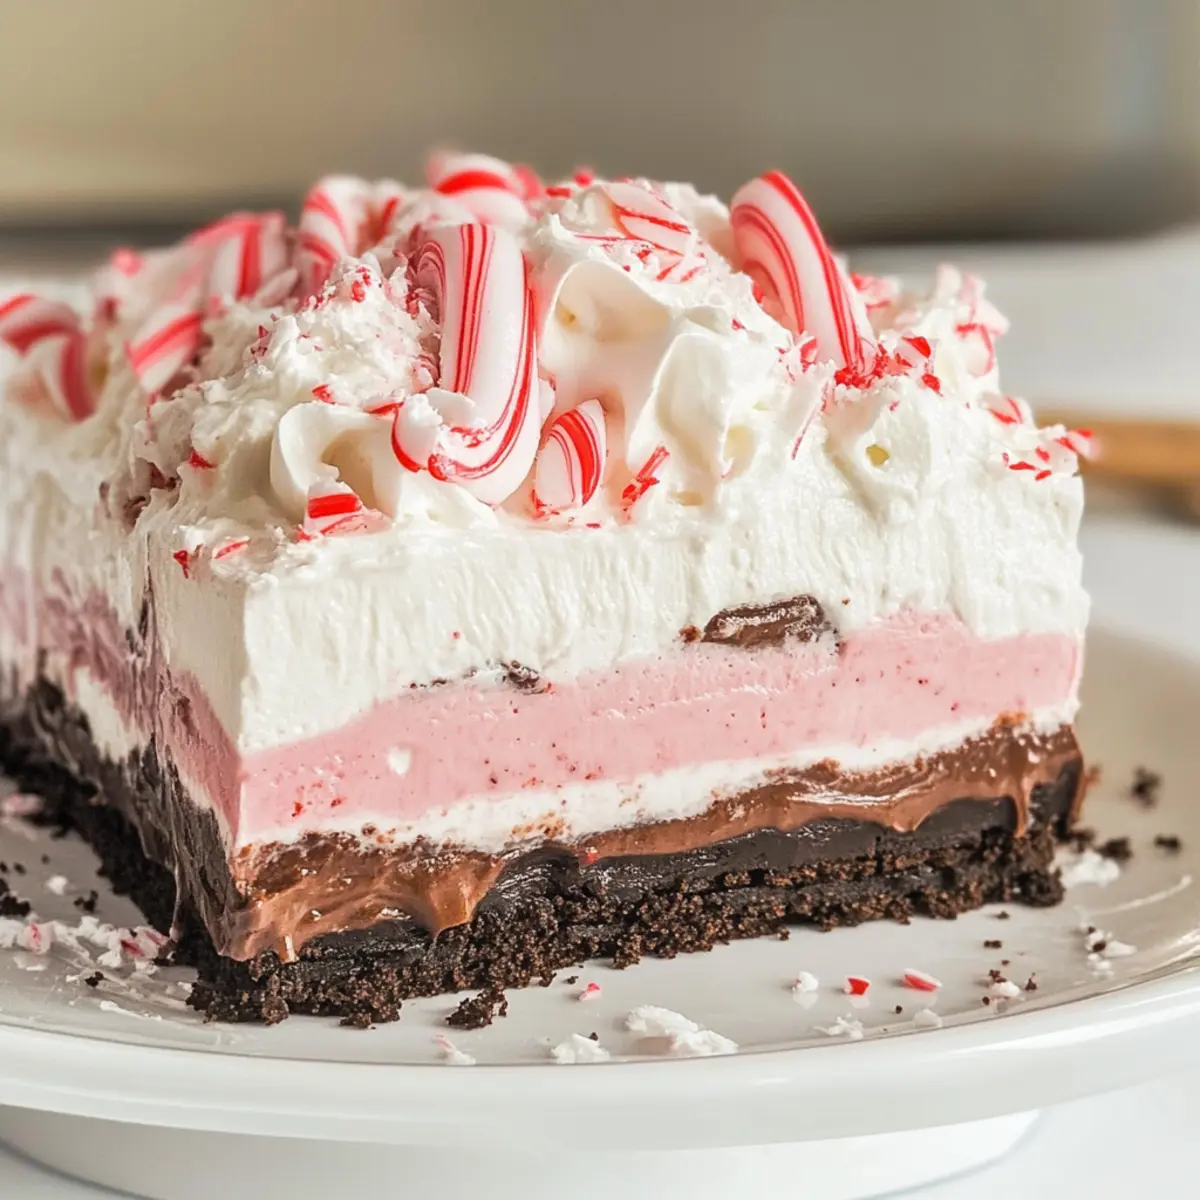
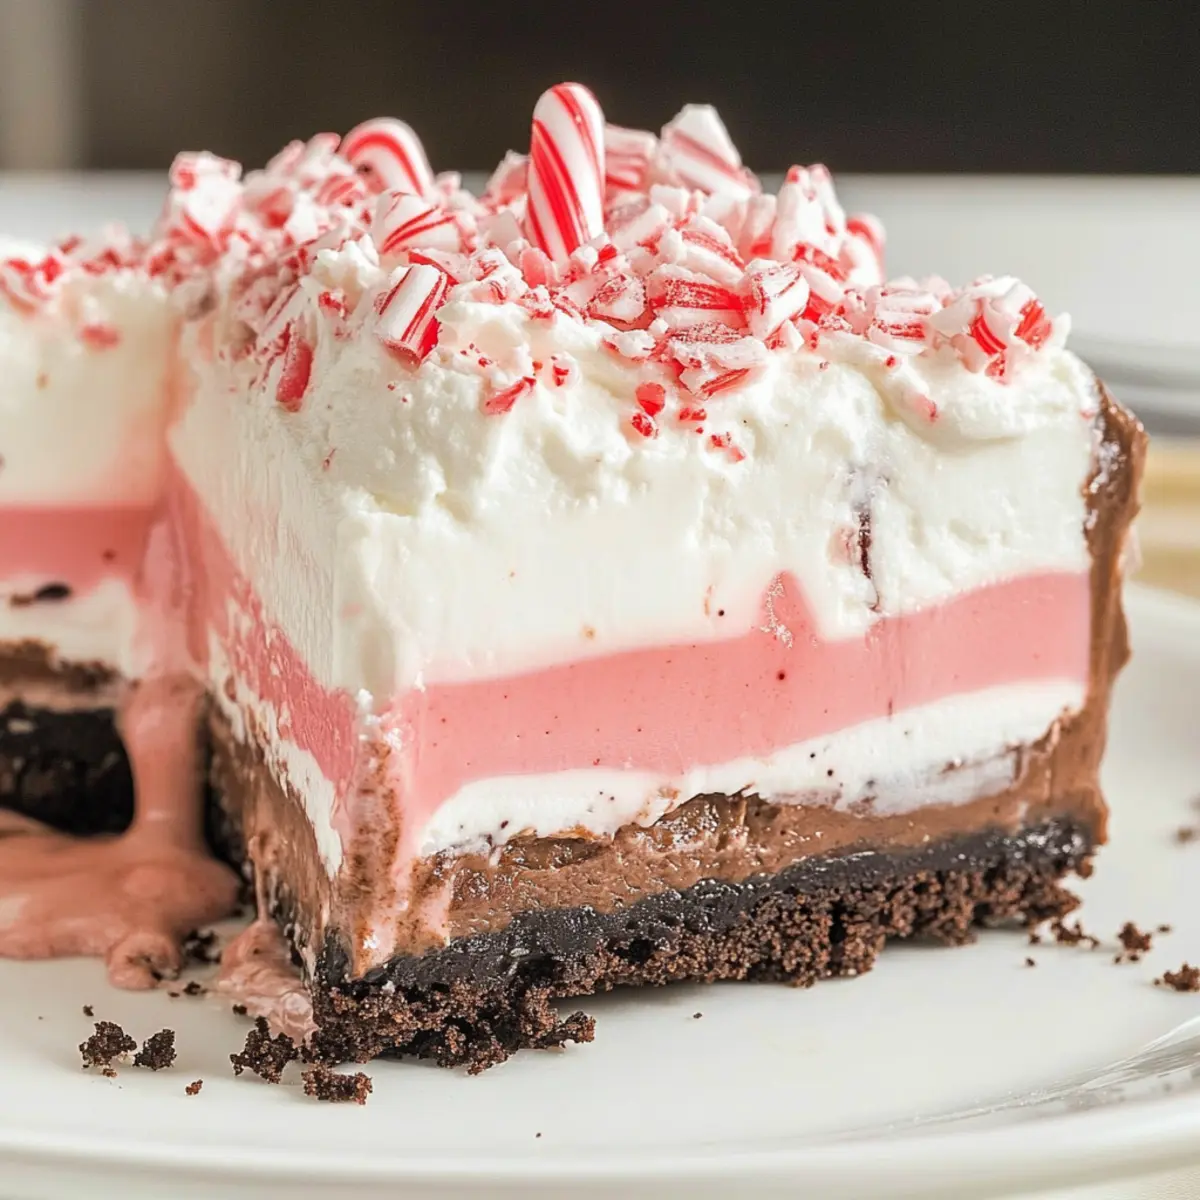
As I assembled the layers of my No-Bake Chocolate Peppermint Lush, a delightful whiff of peppermint floated through the air, instantly transporting me to cozy holiday gatherings filled with laughter and cheer. This luscious dessert is a festive showstopper, combining a crunchy Oreo cookie crust, a creamy peppermint cheesecake layer, and a rich chocolate pudding layer, topped with fluffy Cool Whip. What I love most about this recipe is that it’s not only a crowd-pleaser but also incredibly easy to make—perfect for anyone wanting to capture the holiday spirit without spending hours in the kitchen. Each bite is a perfect balance of textures and flavors that will have you reminiscing about the festive times of yesteryear. Are you ready to create a dessert that will ignite your holiday magic?
Why You’ll Love This Chocolate Peppermint Lush
Easy to Make: Even novice cooks can whip up this no-bake dessert with just a few straightforward steps.
Layered Indulgence: Delight in the silky layers of cheesecake and chocolate pudding, creating a harmonious blend of flavors.
Festive Appeal: The vibrant colors and crushed candy canes make it a visually stunning centerpiece for any holiday gathering.
Versatile Options: Customize it with gluten-free cookies or dairy-free alternatives to cater to everyone’s tastes.
Memory-Making Treat: Each bite brings the warm, nostalgic flavors of Christmas, perfect for sharing with loved ones and creating new traditions.
Indulge in joy with this festive treat that pairs beautifully with a warm cup of cocoa or a slice of White Chocolate Raspberry for a delightful holiday spread!
Chocolate Peppermint Lush Ingredients
For the Crust
- Oreo Cookies – Adds sweetness and forms the buttery crust; substitute with gluten-free cookies for a GF version.
- Butter – Binds the cookie crust together; can use margarine as a dairy-free alternative.
For the Cheesecake Layer
- Cream Cheese – Provides a rich, creamy texture; ensure it’s at room temperature for smooth blending.
- Powdered Sugar – Adds sweetness and stabilizes the cheesecake layer; granulated sugar can be blended finely as a substitute.
- Peppermint Extract – Flavor enhancer for the cheesecake layer; increase to 3 teaspoons for a stronger mint flavor.
- Cool Whip – Creates a light and airy topping; substitute with freshly whipped cream if avoiding Cool Whip.
- Crushed Candy Canes – Adds crunch and festive decoration; optional for that extra holiday sparkle.
For the Chocolate Pudding Layer
- Instant Chocolate Pudding Mix – Forms the velvety chocolate pudding layer; no substitutions recommended for the best consistency.
- Half and Half – Provides creaminess to the pudding; can use whole milk for a lighter option.
For the Finishing Touches
- Red Gel Food Coloring – For aesthetic appeal; omit if not desired.
- Additional Crushed Candy Canes – For garnishing; adds a delightful festive touch before serving.
This comprehensive breakdown ensures you have everything you need to create your delightful Chocolate Peppermint Lush! Enjoy the festive cheer it brings to your holiday gatherings!
Step‑by‑Step Instructions for Chocolate Peppermint Lush
Step 1: Make the Crust
Start by greasing a 9×13-inch dish to ensure easy removal later. In a food processor, crush about 24 Oreo cookies until they resemble fine crumbs. Mix these crumbs with ½ cup of melted butter until well combined, and then firmly press the mixture into the bottom of the greased dish. Place it in the freezer for 20 minutes to set.
Step 2: Prepare Cheesecake Layer
While the crust is chilling, take 8 ounces of room-temperature cream cheese and beat it in a mixing bowl until smooth. Gradually add 1 cup of powdered sugar and 1 teaspoon of peppermint extract, mixing until well blended. Fold in 1 cup of Cool Whip and ¼ cup of crushed candy canes until combined. Spread this creamy cheesecake layer evenly over the chilled Oreo crust.
Step 3: Make Chocolate Pudding Layer
In a separate bowl, whisk together 2 cups of cold half and half with one 3.4-ounce box of instant chocolate pudding mix. Continue whisking for about 2-3 minutes until the mixture thickens to a pudding-like consistency. Carefully pour this velvety chocolate pudding layer over the cheesecake layer, smoothing it out with a spatula for an even finish.
Step 4: Top and Chill
Now it’s time to add the finishing touches! Spread another 1 cup of Cool Whip over the chocolate pudding layer, creating a fluffy topping. You can also add a drop of red gel food coloring for a festive look, if desired. Cover the dish with plastic wrap and refrigerate the Chocolate Peppermint Lush for at least 8 hours, or overnight, to allow the layers to set beautifully.
Step 5: Garnish and Serve
Once chilled, remove the dish from the refrigerator. Before serving, sprinkle additional crushed candy canes on top of the Cool Whip for a delightful crunch and visual appeal. Slice into squares and serve this luscious Chocolate Peppermint Lush at your holiday gatherings, bringing smiles and festive cheer to all!
Chocolate Peppermint Lush Variations
Explore these delightful twists to make your Chocolate Peppermint Lush even more special!
-
Dairy-Free Delight: Use dairy-free cream cheese and whipped topping to ensure everyone can enjoy this treat without worry.
-
Nutty Crunch: Add a layer of crushed almonds or walnuts between the cheesecake and chocolate pudding layers for an irresistible crunch.
-
Minty Boost: Enhance the peppermint flavor by increasing peppermint extract to 2 or 3 teaspoons for an invigorating mint experience.
-
Chocolate Swap: Replace the chocolate pudding with vanilla pudding for a lighter flavor profile that still offers a beautiful contrast with the peppermint.
-
Flavor Infusion: Celebrate the season with a layer of sweetened coconut flakes on top of the Cool Whip for a tropical holiday twist.
-
Gourmet Touch: Drizzle melted dark chocolate over the top before serving for an elegant finish that adds both flavor and a touch of sophistication.
-
Colorful Layers: Use festive-colored gel food coloring in the cheesecake layer to create a visually appealing layered dessert that’s perfect for holiday celebrations.
-
Fruity Addition: Add crushed fresh raspberries or strawberries into the cheesecake layer for a fruity burst that complements the chocolate and peppermint beautifully.
These variations can help you customize your dessert while keeping it festive and delicious! And if you’re looking for more sweet ideas like chocolate-filled treats, try our heavenly White Chocolate Cake or indulge in Chocolate Marshmallow Swirl Cookies for an extra splash of flavor!
What to Serve with No-Bake Chocolate Peppermint Lush
What better way to elevate your dessert experience than with delightful accompaniments that complement the festive richness of this chocolatey treat?
-
Warm Chocolate Sauce: Drizzling warm chocolate sauce over each slice amplifies the rich flavors, creating an indulgent, gooey sensation that pleases the senses.
-
Classic Vanilla Ice Cream: The cool creaminess of vanilla ice cream offers a perfect contrast to the layered richness, creating a classic combination that everyone loves.
-
Fresh Berries: Juicy raspberries or strawberries provide a tart burst, cutting through the sweetness and enhancing the overall flavor profile of the luscious dessert.
-
Peppermint Hot Cocoa: Cozy up with a cup of peppermint hot cocoa to mirror the dessert’s minty notes, making for a delightful pairing that warms the heart.
-
Chocolate Crinkle Cookies: For those who can’t get enough chocolate, these chewy cookies add a different texture, creating a fun surprise with every bite of the dessert.
-
Spiced Holiday Nuts: A bowl of spiced mixed nuts offers a crunchy, savory counterpoint that rounds out the sweetness and adds a festive crunch to your spread.
-
Ginger Snap Cookies: The spiciness of ginger snaps pairs beautifully with the peppermint, making them an ideal accompaniment to serve alongside your creamy layers.
-
Whipped Cream: A dollop of freshly whipped cream enhances the lightness and adds an extra creamy layer of delight, making each bite even more irresistible.
Each of these pairings brings its own unique charm, ensuring your dessert table is as inviting and memorable as the gatherings they celebrate!
Make Ahead Options
These delightful Chocolate Peppermint Lush layers are perfect for meal prep! You can prepare the crust and chocolate pudding layer up to 24 hours in advance. Simply crush the Oreo cookies and mix with melted butter to form the crust, then freeze it. For the pudding, mix the chocolate pudding and half and half, allowing it to thicken, and refrigerate it in an airtight container until you’re ready to assemble. When you’re ready to serve, whip up the cheesecake layer and assemble everything, topping it with Cool Whip and crushed candy canes right before serving. This way, you ensure the lush stays just as delicious and fresh, making your holiday gatherings effortless and stress-free!
Expert Tips for Chocolate Peppermint Lush
-
Soft Cream Cheese: Ensure your cream cheese is at room temperature for a smooth cheesecake layer free of lumps, improving the texture of your Chocolate Peppermint Lush.
-
Cookie Crumb Perfection: Use a food processor to achieve uniform Oreo cookie crumbs; this enhances the texture of the crust for a delightful crunch.
-
Chill Properly: Refrigerate the dessert for at least 8 hours to ensure that all layers are set properly; this extra time lets the flavors meld beautifully.
-
Garnish Wisely: Keep crushed candy canes aside until just before serving to maintain their crunch. This ensures each bite of your Chocolate Peppermint Lush has that delightful texture.
-
Adjust Peppermint Flavor: If you love mint, feel free to increase the peppermint extract to 3 teaspoons for a stronger flavor that amplifies that festive cheer!
How to Store and Freeze Chocolate Peppermint Lush
Fridge: Refrigerate leftovers in an airtight container for up to 3 days to maintain freshness and flavor.
Freezer: You can freeze the Chocolate Peppermint Lush for up to 1 month. Wrap it tightly in plastic wrap and aluminum foil to prevent freezer burn.
Thawing: To enjoy, simply transfer it from the freezer to the fridge and allow it to thaw overnight. This keeps the layers intact and delicious.
Serving After Freezing: Once thawed, serve immediately. The creamy textures will still shine through, ensuring you experience that delightful festive charm!

Chocolate Peppermint Lush Recipe FAQs
How should I select the best Oreo cookies for the crust?
When choosing Oreo cookies, look for packages without any visible breakage or expiration dates approaching. The cookies should be firm and fresh, as this will ensure a sturdy and flavorful crust for your Chocolate Peppermint Lush.
How long can I store leftovers, and what’s the best method?
Refrigerate any leftovers in an airtight container for up to 3 days. This helps retain the creaminess and prevents the crust from becoming soggy. It’s best served chilled, so just pull it out and enjoy a slice whenever the craving strikes!
Can I freeze Chocolate Peppermint Lush, and if so, how?
Absolutely! You can freeze your Chocolate Peppermint Lush for up to 1 month. To freeze, ensure it’s in an airtight container, or wrap it tightly in plastic wrap followed by aluminum foil. This double wrapping helps prevent freezer burn, keeping your dessert delicious for later.
What should I do if my cream cheese lumps remain after mixing?
If you encounter lumps in your cream cheese mixture, don’t worry! This usually happens when the cream cheese is too cold. I recommend letting it sit out for 30 minutes to bring it to room temperature before mixing. If you’ve already started blending, you can also use a hand mixer or whisk vigorously to smooth it out, ensuring a silky cheesecake layer.
Is this dessert suitable for those with allergies or dietary restrictions?
Yes! You can easily customize the Chocolate Peppermint Lush for dietary needs. Substitute gluten-free Oreo cookies for the crust, use dairy-free cream cheese and whipped topping for a completely dairy-free version, and replace any additives that may cause allergies. Just be sure to double-check ingredient labels to keep your festive treat safe for everyone!

Indulge in Chocolate Peppermint Lush for Festive Cheer
Ingredients
Equipment
Method
- Grease a 9x13-inch dish. Crush Oreo cookies until fine crumbs. Mix with melted butter and press into the bottom of the dish. Freeze for 20 minutes.
- In a mixing bowl, beat cream cheese until smooth. Gradually add powdered sugar and peppermint extract. Fold in Cool Whip and crushed candy canes. Spread over the crust.
- In another bowl, whisk cold half and half with chocolate pudding mix until thick. Pour over cheesecake layer and smooth it out.
- Spread remaining Cool Whip over the chocolate layer. Add red gel food coloring if using. Cover and refrigerate for at least 8 hours.
- Before serving, sprinkle additional crushed candy canes on top. Slice and serve chilled.