
As the sun peeks through the trees, a melody of laughter and clinking glasses fills the air—it’s picnic season! One dish that has become our go-to for these sunny escapades is the Pressed Italian Picnic Sandwiches. They’re not just any sandwich; these hearty delights combine savory meats, rich cheeses, and vibrant veggies that pack a flavorful punch. Plus, their make-ahead nature means you can effortlessly prepare them the night before, making them the perfect companions for a day outdoors. With endless customization options, each bite unfolds a delightful surprise. Are you ready to create a sandwich that will steal the show at your next gathering? Let’s dive in!
Why are Pressed Italian Picnic Sandwiches a must?
Simplicity at Its Finest: Preparing these delicious sandwiches requires no culinary expertise—just assemble, press, and enjoy!
Flavor Explosion: The harmonious blend of savory meats, creamy cheeses, and fresh veggies creates a robust taste that will tantalize your taste buds.
Make-Ahead Delight: Prepare them the night before your picnic, and enjoy a stress-free day filled with flavor.
Endless Customization: Switch up the ingredients based on your preferences; try Italian Sausage Breakfast for a breakfast twist or go vegetarian with roasted peppers.
Perfect for Sharing: These hearty sandwiches are sure to impress family and friends, making them an ideal choice for gatherings or casual picnics.
Pressed Italian Picnic Sandwich Ingredients
Prepare to unleash a flavor fiesta with these delightful pressed Italian picnic sandwiches!
For the Bread
- Ciabatta Bread – Essential base providing structure and chewiness; sturdy alternatives like focaccia work too.
- Olive Oil – Adds richness and moisture; try using Italian herb-infused oil for an extra punch.
For the Flavor Base
- Balsamic Vinegar – Provides acidity and enhances flavor depth; red wine vinegar can be an excellent alternative.
- Red Wine Vinegar – Adds a tangy note; apple cider vinegar can be used if needed.
- Dried Oregano – Brings earthy aroma typical in Italian cuisine; fresh oregano can be substituted.
For the Filling
- Genoa Salami – Adds a distinctive taste and texture; swap with other deli meats like pepperoni if desired.
- Hot Capicola & Prosciutto – Contributes savory richness to your sandwiches; turkey is a lighter alternative.
- Provolone Cheese – Melts well and adds creaminess; consider fresh mozzarella for a different texture.
- Fresh Tomato – Provides juiciness and a hint of sweetness; opt for vine-ripened tomatoes for the best flavor.
For the Freshness
- Basil Leaves – Offers aromatic freshness; fresh spinach can substitute for a milder flavor.
- Arugula – Adds peppery notes and crunch; baby spinach can also be used for a smoother taste.
- Parsley – Adds a burst of freshness; use a mix of Italian herbs for added depth.
For Extra Flavor
- Olive Salad or Tapenade – Provides a savory, salty element; substitute with pesto for a different flavor profile.
- Garlic – Freshly minced for robust flavor, and avoid garlic powder for authentic taste.
With its mouthwatering ingredients, your pressed Italian picnic sandwiches will surely be the highlight of any outdoor gathering! Enjoy creating this flavorful masterpiece!
Step‑by‑Step Instructions for Pressed Italian Picnic Sandwiches
Step 1: Prepare the Bread
Slice the ciabatta bread in half horizontally, creating a top and bottom section. Place both halves on a baking sheet lined with parchment paper, ensuring they are ready for filling. This sturdy bread will be the foundation for your Pressed Italian Picnic Sandwiches, giving them the structure they need to hold the delicious ingredients.
Step 2: Make the Flavor Base
In a small jar, combine the olive oil, balsamic vinegar, red wine vinegar, half of the dried oregano, freshly minced garlic, and half of the chopped parsley. Shake well to mix the ingredients thoroughly. Drizzle this flavorful mixture generously over the cut side of the top half of the bread, ensuring a delightful taste infusion in every bite.
Step 3: Layer the Greens
On the bottom half of the bread, layer fresh basil leaves and arugula evenly. This vibrant green layer will not only add freshness but also a peppery kick to your Pressed Italian Picnic Sandwiches. Make sure to cover the bread fully for that perfect crunch and flavor combination when pressed.
Step 4: Spread the Olive Salad
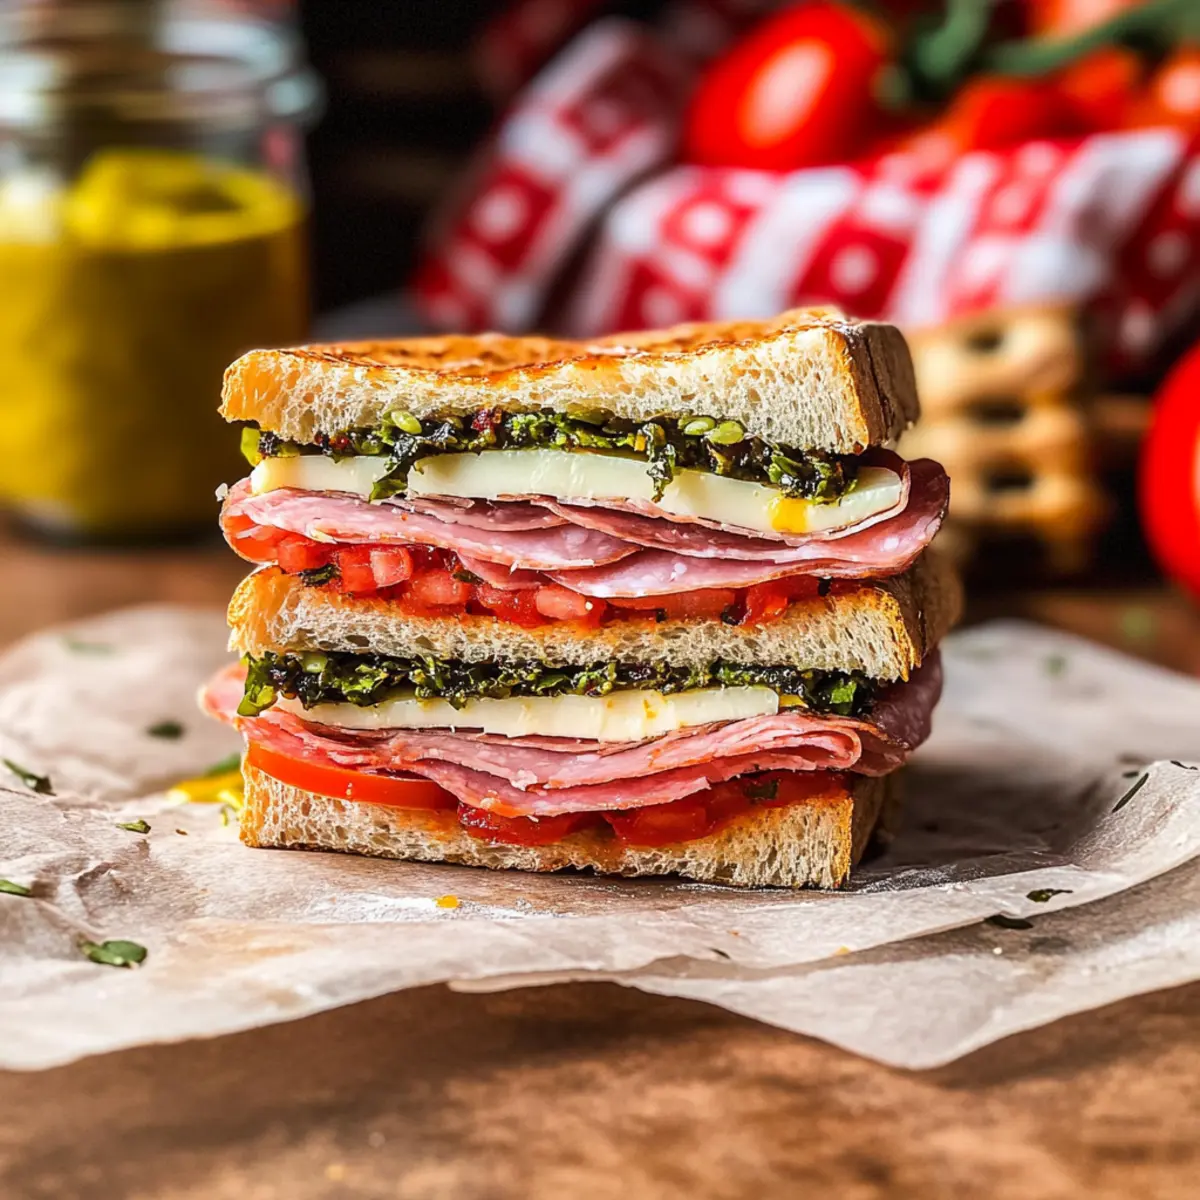
Take the top half of the bread and spread a generous layer of olive salad or tapenade on the exposed side. Follow this with slices of provolone cheese, ensuring it covers the entire surface. The cheese will melt slightly during pressing, adding creaminess and richness to your hearty sandwich.
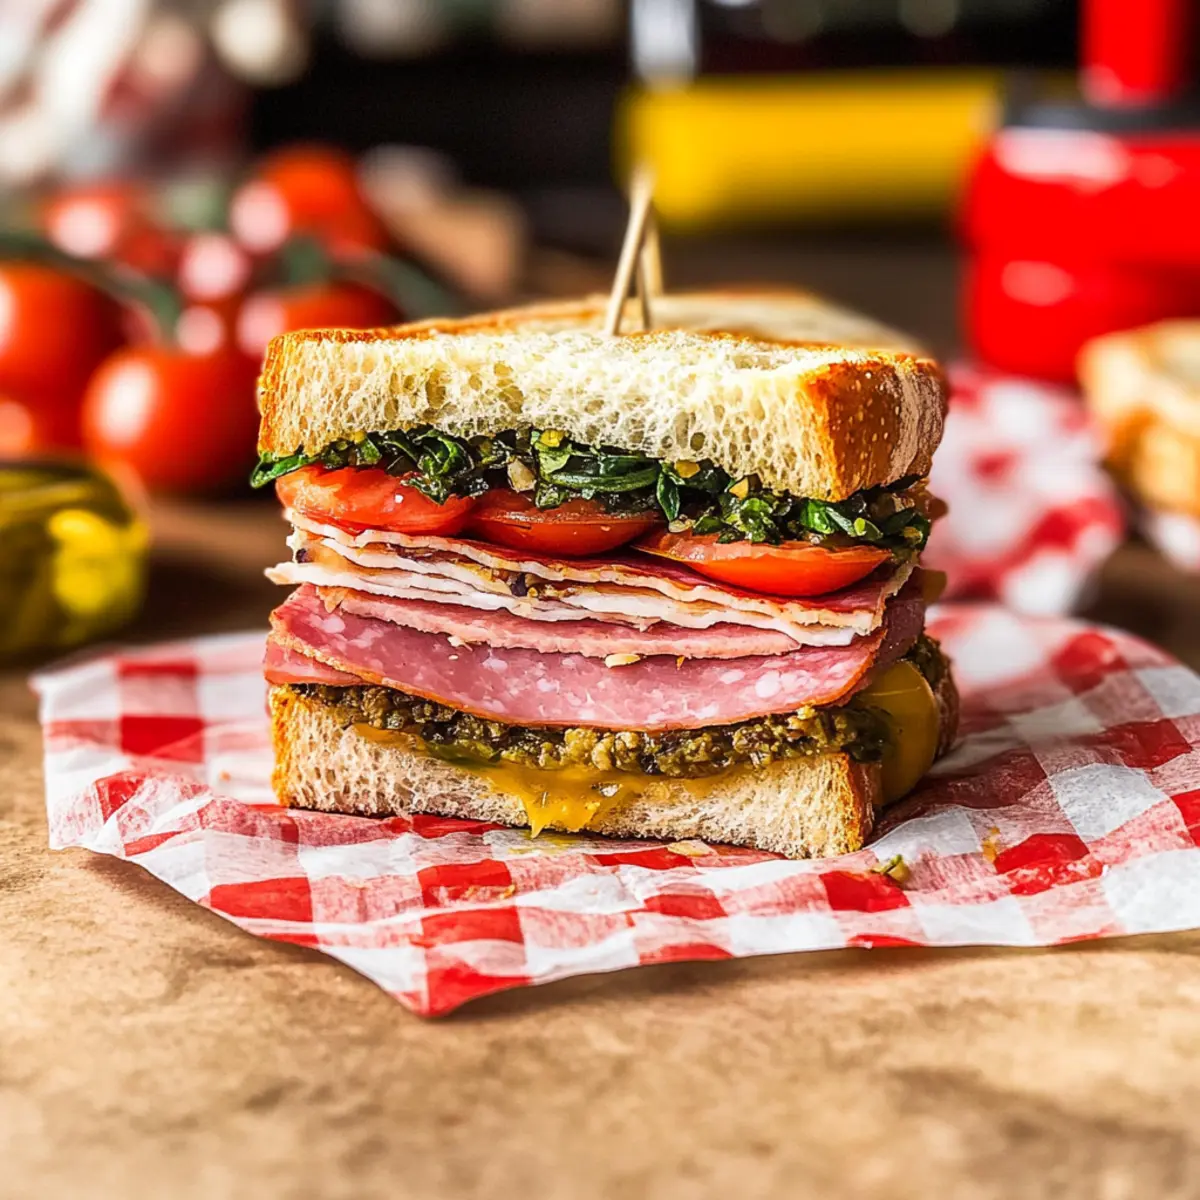
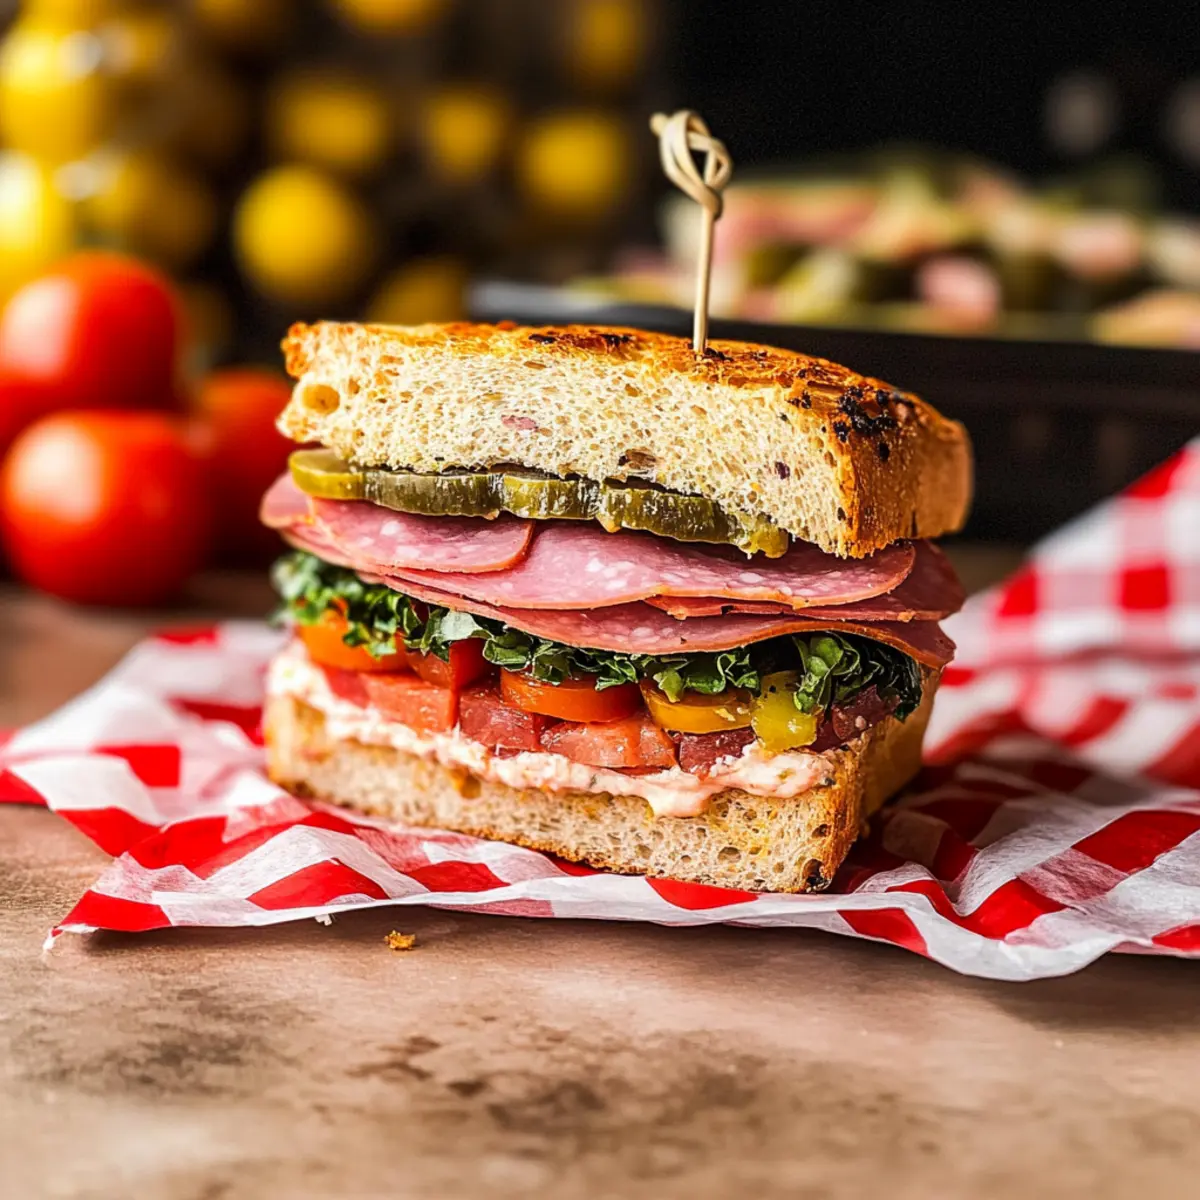
Step 5: Add the Meats and Tomatoes
On the arugula layer, begin stacking the slices of Genoa salami, hot capicola, and prosciutto. Arrange these meats evenly to maximize flavor in your Pressed Italian Picnic Sandwiches. Top with sliced vine-ripened tomatoes, adding juiciness and a hint of sweetness to balance the savory meats.
Step 6: Finish with Herbs
Sprinkle the remaining dried oregano and the rest of the chopped parsley over the tomato slices. This final touch will enhance the flavor profile of your sandwich, providing an aromatic zest. Carefully place the top half of the bread with the olive salad side facing down onto the stacked fillings.
Step 7: Wrap and Press
Tightly wrap the entire sandwich in plastic wrap to keep the contents secure. Place a heavy weight, such as a cast-iron skillet or a few heavy items, on top of the wrapped sandwich. Refrigerate for at least 8 hours, preferably overnight, which will allow the flavors to meld beautifully creating a satisfying pressed sandwich.
Step 8: Slice and Serve
When ready to serve, remove the sandwich from the refrigerator and unwrap it. For a presentation twist and to add extra texture, you can re-wrap it in parchment paper. Slice the sandwich into portions, securing each with twine if desired. Your Pressed Italian Picnic Sandwiches are now ready to steal the show at your next outdoor gathering!

Pressed Italian Picnic Sandwiches Variations
Feel free to let your creativity shine while making these delightful pressed Italian picnic sandwiches—the possibilities are endless!
-
Dairy-Free: Substitute cheese with avocado slices or hummus for a creamy, dairy-free option.
-
Vegetarian Delight: Swap out all meats for roasted vegetables like zucchini, bell peppers, and mushrooms for a hearty veggie version. Roasting brings a sweet depth to the mix that works wonders.
-
Spicy Kick: Add sliced pepperoncini or banana peppers to the layers for a zesty pop. This twist adds a delicious heat that ignites your taste buds!
-
Herb-Infused: Replace parsley and basil with fresh pesto as a spread for an extra burst of flavor. It not only enhances taste but also makes assembling your sandwiches quicker and simpler.
-
Curried Version: Mix curry powder into your olive salad for an unexpected twist. This unique flavor combination offers a delightful fusion that sets your sandwich apart.
-
Extra Crunch: Incorporate crispy bacon or fried shallots in your filling for added texture. The crunch of bacon or shallots will enhance each bite and add a smoky dimension.
-
Mediterranean Vibes: Substitute in feta cheese and kalamata olives for a Mediterranean flair. This combination brings tangy and briny notes that elevate your picnic experience.
-
Flavorful Layers: Include sun-dried tomatoes or a layer of pesto for added moisture and richness. It’s an effortless way to enhance flavor without much fuss.
For even more delicious ideas, check out my other recipes like Ingredient Italian Chicken or the crowd-pleasing Italian Sausage Breakfast. Enjoy experimenting!
Make Ahead Options
These Pressed Italian Picnic Sandwiches are a fantastic option for meal prep, saving you time on busy days! You can assemble the sandwiches up to 24 hours in advance by following the initial steps, then tightly wrap them in plastic wrap and refrigerate. To preserve quality and prevent the bread from becoming soggy, ensure that all ingredients are as dry as possible and store any juicy vegetables, like tomatoes, separately until ready to serve. When you’re ready to enjoy the sandwich, simply unwrap, slice into portions, and secure with twine if desired. This way, you’ll have a delicious, ready-to-serve meal that’s just as flavorful and fresh!
Expert Tips for Pressed Italian Picnic Sandwiches
-
Fill Generously: Don’t hold back on meats and veggies! A hearty sandwich deserves a fulfilling amount for a truly satisfying bite.
-
Pressing Time Matters: Allow your sandwiches to press overnight. This lets the flavors meld beautifully, creating a richer taste experience the next day.
-
Choose Sturdy Bread: Ensure your ciabatta or chosen bread is thick enough to hold the ingredients without tearing during pressing.
-
Use a Panini Press: For best results, use a cast-iron skillet or panini press to compact the sandwich effectively, enhancing texture without added heat.
-
Avoid Garlic Powder: Always opt for freshly minced garlic instead of powder for an authentic and robust flavor in your pressed Italian picnic sandwiches.
How to Store and Freeze Pressed Italian Picnic Sandwiches
Fridge: Store your sandwiches tightly wrapped in plastic wrap or in an airtight container. They will stay fresh for up to 2 days, allowing you to enjoy every delicious bite.
Freezer: While these pressed Italian picnic sandwiches are best enjoyed fresh, you can freeze the fillings separately (meats, cheeses, and veggies) for up to 3 months. Assemble and press the sandwiches when you’re ready!
Reheating: If stored in the fridge, simply unwrap and slice before enjoying cold, or warm them slightly in a dry skillet for a few minutes to bring back that delightful crunch.
Make-Ahead Tip: These sandwiches are perfect for making ahead of time, so aim to prepare and press them the night before your picnic for optimal flavor and convenience.
What to Serve with Pressed Italian Picnic Sandwiches
Indulging in vibrant Italian flavors is just the beginning; let’s craft a delightful meal that elevates your picnic experience.
-
Melon Salad: A refreshing mix of sweet melon and crisp mint balances the savory nature of the sandwich, creating a perfect palate cleanser.
-
Chips and Hot Salsa: The crunch of chips combined with fiery salsa offers a satisfying contrast to the heartiness of the pressed sandwich, adding another exciting texture.
-
Antipasto Skewers: Juicy olives, marinated artichokes, and bite-sized cheeses make for a colorful and shareable side that complements the rich flavors beautifully.
-
Roasted Vegetable Platter: Lightly seasoned grilled vegetables add an earthy component, enhancing the overall vegan-friendly spirit of your picnic spread.
-
Sparkling Lemonade: This refreshing drink is the epitome of picnic hydration, lending a zesty touch that cuts through the richness of the sandwich.
-
Tiramisu Cups: For a sweet finish, these individual dessert cups offer a creamy coffee flavor, delighting your guests and rounding off the meal perfectly.
Each of these pairings works harmoniously to create a symphony of flavors, ensuring your Pressed Italian Picnic Sandwiches are the star of the show!
Pressed Italian Picnic Sandwiches Recipe FAQs
How do I choose ripe ingredients for my sandwiches?
Absolutely! When selecting your fresh vegetables, look for tomatoes that are firm yet slightly soft to the touch, with a vibrant color. For herbs, choose those that appear bright green without any yellowing. Fresh garnishes like basil should smell aromatic and feel tender. Avoid any greens that show signs of wilting or have dark spots, indicating spoilage.
What is the best way to store my pressed Italian picnic sandwiches?
Very good question! Wrap your sandwiches tightly in plastic wrap or place them in an airtight container. They will remain fresh in the refrigerator for up to 2 days. If you notice any moisture inside the wrap, consider using paper towels to absorb it, maintaining the bread’s texture.
Can I freeze pressed Italian picnic sandwiches?
While it’s best to enjoy these sandwiches fresh, you can freeze the individual fillings! Store the cured meats, cheeses, and veggies separately in airtight containers or freezer bags for up to 3 months. When you’re ready, simply thaw and assemble your sandwiches, then press them as usual for the perfect meal.
What should I do if my sandwich is too soggy?
If your pressed Italian picnic sandwich turns out soggy, fear not! This typically happens if there’s too much moisture from tomatoes or a wet spread. An easy fix is to remove the excess fillings, dab away any moisture with paper towels, and add a sprinkle of salt to draw out additional water—this elevates flavor too! Rebuild your sandwich and press again if desired.
Are there any dietary considerations I should keep in mind?
Absolutely! If you’re serving to guests, check for common allergens. The sandwiches contain gluten (from the bread), dairy (from cheese), and various cured meats. Always ask about dietary restrictions and consider making a vegetarian version using roasted vegetables or hummus. For pet owners, avoid sharing any sandwich containing garlic, which can be harmful to pets.
How can I ensure my fillings are balanced?
To create a well-balanced sandwich, use equal parts protein, cheese, and vegetables. I recommend layering the ingredients in this order: greens first for moisture control, followed by meats, cheese, and finally veggies like tomatoes for added crispness. This method helps retain structure and keep flavors distinct, ensuring that every bite is a delight!
Hearty Pressed Italian Picnic Sandwiches for Flavor-Filled Fun
Ingredients
Equipment
Method
- Slice the ciabatta bread in half horizontally, creating a top and bottom section. Place both halves on a baking sheet lined with parchment paper.
- In a small jar, combine the olive oil, balsamic vinegar, red wine vinegar, half of the dried oregano, freshly minced garlic, and half of the chopped parsley. Shake well to mix.
- On the bottom half of the bread, layer fresh basil leaves and arugula evenly.
- Spread a generous layer of olive salad or tapenade on the exposed side of the top half of the bread. Follow with slices of provolone cheese.
- On the arugula layer, stack slices of Genoa salami, hot capicola, and prosciutto. Top with sliced vine-ripened tomatoes.
- Sprinkle the remaining dried oregano and chopped parsley over the tomato slices. Place the top half of the bread with the olive salad side facing down onto the stacked fillings.
- Wrap the sandwich tightly in plastic wrap and place a heavy weight on top. Refrigerate for at least 8 hours, preferably overnight.
- When ready to serve, remove the sandwich from the refrigerator and unwrap it. Slice into portions, securing with twine if desired.