
As I stood in my kitchen, the aroma of sizzling sausage and melted cheese quickly filled the air, transporting me to a cozy Sunday morning gathering. These Easy 3-Ingredient Bisquick Sausage Balls are the answer for anyone craving a simple yet delightful bite that’s perfect for brunch or as a party appetizer. With just three ingredients and a prep time of 15 minutes, you can whip these fluffy, golden treats together in no time! Not only are they a crowd-pleaser, but they can easily be made gluten-free or tailored to your favorite sausage—making them a versatile option for any occasion. Ready to learn how to bring this deliciousness into your home?

Why Are Bisquick Sausage Balls So Popular?
Simplicity at its Core: With just three ingredients, these sausage balls are incredibly easy to make, perfect for even novice cooks!
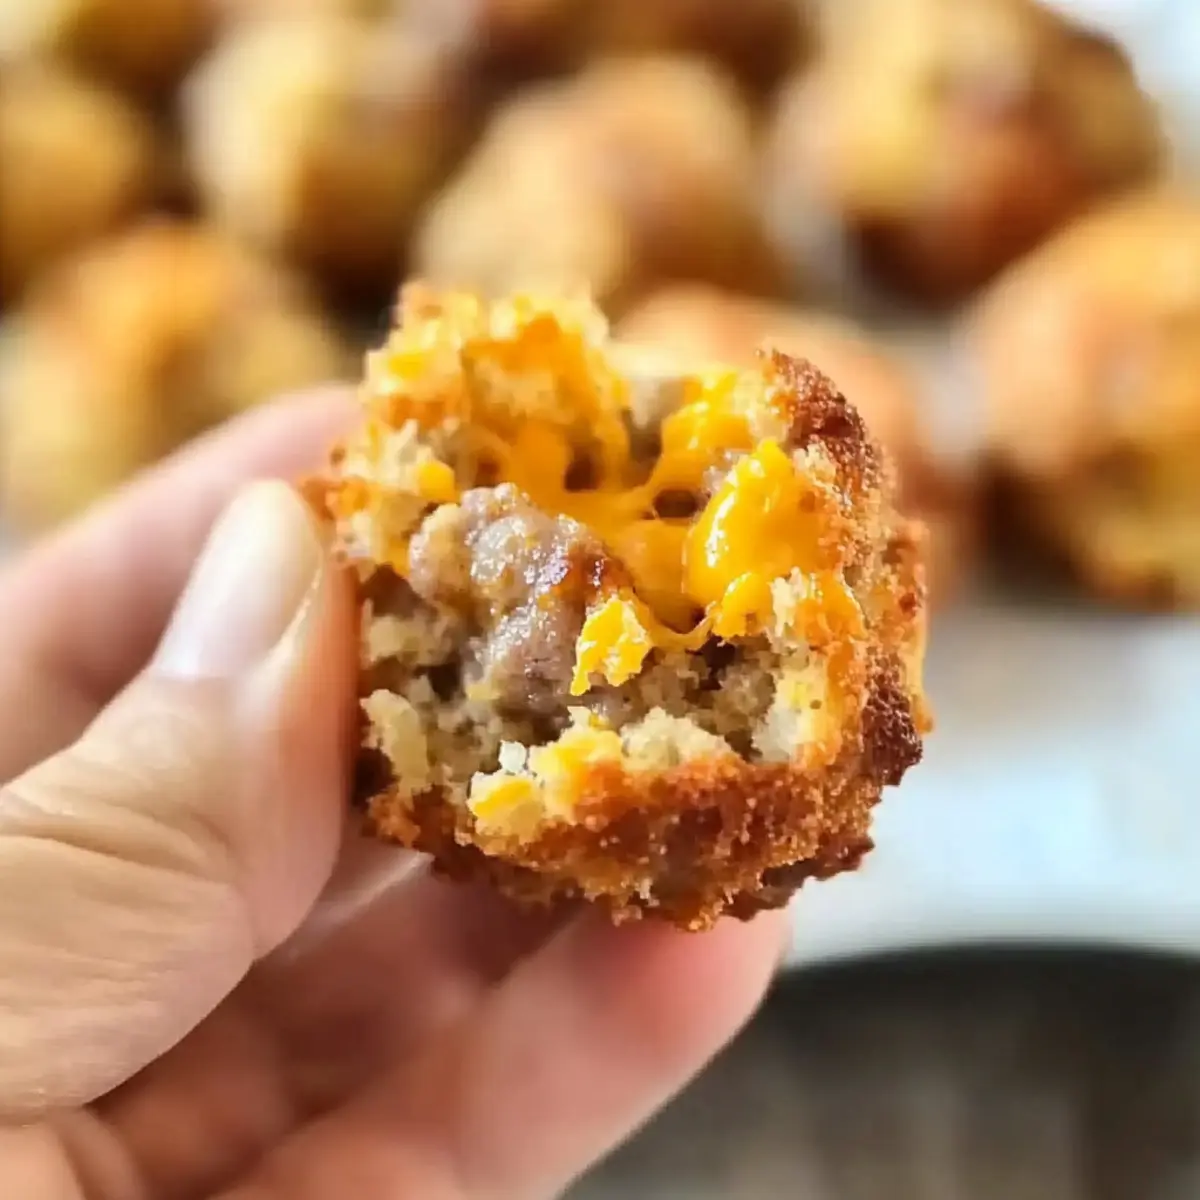
Flavor Packed: The combination of savory sausage and sharp cheddar cheese creates a burst of flavor in every bite, satisfying even the heartiest appetites.
Versatile Enjoyment: Whether you’re serving them at brunch, a party, or just as a snack, these morsels cater to all occasions. Experiment with turkey sausage or a blend of cheeses for unique twists!
Quick to Prepare: Ready in only 15 minutes, these tasty bites allow you to spend less time in the kitchen and more time with your guests.
Crowd Favorite: Their fluffy texture and golden crust make them an instant hit at gatherings, just like my Italian Sausage Breakfast dish or Bake Cookie Balls that never fail to impress!
Bisquick Sausage Balls Ingredients
For the Sausage Balls
- Bisquick – Base for the dough, providing structure; can be replaced with gluten-free Bisquick for a dietary-friendly option.
- Ground Pork Sausage – The key protein; using spiced sausage gives better flavor, but you can opt for turkey sausage for a healthier choice.
- Shredded Cheddar Cheese – Adds richness and flavor; sharp cheddar works best, while Daiya shreds are great for a dairy-free alternative.
- Milk – Provides moisture for fluffiness; substitute with water if necessary, but milk gives the best texture.
Step‑by‑Step Instructions for Easy 3-Ingredient Bisquick Sausage Balls
Step 1: Preheat the Oven
Begin by preheating your oven to 350°F (175°C). This ensures that the Bisquick Sausage Balls bake evenly and develop a lovely golden color. While the oven heats up, gather your baking sheet and line it with parchment paper for easy clean-up and to prevent sticking.
Step 2: Combine Ingredients
In a large mixing bowl, combine the Bisquick, ground pork sausage, shredded cheddar cheese, and milk. Use a sturdy wooden spoon or your hands to mix the ingredients thoroughly. Ensure every part is evenly incorporated to create a uniform dough that will envelop each sausage bite in deliciousness.
Step 3: Form the Balls
Once the mixture is well combined, use your hands to scoop out about 2-3 tablespoons of the dough at a time. Roll each portion into a ball, making sure they are compact but not too tight. You should end up with about 20-24 sausage balls, perfect for sharing or indulging.
Step 4: Arrange on Baking Sheet
Place the formed Bisquick sausage balls onto the prepared baking sheet, spacing them about an inch apart. This spacing allows for even cooking and browning. As you do this, admire how the mixture transforms into delightful little bites that promise flavor in every mouthful.
Step 5: Bake Until Golden
Transfer the baking sheet to the preheated oven and bake for 23-25 minutes. Keep an eye on them as they bake; they should turn golden brown and become firm to the touch. Use a meat thermometer to ensure the internal temperature reaches 160°F for safe consumption.
Step 6: Cool and Serve
Once baked, remove the sausage balls from the oven and let them cool slightly on the baking sheet for about 5 minutes. This step allows the flavors to settle and makes them easier to handle. Then, transfer them to a serving platter and enjoy these warm and fluffy Bisquick Sausage Balls with your favorite dipping sauces!

Make Ahead Options
These Easy 3-Ingredient Bisquick Sausage Balls are perfect for meal prep enthusiasts! You can prepare the sausage ball mixture and refrigerate it for up to 24 hours before baking, allowing the flavors to meld beautifully. Alternatively, form the balls and freeze them on a baking sheet; once frozen, transfer them to a zip-top bag for up to 3 months. When you’re ready to bake, simply preheat the oven and bake directly from frozen, adding a few extra minutes to the cooking time. This method preserves their fluffiness and ensures they’re just as delicious as when made fresh, making weeknight meal planning a breeze!
Bisquick Sausage Balls Variations & Substitutions
Feel free to explore these delicious twists and alternatives to truly make these sausage balls your own—let your culinary creativity shine!
-
Gluten-Free: Use gluten-free Bisquick to cater to dietary needs without sacrificing taste. These variations will still be fluffy and flavorful!
-
Turkey Sausage: For a healthier option, swap ground pork with turkey sausage; you’ll still enjoy that comforting taste with fewer calories.
-
Spicy Kick: Feel adventurous? Use spicy Italian sausage or add a pinch of red pepper flakes to the mix for a fiery flavor boost.
-
Cheese Variety: Try different cheeses like pepper jack or gouda for a new dimension of flavor. Each will lend its unique spin to this already divine dish.
-
Herbs & Spices: Incorporate your favorite herbs or spices, such as rosemary or smoked paprika, to enhance the flavor profile and bring warmth to every bite.
-
Dairy-Free Delight: Opt for Daiya shreds in place of regular cheese if you’re going dairy-free; this will still give you that cheesy feel, though it may not melt as well.
-
Veggie Add-In: Mix in finely chopped veggies like bell peppers or onions for extra texture and nutrients. It’s a delightful twist that adds freshness!
-
Make-Ahead Convenience: For busy days, prepare and freeze the unbaked sausage balls. Then, bake directly from frozen—your future self will thank you!
What’s great about these variations is that they inspire you to make these Bisquick Sausage Balls your own! If you’re looking to satisfy a sweet tooth afterward, try my White Chocolate Raspberry bites or enjoy some Bake Cookie Balls for dessert!
Expert Tips for Bisquick Sausage Balls
-
Moisture Matters: Ensure you include milk for the best texture; using water can lead to dry sausage balls.
-
Crispier Option: For an extra crunch, try air-frying the Bisquick sausage balls at 380°F for 10-12 minutes instead of baking.
-
Check Temperature: Always verify that the internal temperature reaches 160°F with a meat thermometer for safe and delicious sausage balls.
-
Easy Storing: Leftovers can be kept in the fridge for up to 3 days or frozen for up to 4 months, maintaining their delightful flavor.
-
Custom Flavors: Don’t hesitate to mix things up by incorporating different spices or herbs; Italian seasoning or garlic powder can add a unique twist!
What to Serve with Easy 3-Ingredient Bisquick Sausage Balls
Elevate your cooking experience by pairing these savory morsels with delectably complementary sides and drinks.
- Creamy Mashed Potatoes: Their smooth texture balances the fluffy sausage balls, adding a comforting touch to your brunch spread.
- Fresh Garden Salad: A crisp salad with a tangy vinaigrette brings brightness and freshness, perfectly cutting through the richness of the sausage balls.
- Zesty Dipping Sauces: Serve with a variety of dips, such as spicy mustard or ranch, to enhance every bite and cater to diverse taste preferences.
- Savory Spinach Artichoke Dip: This warm, cheesy dip creates a delightful contrast, making it a crowd-pleasing addition to your appetizer table.
- Sweet and Tangy Fruit Compote: A side of fruit compote adds a hint of sweetness that pairs beautifully with the savory flavors of the sausage.
- Chilled Sparkling Lemonade: The fizzy, citrusy drink refreshes the palate and adds a cheerful touch to your brunch gathering.
- Classic Deviled Eggs: These creamy bites echo the hearty flavor theme, making for a delightful pairing at your next get-together.
- Roasted Vegetable Platter: Colorful, roasted veggies introduce more textures and flavors, enhancing both nutrition and aesthetics on your plate.
- Warm Bread Rolls: Soft, buttery rolls offer a comforting side option, perfect for soaking up any remaining dip or complements on your plate.
How to Store and Freeze Bisquick Sausage Balls
Fridge: Store leftover Bisquick Sausage Balls in an airtight container for up to 3 days. Reheat them in the oven or microwave until warmed through.
Freezer: For longer storage, freeze the sausage balls by placing them on a baking sheet until firm, then transfer to a freezer bag. They can be kept for up to 4 months.
Reheating: Bake frozen sausage balls directly from the freezer at 350°F (175°C) for 25-30 minutes or until heated through. Enjoy the fluffy texture just as you did when they were freshly made!
Make-Ahead: Unbaked sausage balls can also be frozen; simply form them into balls, freeze, and then bake straight from frozen for a quick meal option!

Bisquick Sausage Balls Recipe FAQs
What kind of sausage should I use for Bisquick Sausage Balls?
Absolutely! I recommend using spicy ground pork sausage for the best flavor, but feel free to switch it up with turkey or chicken sausage for a leaner option. Each variety brings its own unique taste, so experiment according to your preferences!
How do I store leftover Bisquick Sausage Balls?
Very easy! Simply place the leftovers in an airtight container and store them in the fridge for up to 3 days. When you’re ready to enjoy them again, just reheat in the oven at 350°F (175°C) until warmed through, and they’ll be just as delicious!
Can I freeze Bisquick Sausage Balls?
Absolutely! To freeze your sausage balls, first arrange them on a baking sheet lined with parchment paper and place them in the freezer until firm. After about 2 hours, transfer them to a freezer bag. They can be stored for up to 4 months. When you’re ready to bake, just pop them in the oven directly from the freezer for about 25-30 minutes at 350°F (175°C).
What if my sausage balls turn out too dry?
If your Bisquick Sausage Balls are dry, make sure you are using enough moisture, such as milk. If you inadvertently omit it, the balls can lack fluffiness. Always check that you are mixing the ingredients well to achieve a cohesive dough that holds moisture well. For next time, ensure to follow the ingredient ratios closely for the best result!
Are Bisquick Sausage Balls safe for my pet?
It’s best to avoid feeding your pets any human food that contains processed ingredients, especially sausages that may contain seasonings harmful to them. If you’re looking to share a snack with your furry friend, I suggest making a simple treat without any added spices. Always prioritize their health!
Can I make these gluten-free?
Certainly! To make gluten-free Bisquick Sausage Balls, just substitute regular Bisquick with gluten-free Bisquick mix. They’ll taste just as fantastic, and you won’t miss out on the fluffy texture. It’s a simple swap that opens your recipe up to more friends and family!
Ultimate Bisquick Sausage Balls for Easy Brunch Bliss
Ingredients
Equipment
Method
- Preheat your oven to 350°F (175°C) and line your baking sheet with parchment paper.
- In a large mixing bowl, combine the Bisquick, ground pork sausage, shredded cheddar cheese, and milk.
- Use your hands to scoop out about 2-3 tablespoons of the dough at a time and roll into balls.
- Place the sausage balls onto the prepared baking sheet, spacing them about an inch apart.
- Bake for 23-25 minutes until golden brown and firm to the touch, checking internal temperature reaches 160°F.
- Let cool slightly for about 5 minutes before transferring to a serving platter.