Why Is This Dessert a Must-Try?
Effortless Preparation: With no baking involved, this No-Bake Coconut Cream Dream Dessert is perfect for any home cook. Just mix, chill, and serve!
Tropical Flavor Burst: Each bite is a delightful combination of creamy coconut and sweet vanilla—an instant vacation on your taste buds.
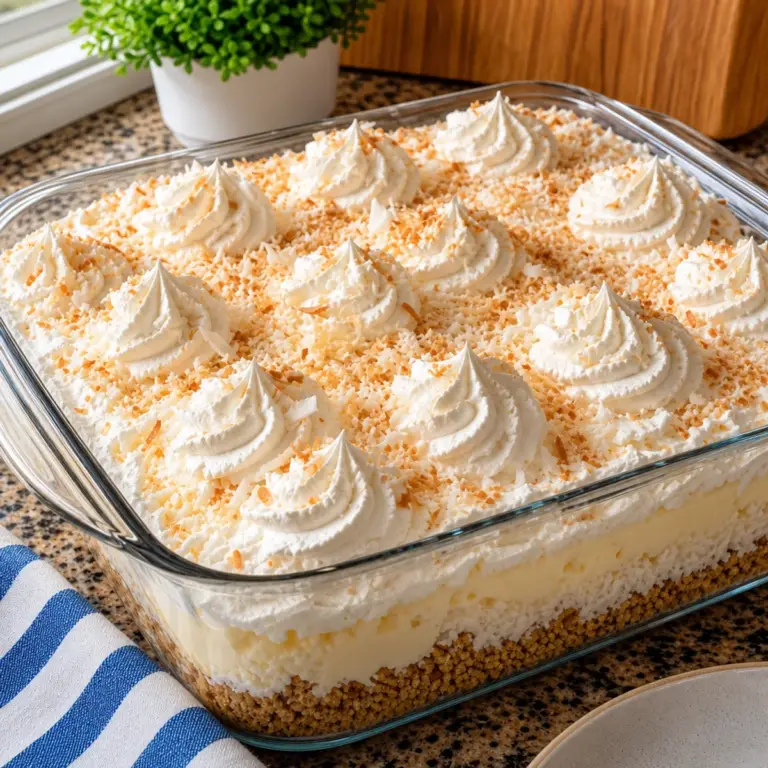
Crowd-Pleasing Delight: Ideal for gatherings, this dessert's visually stunning layers will impress your guests and make you the star of the show!
Versatile Serving Options: Whether for a special occasion or a weekday treat, this dessert can be adapted to include your favorite toppings—think chocolate shavings or fresh fruit!
Quick Chill Time: Ready in just over 4 hours, this treat is a time-saver without sacrificing taste. Perfect for those last-minute dessert cravings!
Easy Clean-Up: One dish and simple ingredients mean less mess and more enjoyment in your kitchen. Why not explore other no-bake wonders on our blog, like No-Bake Chocolate Cheesecake?
No-Bake Coconut Cream Dream Dessert Ingredients
For the Crust
• Vanilla wafer cookie crumbs – A sweet, crunchy base that gives the dessert its foundation.
• Unsalted butter – Helps bind the crumbs together and adds richness.
• Powdered sugar – Sweetens the crust and enhances its texture.
For the Cream Filling
• Cream cheese – Provides a creamy, rich base for the filling.
• Powdered sugar – Sweetens the filling and keeps it light and fluffy.
• Vanilla extract – Adds depth of flavor and enhances the dessert's sweetness.
• Instant coconut cream pudding mix – The star of this No-Bake Coconut Cream Dream Dessert, thickening the filling and infusing it with coconut flavor.
• Cold whole milk – Activates the pudding mix and creates a luscious filling.
• Sweetened shredded coconut – Adds texture and a burst of coconut flavor to the cream filling.
• Whipped topping – Lightens the filling for a soft, fluffy consistency.
For the Whipped Cream Topping
• Heavy whipping cream – Forms the light and airy topping that crowns this dessert.
• Powdered sugar (for whipped cream) – Sweetens the whipped cream and stabilizes it.
• Vanilla extract (for whipped cream) – Enhances the flavor of the topping.
For Garnish
• Toasted shredded coconut – Brings a crunchy texture and nutty flavor to finish off this delightful dessert.
Step-by-Step Instructions for No-Bake Coconut Cream Dream Dessert
Step 1: Prepare the Crust
In a medium mixing bowl, combine 2 cups of vanilla wafer cookie crumbs with ½ cup of melted unsalted butter and 2 tablespoons of powdered sugar. Stir until the mixture resembles damp sand, ensuring all crumbs are evenly moistened. Transfer this crumb mixture into a 9x13 inch glass baking dish, pressing it firmly across the bottom to create an even crust. Chill in the refrigerator for 20 minutes to help set.
Step 2: Make the Cream Cheese Base
In a large mixing bowl, place 8 ounces of softened cream cheese. Using an electric mixer, beat the cream cheese until it’s smooth and creamy, about 2-3 minutes. Gradually add 1 cup of powdered sugar and 1 teaspoon of vanilla extract, mixing until the mixture is light, fluffy, and free of lumps. This base will bring richness to your No-Bake Coconut Cream Dream Dessert.
Step 3: Prepare the Coconut Cream Filling
In a separate bowl, add one package (3.4 ounces) of instant coconut cream pudding mix. Pour in 1½ cups of cold whole milk and whisk for 2 minutes until the pudding starts thickening. Allow it to sit for an additional 2 minutes to achieve a creamier consistency. Gently fold the thickened pudding into the cream cheese mixture using a spatula until fully combined, ensuring a smooth filling.
Step 4: Add Coconut and Topping
Fold 1 cup of sweetened shredded coconut into the filling, distributing it evenly throughout. Next, carefully incorporate 8 ounces of thawed whipped topping, aiming for a fluffy texture. This will add lightness and volume to your filling. When complete, remove the chilled crust from the refrigerator and spread the coconut cream filling uniformly over the crust, smoothing the top with a spatula.
Step 5: Chill the Dessert
Cover the baking dish with plastic wrap and refrigerate the dessert for at least 3 hours, allowing the filling to firm up. This step is crucial for achieving the perfect texture in your No-Bake Coconut Cream Dream Dessert.
Step 6: Whip the Cream Topping
Pour 1 cup of cold heavy whipping cream into a chilled mixing bowl. Beat using an electric mixer until it starts to thicken, then add 2 tablespoons of powdered sugar and ½ teaspoon of vanilla extract. Continue beating until stiff peaks form, which should take about 3-5 minutes. This fluffy whipped cream will elevate your dessert!
Step 7: Assemble the Final Layers
Once the coconut cream filling is solid, spread or pipe the whipped cream evenly over the top. Use a spatula to create a smooth, appealing finish. This adds a beautiful layer to your No-Bake Coconut Cream Dream Dessert, making it visually appealing as well as delicious.
Step 8: Toast the Coconut for Garnish
Place ½ cup of shredded coconut in a dry skillet over low heat. Stir frequently for 2 to 4 minutes until lightly golden and fragrant. This step enhances the coconut flavor and gives a crispy texture for garnish. Once toasted, transfer it to a plate to cool completely before decorating the dessert.
Step 9: Final Chill and Serve
Sprinkle the toasted coconut over the whipped cream topping. Cover the dessert again and refrigerate for another 30 minutes, allowing the flavors to meld. When ready, cut the chilled dessert into 12 even squares, lifting each portion carefully with a flat spatula. Serve cold and enjoy the bliss of your homemade No-Bake Coconut Cream Dream Dessert!
How to Store and Freeze No-Bake Coconut Cream Dream Dessert
Fridge: Store any leftover No-Bake Coconut Cream Dream Dessert in the refrigerator, covered, for up to 4 days to maintain its freshness and texture.
Freezer: If you want to keep it longer, you can freeze the dessert. Cut into portions, wrap each piece in plastic wrap, and place in an airtight container. It can last up to 2 months.
Thawing: When ready to enjoy, transfer the dessert from the freezer to the fridge for a few hours to thaw slowly. Avoid microwaving as it may alter the texture.
Serving Tips: For best results, consume within a couple of days once thawed. The flavor and texture are at their peak right after chilling!
Meal Prep Tips for No-Bake Coconut Cream Dream Dessert
Preparing your No-Bake Coconut Cream Dream Dessert ahead of time is an absolute game-changer for busy weeknights! You can prep the crust (mix 2 cups of vanilla wafer cookie crumbs, ½ cup melted butter, and 2 tablespoons powdered sugar) and refrigerate it for up to 24 hours. The cream cheese filling can also be made in advance; keep it in a sealed container in the fridge for up to 3 days before adding the topping. To maintain optimal freshness, avoid adding the whipped cream until just before serving, ensuring that it stays light and fluffy. When ready to serve, simply top with the prepared whipped cream and toasted coconut for that perfect finishing touch!
No-Bake Coconut Cream Dream Dessert Variations
Invite your taste buds to explore delightful options for customizing this luscious dessert!
Dairy-Free: Substitute cream cheese with coconut cream and use a plant-based whipped topping for a creamy, dairy-free alternative.
Gluten-Free: Instead of vanilla wafer cookie crumbs, opt for gluten-free cookies to satisfy all guests.
Chocolate Twist: Mix in a layer of chocolate ganache beneath the whipped cream topping for an exciting flavor contrast. This adds a divine chocolate layer that any chocoholic would adore!
Tropical Fruits: Add diced mango or fresh pineapple chunks into the coconut filling for a burst of tropical flavor. The juicy fruit complements the creamy texture beautifully.
Nutty Flavor: Sprinkle chopped toasted almonds or macadamia nuts on top for added crunch and a nutty flavor that elevates your dessert. This twist invites a delightful textural experience with each bite!
Extra Layers: For a more elaborate presentation, create alternating layers of filling and crust in a glass dish for a visually stunning dessert.
Coconut Cream Boost: Use coconut milk instead of whole milk in the pudding mix for a more intense coconut flavor. This modification will ensure a truly indulgent tropical experience!
Spiced Up: Add a pinch of cinnamon or nutmeg to the whipped cream for a warm, aromatic twist. These spices will enhance the overall flavor profile while making it feel extra cozy.
By exploring these variations, you're not just making dessert; you're creating an inspiring culinary adventure! And if you’re curious about other tasty no-bake options, check out our No-Bake Lemon Icebox Pie for another refreshing twist.
Expert Tips for No-Bake Coconut Cream Dream Dessert
Chill Time Matters: Be sure to chill the crust for at least 20 minutes before adding the filling. This helps achieve a firmer texture in your No-Bake Coconut Cream Dream Dessert.
Avoid Lumpy Filling: When beating the cream cheese mixture, ensure it’s smooth before adding in other ingredients; this prevents lumps and creates a creamy filling.
Gentle Folding: When incorporating sweetened shredded coconut and whipped topping, fold gently. Over-mixing can deflate the filling’s light texture.
Perfect Whipped Cream: Ensure your heavy whipping cream is very cold for the best results in achieving stiff peaks. This creates a fluffy topping for your dessert.
Don’t Skip the Toasting: Toast the shredded coconut for garnish to enhance flavor and texture. It adds a delicious crunch that contrasts beautifully with the creamy layers.
Make Ahead: This dessert is perfect for preparing in advance. It can be made a day ahead and stored in the refrigerator, allowing the flavors to develop further.
What to Serve with No-Bake Coconut Cream Dream Dessert
Elevate your gathering with delightful accompaniments that enhance every creamy, tropical bite of this luscious dessert.
Fresh Fruit Salad: A colorful mix of seasonal fruits adds a refreshing crunch that balances the creamy layers beautifully, making each bite more vibrant.
Grilled Pineapple Slices: The smoky sweetness of grilled pineapple not only complements the coconut but also brings a lovely charred flavor, perfect to serve alongside a chilled dessert.
Toasted Nuts: A sprinkle of toasted almonds or macadamia nuts provides a satisfying crunch while enhancing the nutty depth, harmonizing seamlessly with the coconut.
Chocolate Sauce: Drizzle a rich chocolate sauce over each portion for a decadent touch that contrasts beautifully with the dessert’s tropical notes.
Indulging in these pairings will create a meal experience that tantalizes the palate and brings a little paradise to your table.
[gallery ids="44346" columns="1" size="full" link="none"]No-Bake Coconut Cream Dream Dessert Recipe FAQs
How do I choose the right vanilla wafers for the crust?
When selecting vanilla wafers, look for a brand that boasts a crispy texture and a sweet flavor. Ideally, they should be fresh and free from any cracks or moisture. A good indicator is a clear package that allows you to see the cookies—this ensures they haven't been crushed or compromised during shipping. I often go for the classic brands that are well-known for their quality; it makes a noticeable difference in the final crust!
How should I store leftovers of the No-Bake Coconut Cream Dream Dessert?
Store any leftovers in the refrigerator, covered tightly with plastic wrap or in an airtight container. This dessert can last for up to 4 days while still maintaining its flavor and texture. I recommend slicing it into portions beforehand to make serving easier. Just remember to keep it well-covered—nastiness from the fridge can sneak in if left exposed!
Can I freeze the No-Bake Coconut Cream Dream Dessert?
Absolutely! If you want to enjoy this delightful dessert later, you can freeze it. First, cut the dessert into individual portions, then wrap each piece in plastic wrap. Place them in an airtight container for added protection and freeze for up to 2 months. For serving, move the desired amount from the freezer to the fridge to allow them to thaw gradually. Avoid using a microwave, as it may compromise the creamy texture.
What should I do if my cream cheese mixture is lumpy?
If your cream cheese mixture turns out lumpy, don’t worry! This can happen if the cream cheese isn’t softened enough. To remedy this, try putting the cream cheese in the microwave for about 10 seconds to make it even softer, then beat it again until smooth before mixing in the sugar and vanilla. If you find that lumps persist after mixing, you can pass the mixture through a fine-mesh sieve for a silky texture.
Are there any dietary considerations I should keep in mind?
Yes! If you're making this dessert for someone with dietary restrictions, consider using gluten-free vanilla wafers to accommodate any gluten sensitivities. For dairy-free options, vegan cream cheese and whipped topping can be used, though the texture may change slightly. Always check the labels for allergies, especially concerning coconut, as it can be a common allergen for some individuals.
Can I substitute ingredients in the No-Bake Coconut Cream Dream Dessert?
Definitely! You can switch out the coconut cream pudding mix for other flavors like chocolate or vanilla if you're looking for a twist. You can also use graham cracker crumbs instead of vanilla wafers for the crust—this will provide a different flavor profile that pairs equally well with the cream filling. Enjoy experimenting with different toppings as well, like crushed nuts or a drizzle of chocolate!
Comments & Reviews