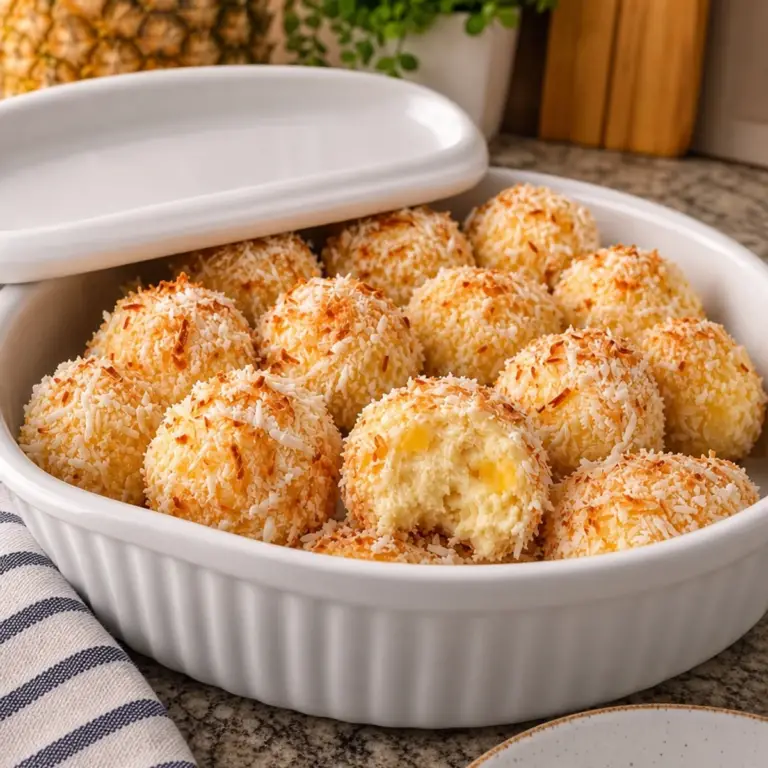
Why Pineapple Coconut Snowball Bites Rock?
Creamy Delight: These Pineapple Coconut Snowball Bites combine smooth cream cheese and sweet pineapple for a texture that melts in your mouth.
Quick & Easy: With just 25 minutes of prep time, you'll whip these treats up in a flash, giving you more time to enjoy with loved ones.
Tropical Twist: Every bite is a mini-vacation to paradise, thanks to the bright flavors of coconut and pineapple.
Crowd-Pleaser: These bites are a hit at gatherings, ensuring everyone comes back for seconds. Want more delicious no-bake ideas? Check out our easy no-bake desserts.
Versatile Treat: Perfect for parties or as a refreshing snack, you'll love how adaptable these bites can be!
Make-Ahead Magic: Prepare them in advance for those busy days; they store wonderfully in the fridge for up to four days.
Pineapple Coconut Snowball Bites Ingredients
For the Filling
• Cream cheese – 8 ounces, softened for easy mixing, creating that creamy base.
• Crushed pineapple – 1 cup, very well drained to keep the mixture from becoming soggy.
• Powdered sugar – ½ cup, adding sweetness and smoothness to the creaminess.
• Vanilla extract – ½ teaspoon, for a hint of aromatic flavor that enhances the bites.
• Sweetened shredded coconut – 1 ½ cups, this provides that delightful coconut flavor.
• Fine graham cracker crumbs – 1 cup, to bind the mixture and absorb excess moisture.
For the Coating
• Sweetened shredded coconut – 1 cup, use this to coat your snowballs for extra texture.
• Shredded coconut (optional toasted garnish) – ¼ cup, toast for added depth and a lovely golden finish.
These Pineapple Coconut Snowball Bites will delight your taste buds with a perfect tropical blend!
[gallery ids="44350" columns="1" size="full" link="none"]Step-by-Step Instructions for Pineapple Coconut Snowball Bites
Step 1: Drain the Pineapple
Begin by thoroughly draining the crushed pineapple using a fine mesh strainer. Press gently with the back of a spoon to extract as much juice as possible, ensuring your mixture won’t be too wet. Then, spread the drained pineapple onto paper towels and blot away any remaining moisture for a drier filling.
Step 2: Prepare the Cream Cheese
Allow the softened cream cheese to reach room temperature so it blends easily. In a large mixing bowl, add the cream cheese, then beat it with an electric mixer on medium speed until it's smooth and creamy—about 1-2 minutes. This will create the perfect base for your Pineapple Coconut Snowball Bites.
Step 3: Add Sweetness and Flavor
Once the cream cheese is creamy, add the powdered sugar to the bowl. Blend again until the mixture is fully incorporated and no lumps remain. Next, stir in the vanilla extract, mixing until the vanilla is evenly distributed throughout the creamy base, adding a lovely aroma that enhances the flavor of your treats.
Step 4: Combine the Pineapple and Coconut
Gently fold in the well-drained crushed pineapple using a spatula until it's evenly distributed throughout the cream cheese mixture. Then, add the 1 and 1/2 cups of sweetened shredded coconut for the filling. This will provide that delightful tropical taste that defines your Pineapple Coconut Snowball Bites.
Step 5: Bind the Mixture
To help absorb moisture and bind the mixture, add the graham cracker crumbs. Carefully fold everything together until a thick mixture forms, ensuring all ingredients are well combined. Check the consistency: if it feels too wet to shape, add an additional tablespoon of graham cracker crumbs for better texture.
Step 6: Chill the Mixture
Cover the bowl with plastic wrap or a lid and refrigerate the mixture for 45 to 60 minutes, allowing it to firm up. This step is crucial for making your Pineapple Coconut Snowball Bites easy to shape into perfect little balls.
Step 7: Prepare for Coating
While the mixture chills, place the sweetened coconut for coating in a shallow bowl. If you choose to toast the optional garnish coconut, spread it in a dry skillet over low heat. Stir constantly for 2 to 3 minutes until it turns lightly golden and fragrant; then transfer it to a plate to cool completely.
Step 8: Shape the Snowballs
Remove the chilled mixture from the refrigerator and line a baking tray with parchment paper. Scoop approximately 1 tablespoon of the mixture for each snowball and roll each portion between your palms to form smooth, round balls. Place each shaped ball on the prepared baking tray as you go.
Step 9: Coat the Snowballs
Once all the balls are shaped, roll each one in the coconut coating until the surface is evenly covered. If using the toasted coconut, sprinkle it generously over each snowball for an extra touch of flavor and visual appeal. Return the coated snowballs to the baking tray.
Step 10: Chill Again and Serve
Refrigerate your Pineapple Coconut Snowball Bites for at least 1 hour, allowing them to firm up and chill thoroughly. Finally, transfer the treats to a serving plate and serve cold for the best creamy texture and refreshing pineapple flavor. Enjoy!
Tips for the Best Pineapple Coconut Snowball Bites
Drain Well: Ensure your crushed pineapple is very well drained. Excess moisture can make your snowballs too soggy to shape nicely.
Room Temperature Cream Cheese: Always let your cream cheese soften to room temperature; it mixes more easily and blends smoothly with the other ingredients.
Consistency Check: If the mixture feels too wet while shaping, add an extra tablespoon of graham cracker crumbs to achieve the perfect moldable texture.
Toasting Coconut: For added flavor, toast the coconut until lightly golden; this simple step elevates the dish's richness and nuttiness.
Chill Time Matters: Don't skip the chilling periods—this helps the mixture firm up, ensuring that your Pineapple Coconut Snowball Bites hold their shape perfectly.
Pineapple Coconut Snowball Bites Variations
Feel free to let your creativity shine while making these delightful bites and customize them to suit your taste!
Dairy-Free: Substitute cream cheese with a vegan cream cheese alternative to enjoy a similar creamy texture without dairy.
If you're looking for a plant-based option, this will still bring a delightful richness to your snowballs!Gluten-Free: Use gluten-free graham cracker crumbs for a gluten-free treat that's still just as satisfying and delicious.
It's a great way to ensure everyone can join in on the fun without missing out on flavor!Coconut Flour Twist: Swap some graham cracker crumbs for coconut flour to amplify the coconut flavor and enhance the bite's texture.
This will give them an even richer coconut taste while maintaining a firm shape for rolling.Fruit Medley: Mix in chopped dried fruits like mango or banana for unexpected flavor bursts that complement the pineapple perfectly.
The addition of fruits will add a delightful chewiness and natural sweetness.Nutty Delight: Fold in finely chopped nuts such as macadamias or almonds for a crunchy texture that contrasts beautifully with the smooth filling.
A touch of nuttiness can elevate these bites to a whole new dimension!Spicy Kick: Add a pinch of cayenne or chili powder for an unexpected heat that balances the sweetness of the pineapple and coconut.
This is a fun way to surprise your taste buds, delivering a sweet and spicy flavor combination.Decadent Chocolate Dip: For a rich indulgence, dip the finished snowballs in melted dark or white chocolate and then roll in coconut.
This extra layer of chocolate adds an irresistible touch that chocolate lovers will adore.Toasted Coconut Garnish: Toast the coconut used for the coating a bit longer to create a deeper flavor profile and a beautiful golden hue.
A little extra toastiness can enhance the overall flavor and make your bites even more visually appealing.
Feel free to explore these variations to create your perfect batch of Pineapple Coconut Snowball Bites and enjoy every delicious morsel!
Meal Prep Made Easy for Pineapple Coconut Snowball Bites
Busy home cooks will love how simple it is to prepare Pineapple Coconut Snowball Bites in advance! You can make the cream cheese mixture up to 24 hours ahead and refrigerate it, ensuring the flavors blend beautifully while maintaining a creamy texture. When you're ready to finish the treats, simply shape the cold mixture into balls and roll them in the coconut coating—this only takes about 15-20 minutes. For those who wish to elevate their snowballs, the toasted coconut garnish can also be made in advance and stored at room temperature. Just remember to keep the finished bites well-chilled in an airtight container — they'll stay fresh for up to 4 days for a quick and refreshing dessert that beats fast food any day!
How to Store and Freeze Pineapple Coconut Snowball Bites
Fridge: Store leftover Pineapple Coconut Snowball Bites in an airtight container in the refrigerator for up to 4 days to keep them fresh and delicious.
Freezer: For longer storage, freeze the snowballs in a single layer on a baking sheet until solid, then transfer them to an airtight container or freezer bag. They can be frozen for up to 3 months.
Thawing: To enjoy frozen bites, thaw them in the fridge overnight before serving. This maintains their creamy texture and refreshing flavor.
Reheating: These treats are best served cold, so no reheating is necessary; simply pull them out of the fridge and indulge!
What to Serve with Pineapple Coconut Snowball Bites?
Tropical Fruit Salad: A mix of vibrant fruits like mango, kiwi, and berries offers a refreshing balance to the richness of the bites.
Creamy Coconut Rice: The luscious texture and subtle sweetness of coconut rice enhance the overall tropical theme of your meal.
Whipped Cream: Light and airy, fresh whipped cream provides a classic, fluffy element that pairs perfectly with these snowballs.
Iced Tea or Lemonade: A chilled glass of citrusy lemonade or sweet iced tea adds a refreshing zing that contrasts beautifully with the creamy bites.
Chocolate Dipping Sauce: For those who love a touch of decadence, a rich chocolate sauce can transform your Pineapple Coconut Snowball Bites into an indulgent treat.
Toasted Coconut Cupcakes: Enhance the coconut theme with light and fluffy cupcakes, topped with coconut frosting that echoes the flavors of your snowballs.
Let these pairings create a dreamy tropical experience you and your guests will savor together!
[gallery ids="44353" columns="1" size="full" link="none"]Pineapple Coconut Snowball Bites Recipe FAQs
How do I choose ripe pineapples for this recipe?
Absolutely! When selecting pineapples, look for one that has a golden color and gives slightly when pressed. The fragrance should be sweet and fruity. Avoid pineapples with dark spots or a sour smell, as this can indicate overripeness.
What’s the best way to store leftover Pineapple Coconut Snowball Bites?
To keep your Pineapple Coconut Snowball Bites fresh, store them in an airtight container in the refrigerator for up to 4 days. Make sure they're well covered to prevent drying out or absorbing odors from other foods.
Can I freeze Pineapple Coconut Snowball Bites?
Yes! For freezing, place the snowballs in a single layer on a baking sheet and freeze until solid—about 1 to 2 hours. Then, transfer them into an airtight container or freezer bag. They can be stored in the freezer for up to 3 months. To enjoy them later, thaw overnight in the fridge.
What should I do if the mixture feels too wet to shape?
If your mixture feels too wet, don’t worry! Simply add an additional tablespoon of graham cracker crumbs and mix until a thick, moldable consistency forms. This will help the snowballs hold their shape better.
Are these suitable for anyone with food allergies?
While these delightful bites are made with common ingredients, it's essential to always check for allergies. The recipe contains dairy (cream cheese) and gluten (in graham crackers). If you're preparing for someone with specific food allergies, consider using gluten-free graham crackers or dairy-free cream cheese alternatives.
Can pets have these Pineapple Coconut Snowball Bites?
It's best to keep these treats away from pets. Ingredients like cream cheese and sugar aren’t suitable for dogs or cats in large amounts. If you want a treat for your furry friend, consider making coconut-based snacks specifically for them!

Comments & Reviews